In this post, I’m sharing how to make authentic chocolate truffles (A.K.A chocolate bonbons) from scratch at home with some simple baking tools and ingredients.
YES! Authentic chocolate truffles can be made from home. We just need to know some crucial tips to make them successful. Today, I'm spilling ALL of the secrets!
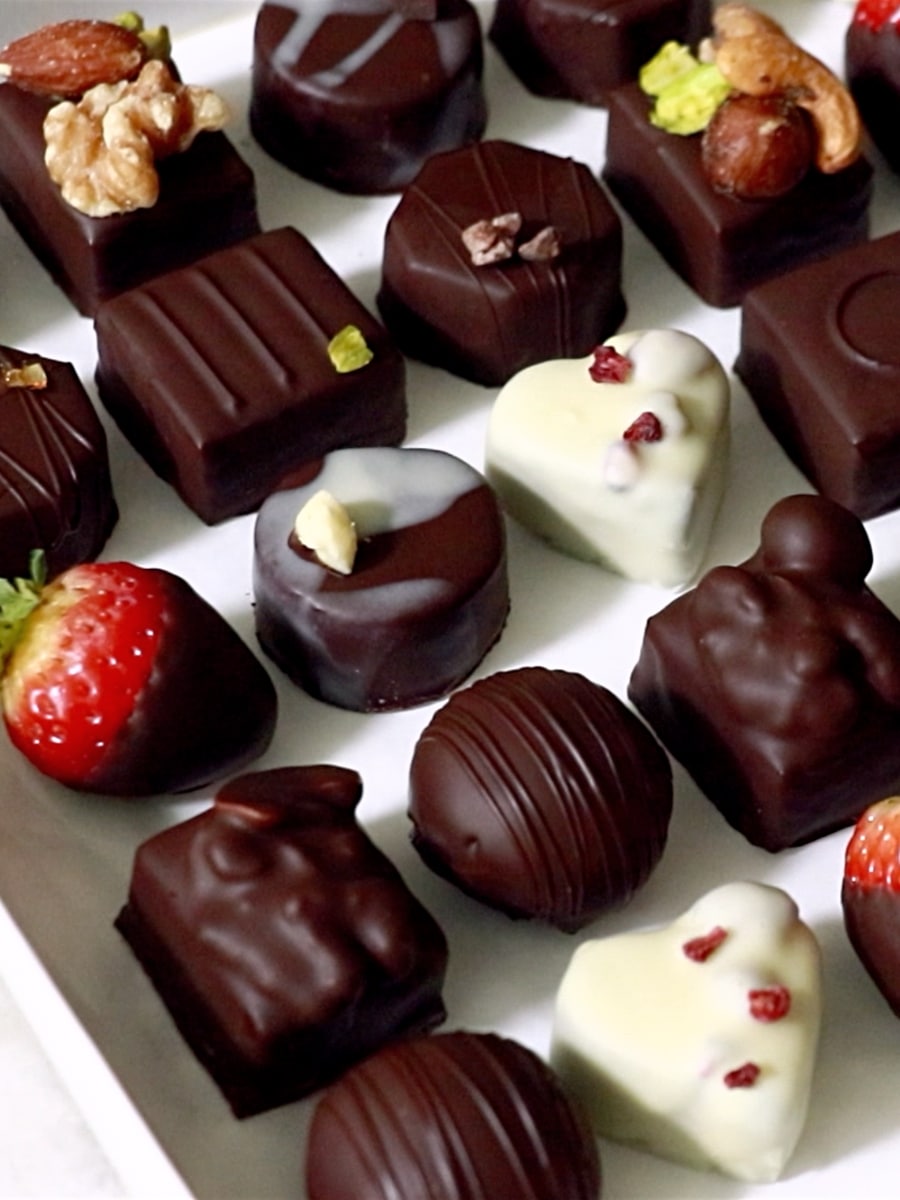
If you made chocolate truffles before, you may have encountered problems such as:
- The ganache was not smooth.
- The chocolate coating was too thick.
- The chocolate coating does not set at room temperature.
- I saw white spots and marbles on the surface.
... and so on. I'm sharing all the troubleshooting so that you can make it successful at home!
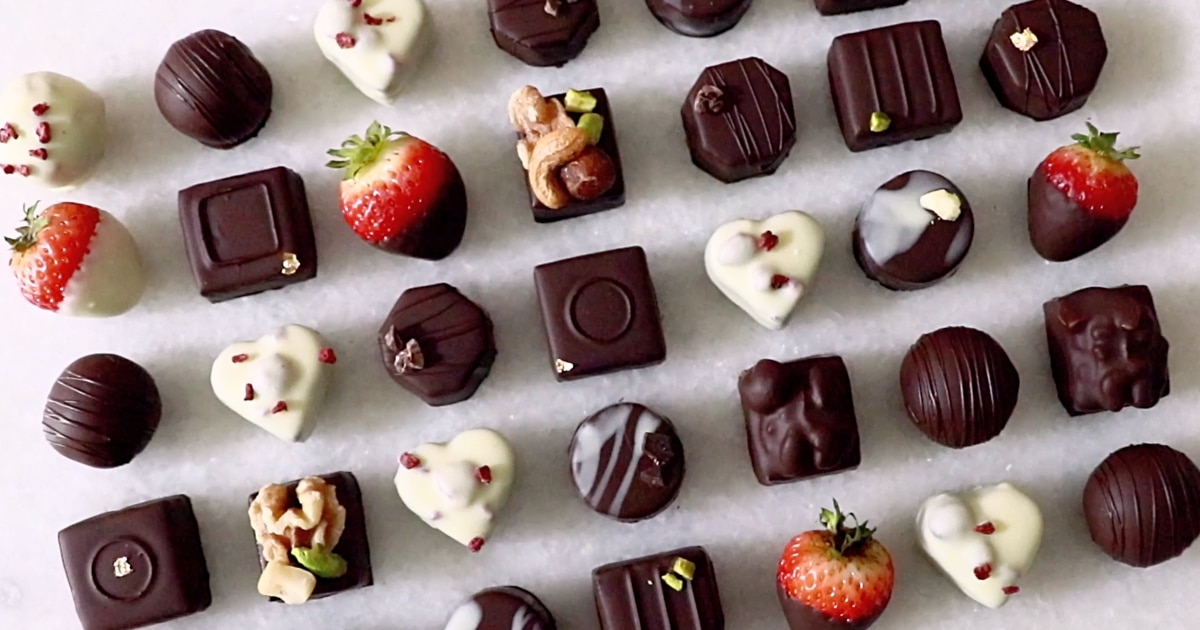
Besides the troubleshooting, you'll learn essential baking tips such as:
- What types of chocolates to use for the ganache and coating (and why)
- What honey and butter do for ganache
- Tips to cut ganache beautifully
- One of the easiest ways to temper chocolate
- How to temper with white, milk, and dark chocolate.
- 6 different ways to shape and decorate them ...and so on!
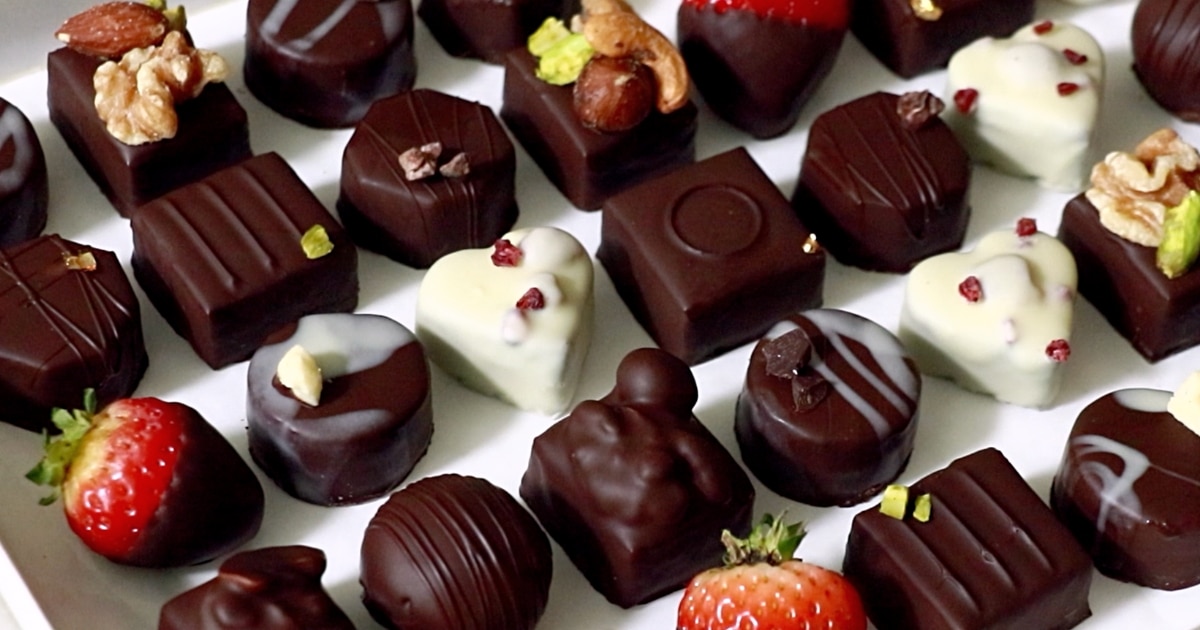
I hope you'll feel less complicated with the process after reading the post and watching the video (for a deeper and clear understanding). Enjoy them as a dessert for a special day or maybe gift them to someone as a surprise chocolate truffle box!
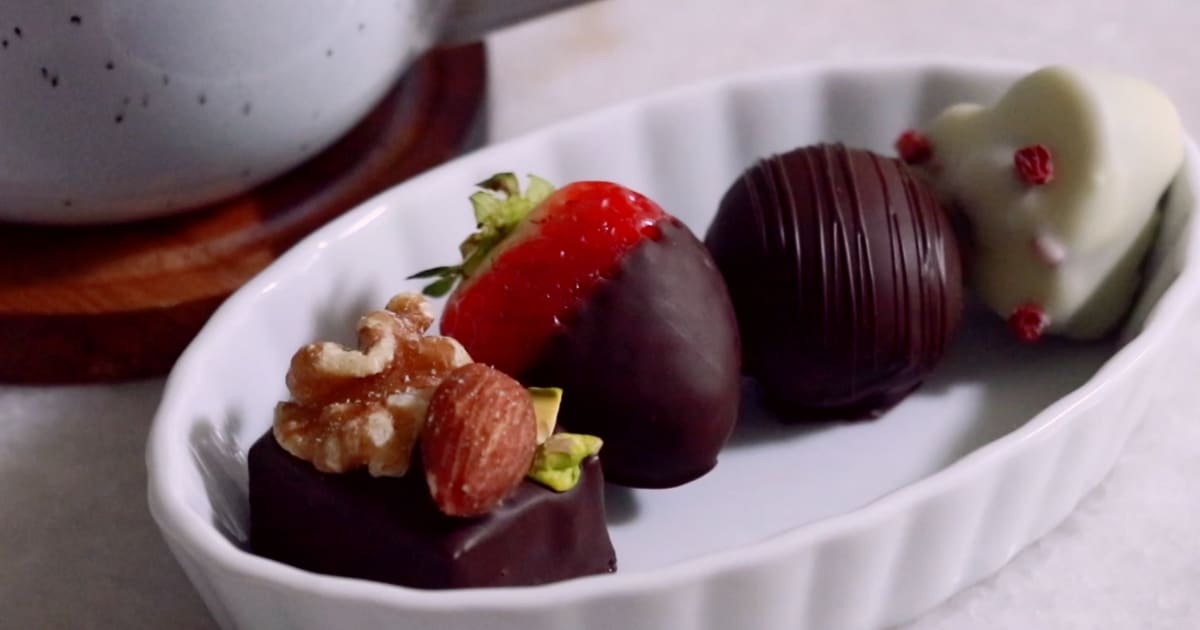
📌 What is a chocolate truffle?
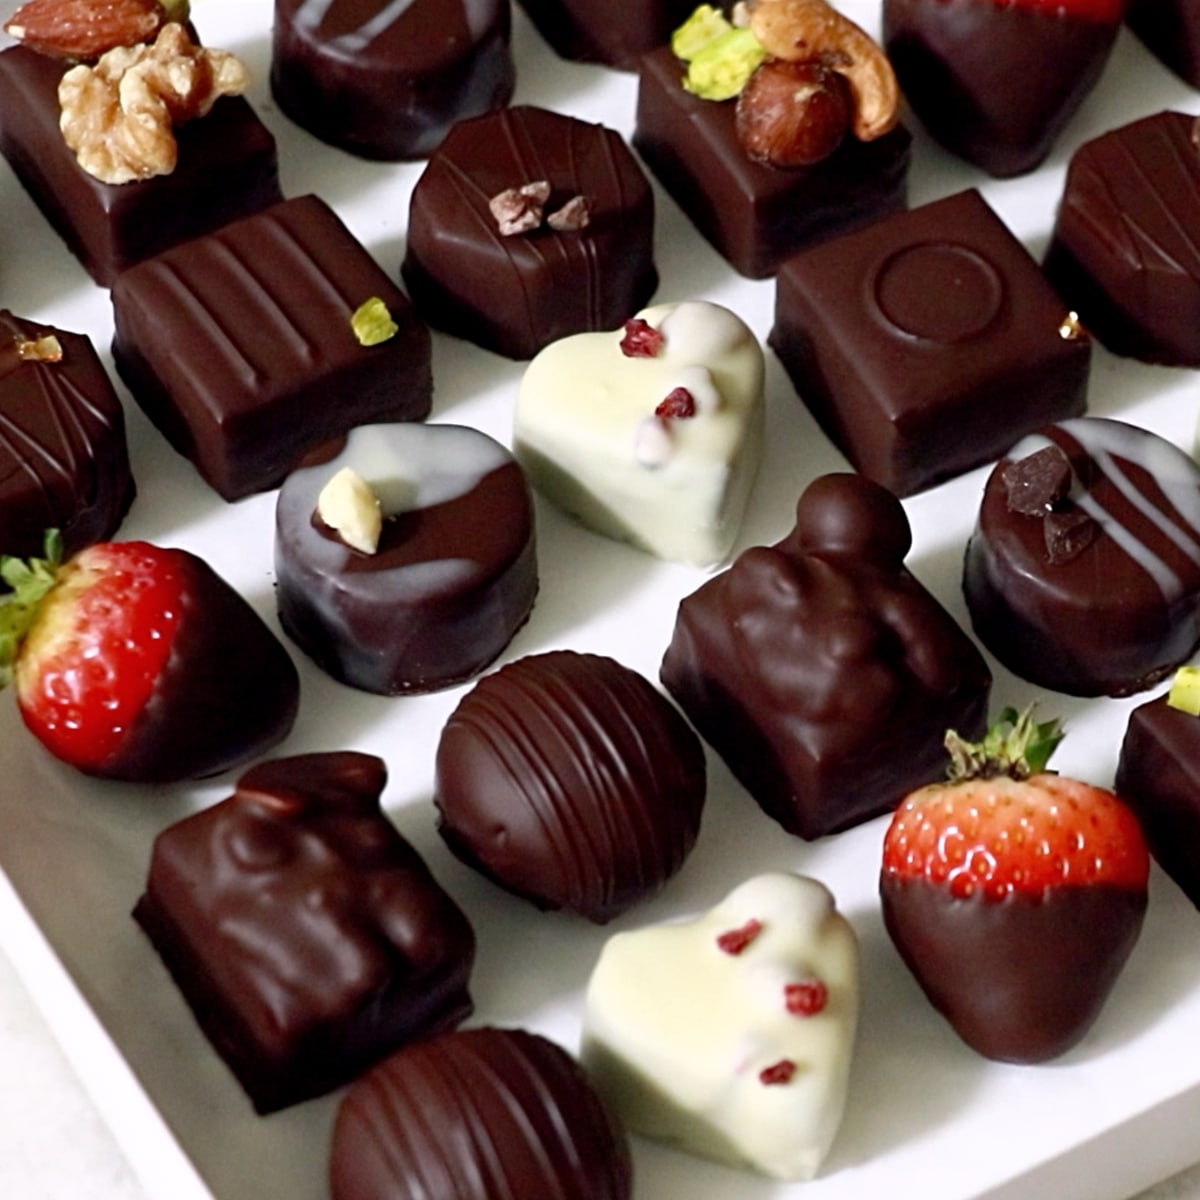
It is a bite-size chocolate ganache that is not always but oftentimes coated with a thin layer of chocolate or any other ingredients. Oftentimes, it is shaped like balls.
How is it different from Chocolate bonbons?
And you may have heard of chocolate bonbons. - The difference is kind of vague and I see it differs slightly depending on the area/country: For example, in some other areas, everything is categorized as "chocolate truffles". In some other areas, they call them chocolate bonbons when the shapes are not balls but square, rectangle, circle, etc instead... or when they are made with a special chocolate mold to give them a more shiny look.
Also, as far as I know, we don't really call them chocolate bonbons when the ganache is NOT coated with a thin layer of chocolate.
Well, it sounds complicated but just wanted to mention it because it made me wonder before (& I know some of you did too!)
📌 What's In Chocolate truffles?
Ganache
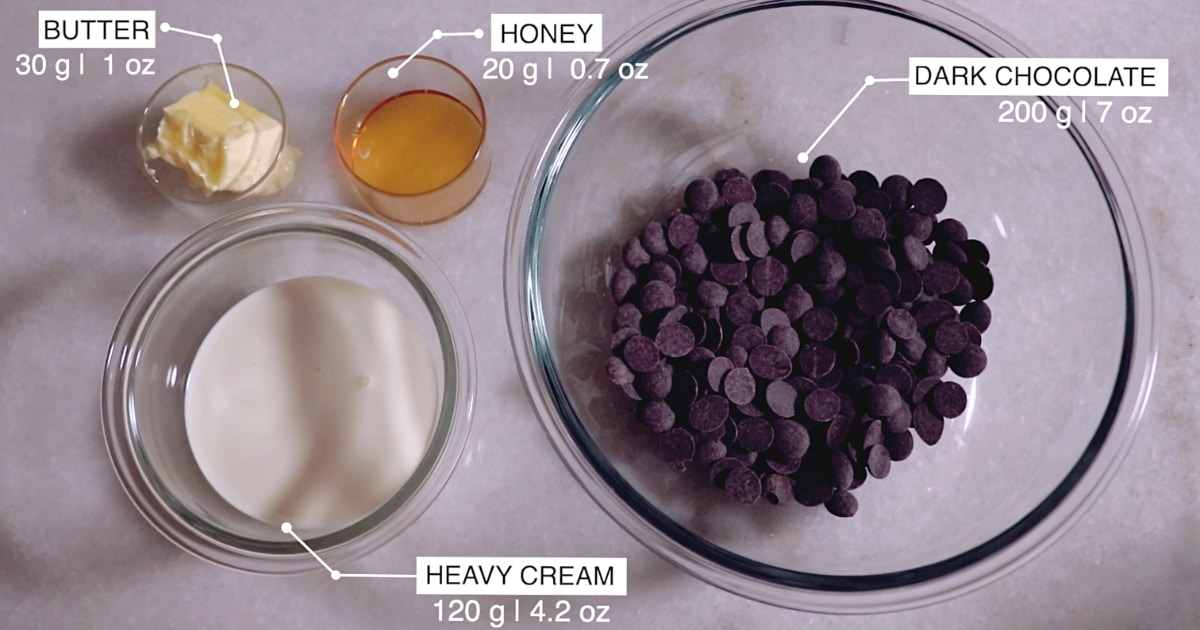
- Dark chocolate
- I recommend chocolate with 50-65% cacao content. I used 64% but if you want a softer ganache, use the one with less cacao percentage.
- Heavy cream
- Honey
- Inverted sugar such as honey helps to create a smooth texture.
- Butter (soft)
- Butter creates a creamier texture. You do not need to add if you want to omit it.
- Dark chocolate to coat the bottom go the ganache
- Tempering it is the best but you can omit it.
Chocolate coating
- White chocolate
- Use couverture chocolate for the best result.
- Dark chocolate
- I used 64% couverture chocolate to pick the exact same percentage.
Decorations
(Use any ingredients of your choice!)
- Toasted mixed nuts
- Pistachios
- Cacao nibs
- Gold leaf
- Pieces of white and dark chocolates
📌 How To Make Chocolate Truffles
Follow the 12 steps:
Ganache
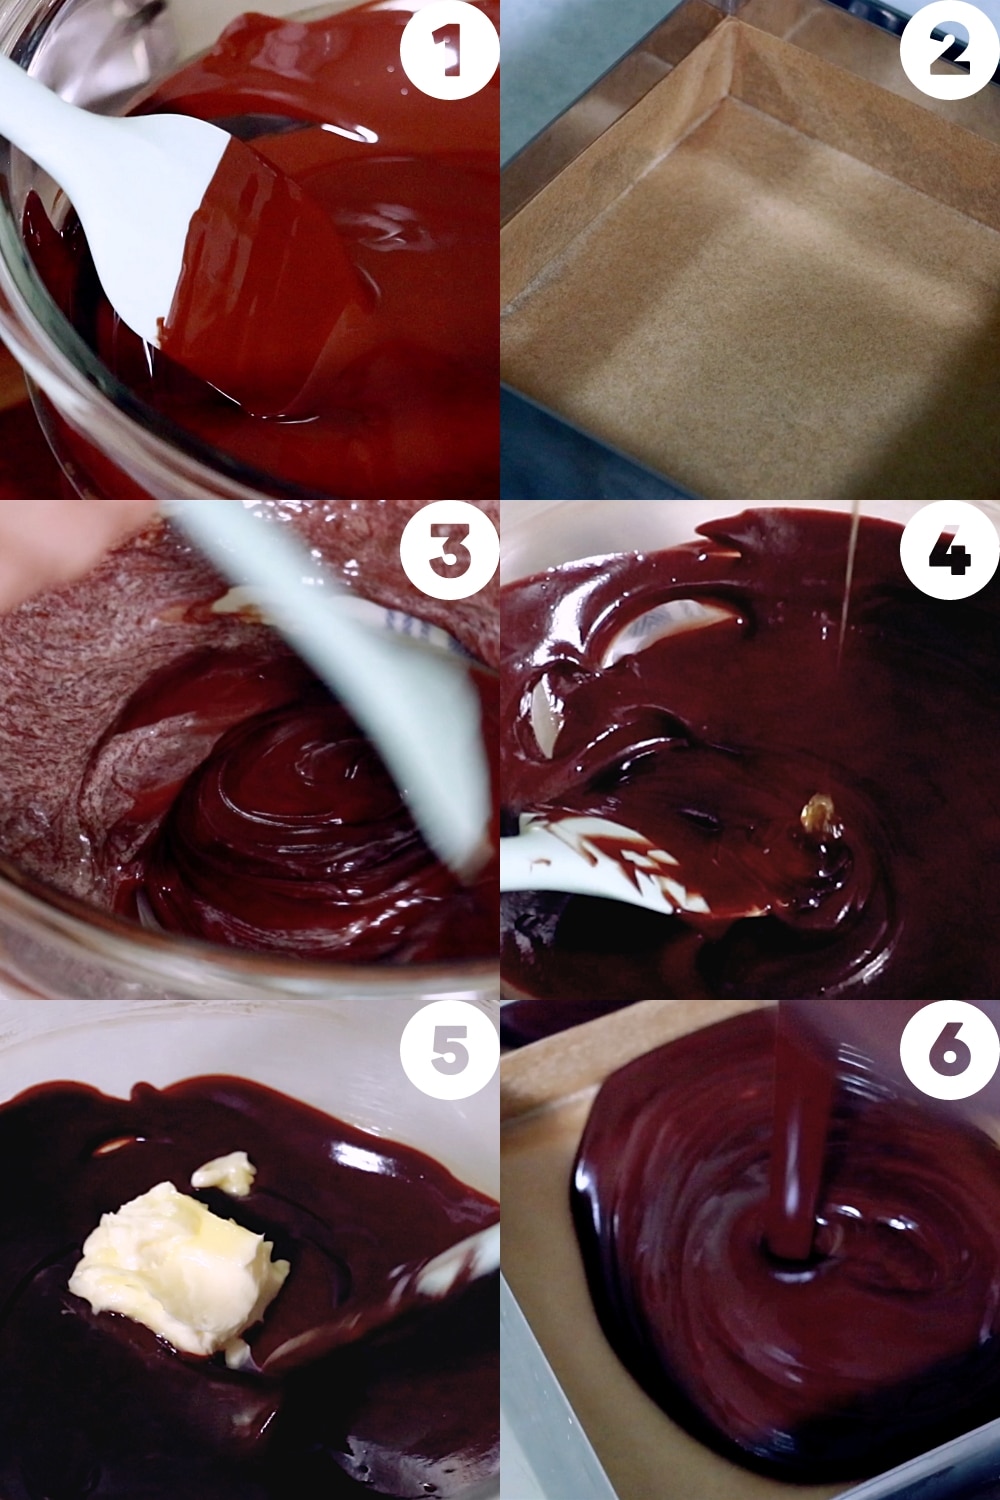
- Melt the dark chocolate.
- Warm it up to 45 - 50 C | 113 to 122 F
- Prepare a ring/mold with parchment paper inside. - 15 cm | 5.9 "
- Add heavy cream to the melted chocolate and mix.
- Heat cream to 70 - 80 C | 158 - 176 F. (I used a microwave but you can use a stove with a pot as well.)
- Add about ⅓ of the heavy cream and mix gradually from the center towards the edge until everything looks even and smooth. And add about half of the heavy cream and repeat the same process. Finally, add the rest and repeat it. Don't forget to clean the bowl and spatula on the way to make an even ganache.
- Add honey and mix.
- Add soft butter and mix.
- Make sure that your butter is very soft.
- When adding butter, the ganache should be about 37 - 39 C | 98 - 102 F. (It feels gently warm when you touch it.)
- As an option, mix with a hand blender at the very end to create an extra smooth ganache
- Pour into a mold/ring and chill it completely.
- Hold the ring/mold with your hands really well and toss some times to remove some air bubbles.
- Wrap it tightly so that it's not going to get any moisture damage in the fridge.
- Chill in the fridge until it gets firm completely - more than a few hours to a day
Prepare a 15 cm | 5.9 " square ring/mold (Or use something close to the size.)
Cut the ganache
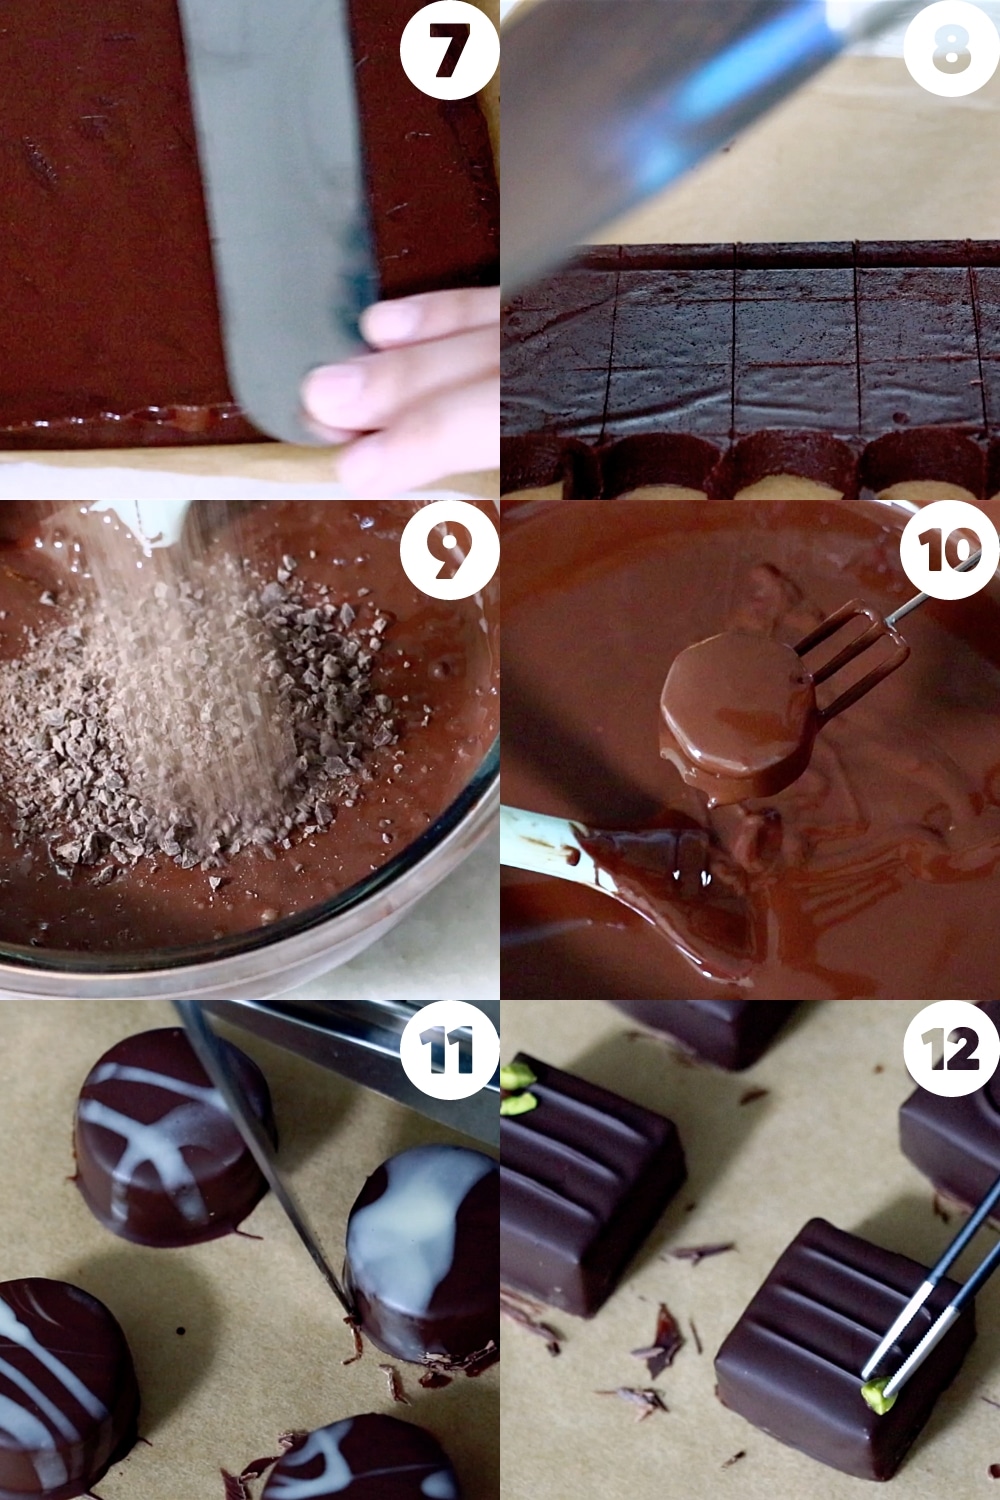
- Spread melted chocolate on one side of the ganache very thinly.
- Level out the edges if it's not flat.
- Spread a very thin layer of tempered chocolate. (Look below to see how you can temper chocolate. You could skip the tempering process to omit some time.)
- Flip and cut the ganache.
- Mark (Length: 15 cm | 5.9 ") with 3 cm | 1.1 " intervals to create 25 pieces.
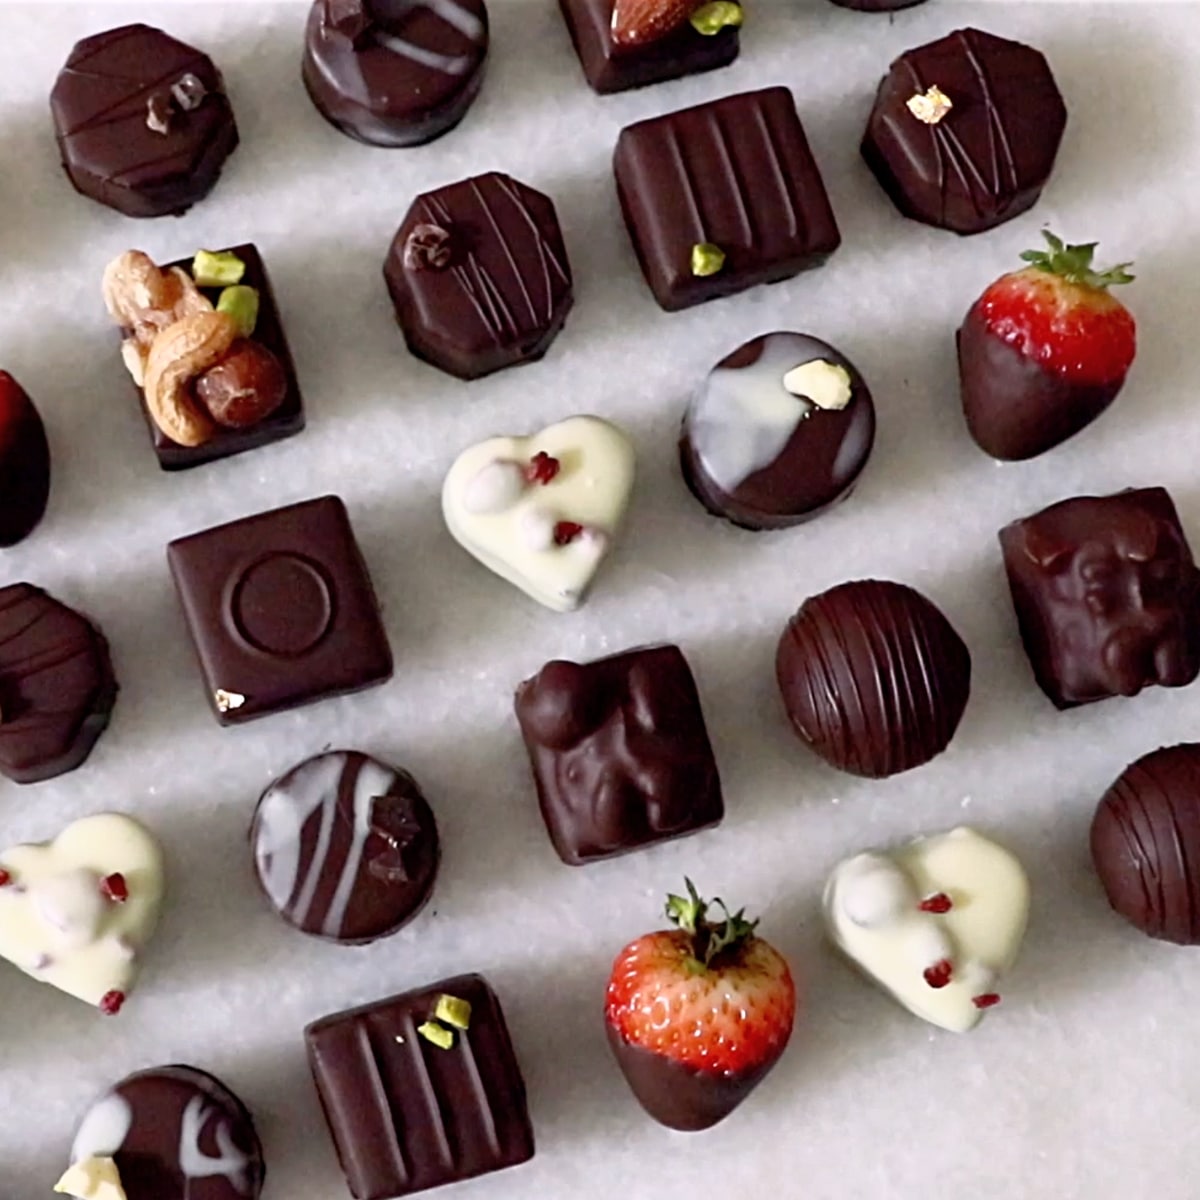
- Cut into 5 different shapes (5 pieces each): Heart, circle, rectangle (cut off the edge a little bit to create the rectangle shape), square, and octagon.
- Using extra scrubs from above, make balls. You should be able to get 4-6 pieces. In total, you will make about 30 pieces with 6 designs. (Try any shapes & sizes you like!)
- Chill in the fridge and take them out ahead before use so that they are not too cold by the time you coat the chocolate. Comfortably cold ganache is perfect to coat.
Tempering chocolate
- White and dark chocolate. Or use just one as you like.
- First, melt about ¾ of both white and dark chocolate in a water bath. Meanwhile, cut the rest (¼) into very fine pieces so they can melt easier.
- For white chocolate: Melt it until it reaches 40 - 45 C | 104 - 113 F. And add the diced chocolate and mix. Don't add all of it at once. Save just a little bit just in case you need to add more later in case most of them melted away. The goal is to let it cools down to between 26 - 28 C | 78.8 - 82.4 F right after all the white chocolate is melted. (That means the tempering was a success!) Today I coated only six truffles (one ball and five hearts) with white chocolate.
- Dark chocolate: Melt it at 45 - 50 C | 113 - 122 F. And add the diced chocolate and mix. Just like how we did with white chocolate, don't add all of it at once, save some just in case you need to add more later. The goal is to let it cools down to between 31 - 32 C | 87.8 - 89.6 F right after all the white chocolate is melted.
- If the chocolate was still not melted by the time you reach those temperatures, warm it up a little bit with a microwave, hot water, or a hair dryer.
- As an option, mix it with a hand blender at the very end to make sure that it is entirely even. It also removes some air bubbles in it.
- To check if the tempering is done correctly, drop the chocolate on anything you like and check: The chocolate should get set within a few minutes at room temperature.
Chocolate coating
- Coat the ganache with tempered chocolate.
- Drop the ganache on the melted chocolate. Push it down with a fork and scoop it up. As an option, blow some cold air on top with a hair dryer so that the coating gets thinner easily. Next, toss some times to remove excess chocolate. Finally, clean off the bottom with the edge of the ball.
- If you don't have a special fork for chocolate truffles, use a regular fork. (& it works just fine!)
- Mix the chocolate every time or at least every few times to make the temperature even.
- For white chocolate: Hold the temperature at 26 - 28 C | 78.8 - 82.4 F during the coating process.
- For dark chocolate: Hold the temperature at 31 - 32 C | 87.8 - 89.6 F during the coating process. - But! The range is really narrow and I find it difficult to continue holding the temperatures. That is why I usually do between 30 - 32 C | 86 - 89.6 F) & it works just fine.
- Melted dark chocolate is thicker than melted white chocolate. And the coating tends to get thicker easily because of that. Blowing air with a hair dryer like today really helps to make it thinner (Thin chocolate coating creates such a very present texture!) Just be careful not to blow too hard because tempered chocolate shrinks a little bit as it cools down and the coating can crack a little bit if it is too thin.
Finish them off
- Cut off the excess chocolate around the bottom edge.
- Finish decorating on top. - Decorate with any ingredients you like!
- Today I used: Toasted mixed nuts, pistachios, cacao nibs, gold leaf, pieces of white and dark chocolates, and some left melted dark chocolate
📌 Frequently Asked Questions
Store in the fridge in an airtight container. I do not recommend storing it at room temperature for a long time because the ganache contains heavy cream.
And I recommend consuming them within five days or a week especially if it's a homemade chocolate truffle,
- But just know that there are so many opinions about this (Some chefs say a few weeks or a month while others say a few days!)
It is possible to freeze them but be careful since they can get moisture damage. To minimize that, seal and wrap the container/box tightly.
And after you've taken it out from the freezer, don't move it to room temperature right away because any drastic temperature gap can cause moisture damage. Leave it in a fridge overnight and from a fridge, move it to room temperature.
I highly recommend using couverture chocolate if you can get it because that's the best type of chocolate for tempering. It is also the highest quality chocolate that does not contain unnecessary additional ingredients. It tastes amazing! I used these dark chocolate and white chocolate today. They are one of my favorites.
But! If you cannot get couverture chocolate, just use any chocolate you get. I believe in starting with what you can get. It's not going to be exactly the same result but it's still amazing and delicious because it's chocolate!!
📌 VIDEO: Chocolate Truffles
To learn how to make chocolate truffles visually and get a deeper understanding of all the processes, watch the video!
Don't forget to subscribe if you liked it😉
📌 The Printable Recipe
💬 I appreciate it if you can leave a review here if you tried this recipe and loved it! I always love to hear how you enjoyed it with your friends and family.
How To Make Authentic Chocolate Truffles
Equipment
- 15cm | 5.9" square mold/ring or use something close to the size
- Parchment paper
- Spatula
- Knife
- Pot
- Bowl
- Fork
- Hand blender optional
Ingredients
Ganache
- 7 oz Dark chocolate I recommend chocolate with 50-65% cacao content. I used 64% but if you want softer ganache, use the one with less cacao percentage.
- 4.2 oz Heavy cream
- 0.7 oz Honey
- 1 oz Butter (soft)
- 1 oz Dark chocolate to coat the bottom go the ganache Tempering it is the best but you can omit it to make it more simple.
Chocolate coating
- Some White chocolate I used 320 g | 11.3 oz for one batch
- Some Dark chocolate I used 1 kg | 35oz for one batch. Use as much as you feel comfortable with. I used 64% couverture chocolate. No need to pick the exact same percentage.
Decorations (Use any ingredients of your choice!)
- Some Toasted mixed nuts
- Some Pistachios
- Some Cacao nibs
- Some Gold leaf
- Some Pieces of white and dark chocolates
Instructions
Ganache
- Melt the dark chocolate. Warm it up to 45 - 50 C | 113 to 122 F.7 oz Dark chocolate
- Meanwhile, prepare a ring/mold with parchment paper inside. - 15 cm | 5.9 "
- Add heavy cream to the melted chocolate and mix:Heat cream to 70 - 80 C | 158 - 176 F. (I used a microwave but you can use a stove with a pot as well.) Add about one-third of the heavy cream and mix gradually from the center towards the edge until everything looks even and smooth. And add about half of the heavy cream and repeat the same process. Finally, add the rest and mix until it looks even. Clean the bowl and spatula on the way.4.2 oz Heavy cream
- Add honey and mix.0.7 oz Honey
- Add soft butter and mix:Make sure that your butter is very soft. The ganache should be about 37 - 39 C | 98 - 102 F when you add butter. (It feels gently warm when you touch it.) As an option, mix with a hand blender at the very end to create an extra smooth ganache.1 oz Butter (soft)
- Pour into a mold/ring and chill it completely. Hold the ring/mold with your hands really well and toss sometimes to remove some air bubbles in it. Wrap it tightly so that it's not going to get any moisture damage in the fridge. Chill in the fridge until it gets firm completely - more than a few hours to a day
- Shave the edges with a knife if it's not flat. Spread a very thin layer of tempered chocolate. (Look below to see how you can temper chocolate. You could skip the tempering process to if you like.)1 oz Dark chocolate to coat the bottom go the ganache
- Flip and cut the ganache. Mark (Length: 15 cm | 5.9 ") with 3 cm | 1.1 " intervals to create 25 pieces. Cut into 5 different shapes (5 pieces each): Heart, circle, rectangle (cut off the edge a little bit to create the rectangle shape), square, and octagon. Using extra scrubs from above, form balls. You should be able to get 4-6 pieces. In total, you will make about 30 pieces with 6 designs. (Try any shapes & sizes you like!) * Chill in the fridge and take them out ahead before use so that they are not too cold by the time you coat the chocolate. Comfortably cold ganache is perfect to coat.
Tempering chocolate
- (White and dark chocolate. Or use just one as you like.)First, melt about ¾ of both white and dark chocolate in a water bath. Meanwhile, cut the rest (¼) into very fine pieces so that they can melt easier. For white chocolate: Melt it until it reaches 40 - 45 C | 104 - 113 F. And add the diced chocolate and mix. Don't add all of it at once. Save just a little bit just in case you need to add more later in case most of them melted away. Let it cools down to between 26 - 28 C | 78.8 - 82.4 as soon as all the white chocolate is melted. (That means the tempering was a success!) If the chocolate was still not melted by the time you reach those temperatures, warm it up a little bit with a microwave, hot water, or a hair dryer as a quick fix.Today I coated only six truffles (one ball and five hearts) with white chocolate, so didn't use a lot of chocolate. Dark chocolate: Melt it at 45 - 50 C | 113 - 122 F. And add the diced chocolate and mix. Just like how we did with white chocolate, don't add all of it at once, save some just in case you need to add more later. Let it cools down to between 31 - 32 C | 87.8 - 89.6 F as soon as all the white chocolate is melted. As an option, mix it with a hand blender at the very end to make sure that everything is completely even and smooth. It also removes some air bubbles. To check if the tempering is done correctly: Drop the chocolate on anything you like and check: The chocolate should get hardened within a few minutes at room temperature. If it does not, the tempering was not done successfully. (In that case, you need to start over. It should be good to go if you follow the exact steps!)Some White chocolate, Some Dark chocolate
Chocolate coating
- Drop the ganache on the melted chocolate. Push it down with a fork and scoop it up. As an option, blow some cold air on top with a hair dryer so that the coating gets thinner easily. Next, toss some times to remove excess chocolate on the side. Finally, clean up the excess chocolate on the bottom using the edge of the ball. If you don't have a special fork to make chocolate truffles, use a regular fork. (& it works just fine!) Mix the chocolate every time or at least every few times to make the temperature even. White chocolate: Make sure that the temperature is held and maintained between the range (26 - 28 C | 78.8 - 82.4 F) during the coating process.Dark chocolate: Make sure that the temperature is held and maintained within the range (31 - 32 C | 87.8 - 89.6 F) during the coating process. - That being said, the range is really narrow and I find it difficult to continue holding the temperatures. That is why I usually do between 30 - 32 C | 86 - 89.6 F) and it works just fine so far!
Finish them off
- Cut off the excess chocolate around the bottom edge.
- Finish decorating on top:Decorate with any ingredients you like! Today I used: Toasted mixed nuts, pistachios, cacao nibs, gold leaf, pieces of white and dark chocolates, and some left melted dark chocolateSome Toasted mixed nuts, Some Pistachios, Some Cacao nibs, Some Gold leaf, Some Pieces of white and dark chocolates
Video
Notes
- I coated strawberries with the leftover chocolate as well.
Nutrition
If you are a chocolate lover (I'm guessing that's why you are here!), check out my other delicious chocolate dessert recipes as well:
You may also like:
Go back to the top of this post.

Leave a Reply