Perfect Crème Brûlée
Make a perfect crème brûlée by following 6 simple steps. I'm spilling all the secrets and troubleshooting tips to make it successful at home.
Equipment
- Saucepan
- Knife for vanilla beans
- Bowl
- Whisk
- Fine sieve Use a fine sieve.
- Baking sheet tray to pour hot water in
- Thin cloth or kitchen towel to palce on the sheet tray
- Ramekins One batch is enough for: 4 - 5 5” (12 cm) ramekins
Ingredients
Filling
- 16.9 oz Heavy cream 2 US cups
- 4.2 oz Whole milk ½ US cup
- 1 pod Vanilla beans
- 3.1 oz Granulated sugar ½ US cup - 1 Tbsp
- 3.5 oz Egg yolks about 6 eggs
Caramel
- Some Granulated sugar 1 ¾ teaspoon for each 5-inch wide (12cm) ramekins
Instructions
The 6 Steps
- In a medium saucepan, add heavy cream, milk, vanilla beans (scrape off the seeds inside and add them to the pot with the empty pod), and about half of the sugar. Heat them at medium heat until it starts simmering gently. Keep a close eye on it to prevent it from boiling out or evaporating too much. Remove from the heat, cover the top with a lid, and wait for about 10 minutes to infuse the vanilla flavor.16.9 oz Heavy cream, 4.2 oz Whole milk, 1 pod Vanilla beans
- In a large bowl, mix the yolks and the rest of the sugar. There is no need to whip them - Stop as soon as they are incorporated evenly.3.5 oz Egg yolks, 3.1 oz Granulated sugar
- First, add about ⅓ of the heated liquids to the egg yolk mixture and mix with a whisk gently until it looks even. Add the rest of the liquids as you mix. Mix it with a spatula at the end to ensure it's mixed evenly.
- Strain it with a fine sieve to discard any cooked egg and pour it into ramekins equally. One batch is enough for 4 - 5 6 oz ramekins with a 5-inch (12 cm) width.
- Place the sheet tray in the oven rack, lay a thin cloth or paper towels, and pour hot simmering water so that a little over ½ to ⅔ of the height of ramekins can dip in it. Carefully place ramekins onto it and bake at 300ºF | 149ºC until the filling jiggles slightly like a pudding or jello when adding vibrations. Adjust the time and temperature depending on the oven, thickness, amount, etc. * Bake them for about 25 minutes with 5 ramekins. (24 mins with my oven) * Bake them for about 30 minutes with 4 ramekins. (28 minutes with my oven)Take them out carefully and cool them on a wire rack. Move them to the fridge to chill them for more than a few hours.
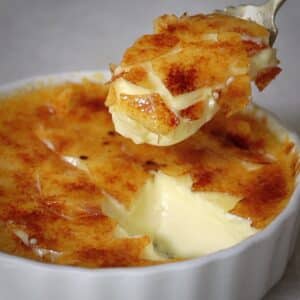
- Spread the sugar over the surface evenly and burn it with a torch to create a thin layer of caramel crunch. Wait for a few minutes until the caramel cools down. As an option, top it with fresh berries, mint, or any ingredient you desire and enjoy!Some Granulated sugar
Pro Tips
- The custard filling* Try not to mix sugar and yolk vigorously to prevent them from containing lots of air inside. The texture of creme brulee won't be so smooth when that happens. The same tip applies when adding liquids as well.* If you see a lot of air bubbles on the surface of the filling after pouring it into ramekins, heat them for just a blink second with a kitchen torch to pop them.* Be careful not to spill the hot simmering water on the filling in ramekins when placing them. It'll affect the consistency of the baked filling.* You can also chill the baked creme brulee in the fridge overnight. In that case, wrap each ramekin after they cool down completely. The cream gets thickened slightly more compared to chilling it for a few hours although the difference is not significant.The sugar caramelization* Ensure that the filling is very cold before finishing it with caramelized on top. Cold filling tastes so much better than room temperature filling with the caramelized sugar crust. * When you store ramekins with plastic wrap on top, check if there is no excess water attached to the surface and gently remove it with a kitchen towel if you see it.* Do not add too much sugar on top to prevent the caramel crust from getting too thick since it doesn't feel very pleasant. Spread it thinly so it delicately breaks when hitting it with a spoon.* After burning the sugar on top, do not let it sit for too long to prevent the caramel from starting to sweat. * Start torching sugar from the sides of the ramekins and slowly move inward to burn sugar evenly a bit easier.* Decrease the strength of the blowing strength if you find it difficult to caramelize evenly.
Video
Notes
How to Store it:
Move them to the fridge after they cool down enough and wrap each after they are cooled completely if you don't eat them right away. *Caramelize the sugar on top right before serving as the caramel starts getting softened as it sits. Store them in the fridge for up to four days. I highly recommend enjoying them within that day or the next day for the best taste. One batch of this recipe is enough for 4 - 5 6-oz ramekins. (Use 5 ramekins when you don't mind it getting a bit shallower. ** For best results, measure ingredients with a scale. All recipes are designed with weighed ingredients using grams/ounces. Cup measurements are provided for your convenience. **Nutrition
Calories: 475kcal | Carbohydrates: 23g | Protein: 7g | Fat: 41g | Saturated Fat: 24g | Polyunsaturated Fat: 2g | Monounsaturated Fat: 11g | Cholesterol: 327mg | Sodium: 45mg | Potassium: 149mg | Sugar: 22g | Vitamin A: 1738IU | Vitamin C: 1mg | Calcium: 119mg | Iron: 1mg
Tried this recipe?Let us know how it was!