
A step-by-step guide to making brown butter in minutes and using them properly for various baking recipes. I'm sharing it with clear tips, images, and a video tutorial so that you can master it even if this is your first time making it!


📌 What Is Brown Butter?
Brown butter is made by cooking regular butter past the melting point to brown it (the browning process is called the Maillard reaction, just like when toasting bread or sealing steaks). Caramelizing the milk solids (milk proteins) in butter creates a richer and nutty flavor. That is why it is also called Beurre noisette in French, meaning hazelnut butter.
The browned butter is often used to create savory dishes using butter-based sauce, such as pasta dishes or seafood/meat dishes, or for baking recipes using melted butter, such as madeleines, cookies, crepes, etc.

What does the brown butter taste like?
the browned butter has a nutty richer flavor than regular butter.
📌 The Best Butter For Brown Butter
Use high-quality butter for the best taste whenever the budget allows!
Although it is possible to make brown butter with both salted and unsalted butter, I recommend using unsalted butter when you can for the best results. Salted butter tends to foam a lot more bubbles while cooking it which makes it harder to judge the right color of the browned bits while cooking them.

📌 The Tools You'll Need
- Saucepan: Use a light-colored pan, such as a stainless steel saucepan, so that you can see the color of brown specks well while cooking it.
- Rubber spatula: Use a silicone spatula, wooden spoon, or whisk, whichever works best for you. I like to use a silicone spatula to scrape off the edges of the pan while cooking to prevent the milk solids from sticking to them.

📌 Step-by-Step Instructions To Make Brown Butter
1. Melting stage
Heat butter at medium heat in a stainless steel saucepan. Use cold or room temperature butter, whichever you like. You can cut the cold butter into smaller pieces, but it is not crucial to the success. Stir the butter occasionally to melt it.
Once all the butter melts, you'll start seeing a layer of fine foam covering the surface of the pan. That's the sign it starts boiling hard in a short time.


2. Boiling stage
Butter starts boiling after the melting stage. Here, the liquids in butter are evaporating. Pay attention to the look, sound, and smell to judge if the browning stage is starting slowly.
The look
The big bubbles are popping hard.
The sound
The popping sound is very loud.
The smell
It does not smell particularly different yet.


3. Browning stage
Butter starts boiling after the melting stage, and the liquids in butter slowly evaporate. In the beginning, you'll see a thin layer of white foam on the surface, but it'll go away as you continue boiling it.
Pay attention to the look, sound, and smell to judge if the browning stage is starting slowly.
The look
In the beginning stage of browning, the big bubbles start getting smaller. Pay close attention once that happens since milk solids darken quickly after that. At this point, I like to reduce the heat to slow the burning process.
Once the smaller bubbles turn into fine foam, that is a sign the milk solids are browning at a faster speed.
The sound
The loud bubble sounds start quieting down as the butter starts browning.
The smell
The toasty nutty aroma starts coming out once the butter starts browning.


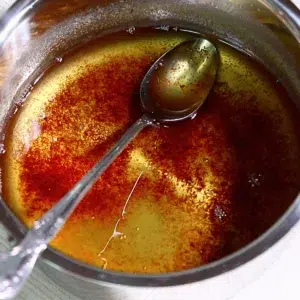
4. Remove from the heat.
Once the little brown bits look golden brown in color, remove them from the heat. They get slightly darker with the remaining heat, so I recommend stopping it a little bit before the ideal. You can also dip the bottom of a saucepan in cold water to cool it faster.
The liquid butter should look golden brown.


📌 How To Store Brown Butter
Pour the brown butter into an airtight container and store it in the fridge for up to a few weeks or a few months in the freezer.
Just like regular butter, brown butter hardens when it's chilled. Leave it at room temperature or heat it in the microwave to soften it. Stir the butter well with a spoon before use so that the browned milk solids even out in the butter.


📌 Uses For Brown Butter
You can use brown butter for pretty much any baking recipe that uses melted butter! Here are some ideas:
- Cookies: Brown butter chocolate chip cookies are one of the popular ones!
- Blondies: Butter blondies, caramel blondies, etc.
- Madeleines: Vanilla madeleines, Chocolate madeleines, lemon madeleines, etc.
- Financier
- Crepes: You can use brown butter to make classic crepes.
- Pancakes
- Savory recipes: Pasta dishes, seafood dishes, steaks, butter-base sauce, etc.


The comparison
I baked vanilla madeleines with regular butter (on the left) and brown butter (on the right) to compare them.
The ones with brown butter were slightly richer in aroma and flavor, although they both tasted great.


📌 Brown Butter For Baking
Butter is composed of butterfat, milk solids, and water (The water content is usually about 15 - 20 % of the whole content). Yes, it contains water! In the process of making the brown butter, all the moisture evaporates. Which means the weight of the butter also reduces! This is something we miss oftentimes but is so important for baking.
For example, when the recipe requires one stick of regular butter (4 oz | 113 g), you'll get about 3.3 oz or 93 g of brown butter after browning it. The content is reduced by 18%. (It was 18% with the butter I used. It can fluctuate depending on the brand. It usually is 15 - 20%.)
So if you want to be most truthful about the texture of the recipe, add more water or even milk to make it 4 oz or 113 g.
BUT! If that is too confusing or sounds too much, you can skip the water or use the same amount of brown sugar as regular butter.
Although it is a bit complicated, I wanted to include this information since some people may notice the difference in texture when alternating regular butter with brown butter.
📌 FAQ
What's the difference between clarified butter and brown butter?
Clarified butter is a regular butter after evaporating all the water and removing milk solids from it. The milk solids are not browned like brown butter; instead, they are skimmed off or strained with a cheesecloth after the boiling stage. By removing the milk solids, clarified butter has a more neutral flavor than brown butter. You can also cook it at a higher temperature for a longer time than regular butter without causing it to start smoking.
Can I cook a lot of butter at once to make brown butter?
Yes! Use a larger pan to see the browned milk solids well in the bottom of the pan while cooking them. With a smaller pan, you can potentially burn them too much since the melted butter is too thick in a pan to see through the browned bits.
📌 Video Tutorial
Learn how to make brown butter visually to better understand the process!
Don't forget to subscribe if you liked it😉
📌 Printable Recipe
💬 If you loved this recipe, please share your feedback on this post! I always love to hear how you enjoyed it with your friends and family.
How To Make Brown Butter
Ingredients
- 4 oz Unsalted butter 1 stick of US butter
Instructions
- Melting stageHeat butter at medium heat in a stainless steel saucepan. Use cold or room-temperature butter, whichever you like. Stir the butter occasionally with a rubber spatula to melt it. Once all the butter melts, you'll start seeing a layer of fine foam covering the surface of the pan. That's the sign it starts boiling hard in a short time.4 oz Unsalted butter

- Boiling stageButter starts boiling after the melting stage and the liquids in butter slowly evaporate. In the beginning, you'll see a thin layer of white foam on the surface, but it'll go away as you continue boiling it. Pay attention to the look, sound, and smell to judge if the browning stage is starting slowly.The look: The big bubbles are popping hard. The sound: The popping sound is very loud.The smell: It does not smell particularly different yet.
- Browning stageAfter the bubbling stage, the butter starts browning. The process takes about a few minutes with one stick of butter after all the butter is melted, but this can fluctuate widely depending on the size of the pan you use, the strength of the heat, and the amount of butter. Judge with the look, sound, and smell to be most accurate.The look: In the beginning stage of browning, the big bubbles start getting smaller. Pay close attention once that happens since milk solids darken quickly after that. At this point, I like to reduce the heat to slow the burning process.Once the smaller bubbles turn into fine foam, that is a sign the milk solids are browning at a faster speed.The sound: The loud bubble sounds start quieting down as the butter starts browning. The smell: The toasty nutty aroma starts coming out once the butter starts browning.
- Remove from the heat.Once the little brown bits look golden brown in color, remove them from the heat. They get slightly darker with the remaining heat, so I recommend stopping it a little bit before the ideal. You can also dip the bottom of a saucepan in cold water to cool it faster.


Video
Notes
How to store it:
Pour the brown butter into an airtight container and store it in the fridge for up to a few weeks or a few months in the freezer.Nutrition
📌 Pin It!
Pin this brown butter recipe and many other delicious recipes on my Pinterest page!

Leave a Reply