Treat yourself with the creamiest baked matcha cheesecake! It's rich, smooth, and perfectly matcha. You can make the cheesecake batter in easy steps with one bowl and a whisk.

Jump to:
- Best Baked Matcha Cheesecake
- What Is Matcha? 🍵
- What kind of matcha should I use?
- Tips For The Ingredients
- Tools You'll Need to Make Matcha Cheesecake
- The Step-By-Step Instructions
- How to detach the cheesecake from the pan.
- 5 steps to slice cheesecake:
- The Video: Watch How To Make It!
- How To Store Matcha Cheesecake
- FAQ
- More Japanese Dessert Recipes
- Printable Recipe
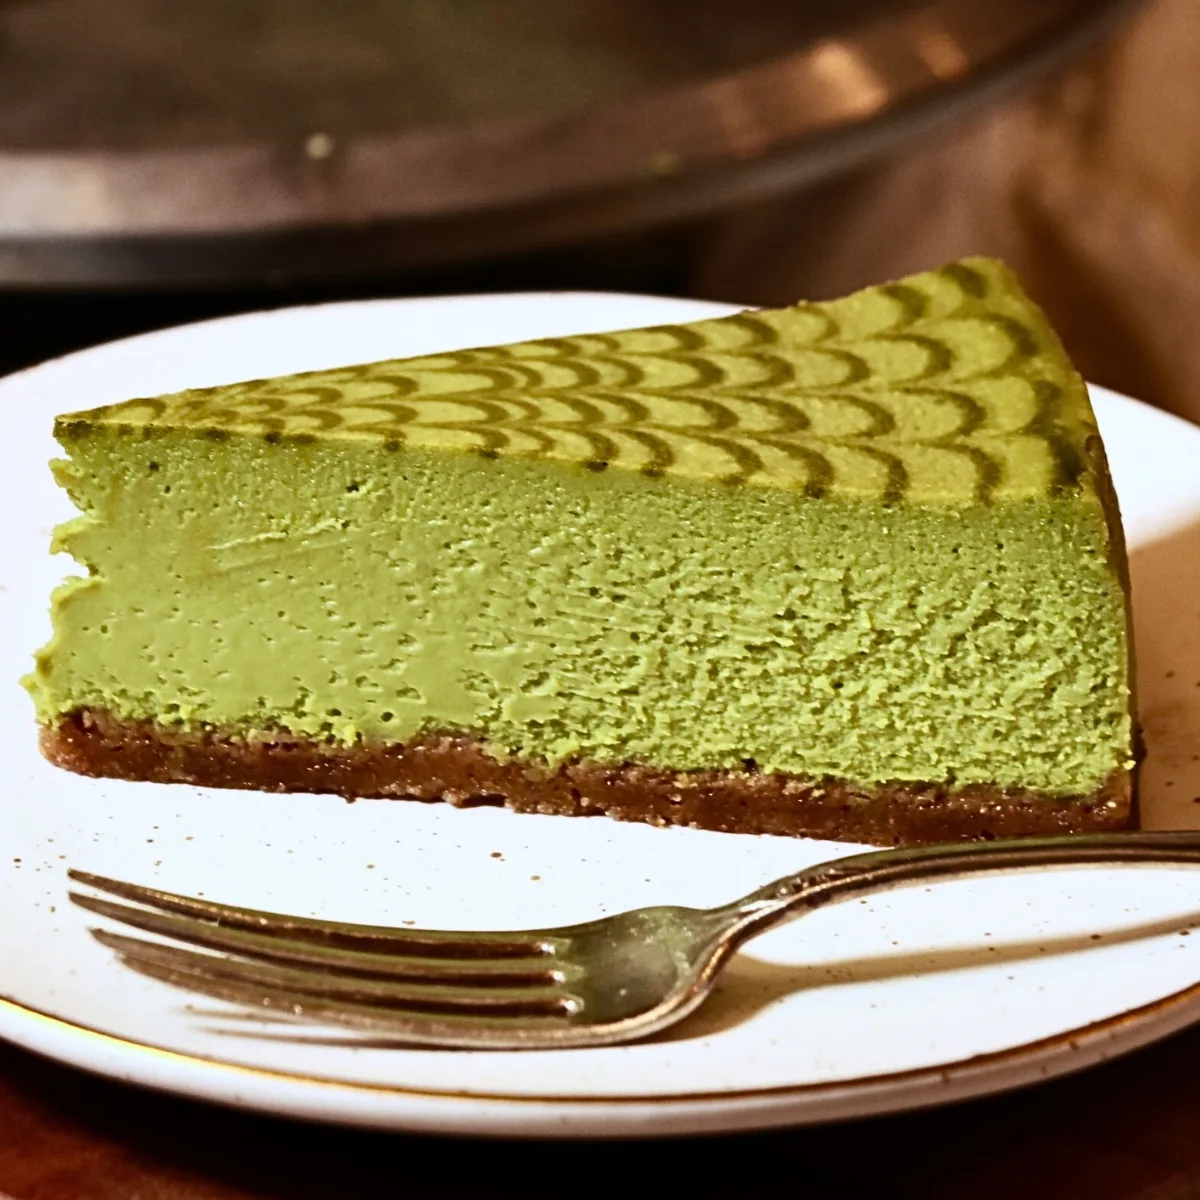
- BEST Baked Matcha Cheesecake
Growing up in Japan, matcha desserts were always on the menu at cafes and pastry shops. I have to be honest; I didn't care for it when I was a kid, but as I aged, the bitterness turned into something I appreciated.
My love for matcha slowly began to blossom after I had fine matcha tea at a ceremony, a matcha latte at Starbucks😁, and various matcha desserts. My absolute favorite matcha desserts are matcha ice cream, matcha sponge cake, matcha cookies, matcha ganache, matcha crêpes... the list goes on and on. And matcha cheesecake is one of them.

Best Baked Matcha Cheesecake
I'm thrilled to share what I believe is the best baked cheesecake.
There are a few things that make this cheesecake so exceptional.
Creamy, creamy, and creamy!
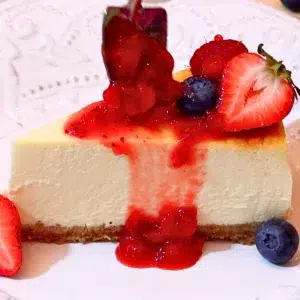
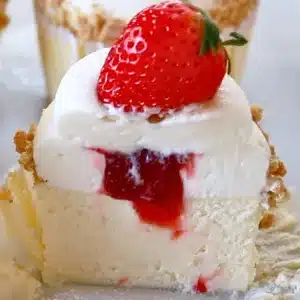
One of the best things about this cheesecake is that it is incredibly creamy. For baked cheesecakes, the texture plays a significant role in the overall experience. Just like my New York cheesecake and Strawberry mini cheesecakes, this cheesecake is super velvety with a silky smooth texture.
Perfectly matcha
I completely understand that everyone has a different preference for the intensity of the matcha flavor, yet it is an essential aspect of crafting a delicious matcha cheesecake.
I focused on adding just the right amount of matcha that satisfies beginner to long-time matcha lovers, avoiding it from being too mild or intense in the cheesecake. Note that the taste also fluctuates drastically, depending on what type of matcha you are using. (Read the section below for more details!)
What Is Matcha? 🍵
Matcha is a green tea powder made from stone-ground tea leaves, primarily produced in Japan. The matcha powder is whisked into hot water to form a foamy drink, which is traditionally served in Japanese tea ceremonies.
Due to its unique flavor and health benefits, matcha powder is gaining popularity worldwide, featured in a range of drinks and desserts.
Matcha is rich in various components, including amino acids, vitamins C, A, and E, minerals, caffeine, and antioxidants. The antioxidants include catechins, which may help prevent cell damage and lower the risk of certain diseases.
What kind of matcha should I use?
I prefer to use high-quality matcha for its taste, aroma, and color. When purchasing matcha in the United States, you'll notice there are roughly three grades of matcha:
- Ceremonial grade matcha
- Culinary grade matcha
- Baking matcha
Ceremonial grade matcha is most flavorful and rich in color, while baking matcha is most mild and pale in color. And I always opt for ceremonial-grade even for baking, for the quality. Pick culinary grade if ceremonial grade is not available.
Some of my favorite types include Uji matcha from Uji, Kyoto, and Yame matcha from Yame, Fukuoka. The flavors vary widely depending on the brand and region.
It's really like chocolate. Ultimately, it is up to your preference. Try some kinds and find your favorite!
Tips For The Ingredients
The Graham cracker crust
- Unsalted butter: Melt butter before use. It helps to connect Graham cracker pieces.
- Graham crackers: Alternatively, you can use Oreo cookies to create an Oreo cookie crust.
- Granulated sugar: You can omit it if you prefer.
Cheesecake filling
- Matcha powder: Use high-quality matcha for the best results. They tend to have a brighter color.
- Granulated sugar: Use white sugar, such as granulated sugar or caster sugar.
- Cream cheese: Leave it at room temperature for a few hours ahead of time to soften it. Do not use cold cream cheese, as it does not blend well with other ingredients.
- Heavy cream: Use heavy cream or heavy whipping cream. I decided not to add sour cream since I felt the flavor didn't pair well with matcha.
- Cornstarch: Cornstarch helps thicken the filling with a reduced amount of eggs. It creates a slightly lighter texture and prevents the filling from getting too dense.
- Yolks: Egg yolks add a richer flavor while thickening the filling.
- Egg: It helps to thicken the filling.
Matcha Decoration
- The cheesecake filling: Set aside one tablespoon of the cheesecake filling for decoration. You can omit the decoration if you prefer.
- Matcha powder: Mix a small amount of matcha powder with the filling to create a green paste for decoration.

Tools You'll Need to Make Matcha Cheesecake
- Ziplock and a rolling pin or food processor: Use them to crush graham crackers.
- 9-inch springform pan with a removable bottom
- Baking sheet tray: Use it to pour hot water into to bake the cheesecake with a water bath.
- A thin cloth or kitchen towel: Lay it on top of the baking sheet to deliver the heat more gently in the oven.
- Aluminum foil or oven bag: Cover the sides of the pan with it to prevent the hot water from going into the pan.
- Large bowl or stand mixer with a paddle attachment
- Whisk
- Rubber spatula
- Toothpick: Use it to create a matcha decoration on top of the cheesecake filling.
- Pot for water bath
- Small cake spatula: Use it to detach a cheesecake from a pan.
- Large cake spatula: Use it to transfer a cheesecake.
The Step-By-Step Instructions
Preparation
- Coat a thin layer of butter all over the pan so that the cake comes out more easily. You can also cover the side with parchment paper.
- Prepare a gently simmering water to bake the cheesecake with a water bath. (Baking it with a water bath creates a much smoother texture!)
- Leave the cream cheese at room temperature for a few hours beforehand to soften it.
Make the crust.


- Melt butter.
- Crush graham crackers in a ziplock using a rolling pin. Avoid making it too powdery, and leave some crumbs to achieve a better crumbly texture.
- Mix the graham crackers and sugar roughly in a bowl.
- Add melted butter and mix until combined.
- Drop it onto the greased pan and flatten the surface by gently pushing it with a flat object, such as a measuring cup. Apply sufficient pressure to prevent the mixture from breaking down during transfer or slicing.
- (optional) If you want the crust to be toastier and crispier, bake it ahead at 340°F (171 °C) for about 8 minutes, until the edges are slightly golden brown.
- After the crust has cooled, wrap the sides with a few layers of foil or an oven bag to prevent water from seeping in during the baking process with a water bath.
- Lay a thin cloth or kitchen towel on a baking tray to deliver the heat more gently. Place the pan on top of it.
Make the cheesecake filling.


- Whisk the sugar and matcha powder well. By doing it, you can eliminate the lumps of matcha powder.
- Whisk the room temperature cream cheese in a separate bowl until smooth.


- Add the matcha and sugar mixture and whisk well until smooth. (Mix slowly at the beginning so that the matcha powder is not scattered everywhere, and gradually increase the speed.)
- Add heavy cream: Add about ⅓ of it first and mix until smooth. Add the remaining heavy cream and mix until well combined.


- Add cornstarch. The batter will appear lumpy at first. Continue mixing until the mixture looks smooth.
- Add the egg yolks and whole eggs, mixing well each time.
- Switch to a rubber spatula at the end and clean up the bottom and sides of the bowl to ensure everything is evenly incorporated.
Tips for the cheesecake batter💡
- Using soft cream cheese is crucial for making a smooth batter. It will be a struggle to blend cold cream cheese with other ingredients.
- You can also make the filling using a stand mixer with a paddle attachment.
Draw patterns on top with matcha paste.


- Set aside about one tablespoon of the cheesecake filling in a small bowl.
- Add sifted matcha powder to it. Mix well until smooth.


- Spoon the mixture into a small piping bag. (or even ziplock!)
- Pour the cheesecake filling into the prepared pan.
- Cut the tip of a piping bag and draw swirls on top of the cheesecake filling. (Watch the video tutorial to see how I do it.)
- Insert a toothpick near the edge of the pan and pull it toward the center. Keep repeating it to create a pattern.

Tips for drawing the lines💡
- The tip of the piping bag shouldn't touch the filling as you draw the swirls. Lift it and drop the line as you squeeze, moving your hands to where you want it to land.
- It's harder to draw a line when it's too thin. You can pipe more easily with a thicker line.
- Even if the swirls don't look perfect, it's totally fine! - It'll still look beautiful if you use a toothpick at the end. You can also draw anything you like and have fun!
Bake the cheesecake.


- Slowly and carefully move it to the oven so that the drawn pattern on top does not move.
- Pour the hot water into the baking tray, filling it up to about ¼ to ⅓ of the pan's height.
- Bake at 325°F (162 °C) for approximately 70 minutes with a water bath, until it wobbles and bounces when gently tapped on the side. It shouldn't look like liquidity. Turn off the heat, leave the oven door open (about 1 inch), and let the cheesecake sit in the oven for about 30 minutes to ensure it's completely cooked through to the center.
- Let it cool at room temperature and chill it in the fridge for at least 5 hours until the cheesecake is completely cold.
Tips for baking the cheesecake💡
- The filling may look very soft, but do not worry; it becomes firmer once it is chilled.
- Adjust the baking time and temperature according to the oven type, pan size, etc.
How to detach the cheesecake from the pan.


- Insert a small cake spatula or knife around the edge to ensure the cheesecake filling and crust are detached. Take off the side of the pan.
- Detach the bottom edge using a small cake spatula. Insert a large cake spatula under the bottom of the cheesecake to transfer it to a plate or cake stand.
5 steps to slice cheesecake:
- Warm a knife with hot water.
- Wipe off the water.
- Run the hot knife down the cheesecake and slice it.
- Clean a knife with a wet paper towel or cloth.
- And repeat the process!

Now, enjoy! I also love to eat this creamy cheesecake with a drop of fluffy whipped cream. It tastes so good.
Happy baking,
Aya xx

The Video: Watch How To Make It!
Watch the video tutorial to learn how to make matcha green tea cheesecake visually and have a deeper understanding of each step!

Don't forget to subscribe to me on YouTube if you liked it 😉
How To Store Matcha Cheesecake
Protect the cut sides with plastic wrap to prevent them from drying out. Wrap this surface with plastic wrap, or place it in an airtight container and store it in the refrigerator for 4 - 5 days.
FAQ
Yes! You can make a gluten-free matcha cheesecake by omitting the crust.
It is definitely possible, but I highly recommend baking it with a water bath to achieve a silky smooth texture.
Yes. I tried not to add too much matcha powder so that most people wouldn't feel it's too intense, but you can reduce the amount slightly if you are nervous!
Azuki (Japanese sweetened red bean paste) and white chocolate are most frequently paired with matcha desserts; their sweetness and flavor go well. I also like it with berries, whipped cream, and caramel.
More Japanese Dessert Recipes
If you liked this matcha cheesecake recipe, also try other Japanese-style desserts!
Printable Recipe
💬 Did you try this recipe? I'd like to hear your feedback! I also love hearing how you enjoyed it for your special occasion. If you have a question, please leave it in the comment section below, and I'll respond as soon as possible.
BEST Baked Matcha Cheesecake
Equipment
- Ziplock and a rolling pin or food processor.
- 9-inch Springform pan with a removable bottom
- Baking sheet tray for a water bath
- A thin clothes or kitchen towel
- Aluminum foil or oven bag.
- Large bowl or Stand mixer with a paddle attachment
- Whisk
- Rubber spatula
- Toothpick
- Large Pot for hot water
- Cake spatula
Ingredients
Crust
- 100 g (7 Tablespoons) Melted butter
- 180 g (12 sheets) Graham crackers
- 25 g (2 Tablespoons) Granulated sugar
Cheesecake filling
- 12 g (2 Tablespoons) Matcha powder
- 200 g (1 cup) Granulated sugar
- 675 g (3 8-oz blocks) Cream cheese
- 320 g (1 ⅓ cups) Heavy cream
- 16 g (2 Tablespoons) Cornstarch
- 30 g (2 yolks) Yolks
- 100 g (2 eggs) Egg
Matcha swirls on top
- 1 Tablespoon The cheesecake filling
- ¼ teaspoon Matcha powder
NOTE: For best results, measure ingredients with a scale. All recipes are designed with weighed ingredients using grams/ounces. Cup measurements (US customary units) are provided for your convenience.
Instructions
Preparation
- Coat a thin layer of butter all over the pan so that the cake comes out more easily. You can also cover the side with parchment paper.
- Prepare a gently simmering water to bake the cheesecake with a water bath. (Baking it with a water bath creates a much smoother texture!)
Graham cracker crust
- Melt butter.
- Crush graham crackers in a ziplock using a rolling pin. Avoid making it too powdery, and leave some crumbs to achieve a better crumbly texture.180 g Graham crackers
- Mix the graham crackers and sugar roughly in a bowl.25 g Granulated sugar
- Add melted butter and mix until combined.100 g Melted butter
- Drop it onto the greased pan and flatten the surface by gently pushing it with a flat object, such as a measuring cup. Apply sufficient pressure to prevent the mixture from breaking down during transfer or slicing.
- (Optional) If you want the crust to be toastier and crispier, bake it ahead at 340°F (171 °C) for about 8 minutes, until the edges are slightly golden brown.
- After the crust has cooled, wrap the sides with a few layers of foil or an oven bag to prevent water from seeping in during the baking process with a water bath.
- Lay a thin cloth or kitchen towel on a baking tray to deliver the heat more gently. Place the pan on top of it.
Cheesecake filling
- Whisk the sugar and matcha powder well. By doing it, you can eliminate the lumps of matcha powder.12 g Matcha powder, 200 g Granulated sugar
- Whisk the room temperature cream cheese in a separate bowl until smooth.675 g Cream cheese
- Add the matcha and sugar mixture and whisk well until smooth. (Mix slowly at the beginning so that the matcha powder is not scattered everywhere, and gradually increase the speed.)
- Add heavy cream: Add about ⅓ of it first and mix until smooth. Add the remaining heavy cream and mix until well combined.320 g Heavy cream
- Add cornstarch. The batter will appear lumpy at first. Continue mixing until the mixture looks smooth.16 g Cornstarch
- Add the egg yolks and whole eggs, mixing well each time.30 g Yolks, 100 g Egg
- Switch to a rubber spatula at the end and clean up the bottom and sides of the bowl to ensure everything is evenly incorporated.
Matcha swirls on top
- Set aside about one tablespoon of the cheesecake filling in a small bowl.1 Tablespoon The cheesecake filling
- Add sifted matcha powder to it. Mix well until smooth.¼ teaspoon Matcha powder
- Spoon the mixture into a small piping bag. (or even ziplock!)
- Pour the cheesecake filling into the prepared pan.
- Cut the tip of a piping bag and draw swirls on top of the cheesecake filling. (Watch the video tutorial to see how I do it.)
- Insert a toothpick near the edge of the pan and pull it toward the center. Keep repeating it to create a pattern.
Bake the cheesecake.
- Slowly and carefully move it to the oven so that the drawn pattern on top does not move.
- Pour the hot water into the baking tray, filling it up to about ¼ to ⅓ of the pan's height.
- Bake at 325°F (162 °C) for approximately 70 minutes with a water bath, until it wobbles and bounces when gently tapped on the side. It shouldn't look like liquidity. Turn off the heat, leave the oven door open (about 1 inch), and let the cheesecake sit in the oven for about 30 minutes to ensure it's completely cooked through to the center.
- Let it cool at room temperature and chill it in the fridge for at least 5 hours until the cheesecake is completely cold.
Video

Jane says
So excited to try this recipe! Can I use Goya Maria cookies instead of graham cookies for the base? Will it change the texture of the base?
ayacaliva says
Thank you!😊 Yes, the texture changes a bit but it should work just fine. I hope you'll like it!
Anna says
Loved it!
But I have to say I could not keep the cookies base crunchy, even though I baked it first.
To be honest this is a problem I've had with all cheesecakes, maybe you have a hint to share? Even if you bake the cookies first, how can they remain crunchy when you add the liquid part later? Thanks!
ayacaliva says
Thank you so much!! I'm so glad you liked it. About your question,
I see what you are saying, I agree with you. The cheesecake crust doesn't really get very crunchy probably due to some of the moisture from the liquid cheesecake batter. It's more like crumbly. I would first check if the pan is completely sealed on the bottom to avoid the water leakage. If that was not the case, I would add a little bit more butter in the crust which should helps to make it a little bit more solid.
The crust feels slightly more crunchier with my no-bake cheesecake recipe since the filling is fluffier and not so fluid. Give it a try if you are interested😊
Sanne says
Yummm the cheesecake itself was so delicious and smooth.
We drew a red panda face on the top, so fun!
The bottom was a bit soggy, were gonna try baking it seperately next time
Aya Caliva says
I love the idea! I bet it looked so cute. Thanks for sharing!!