
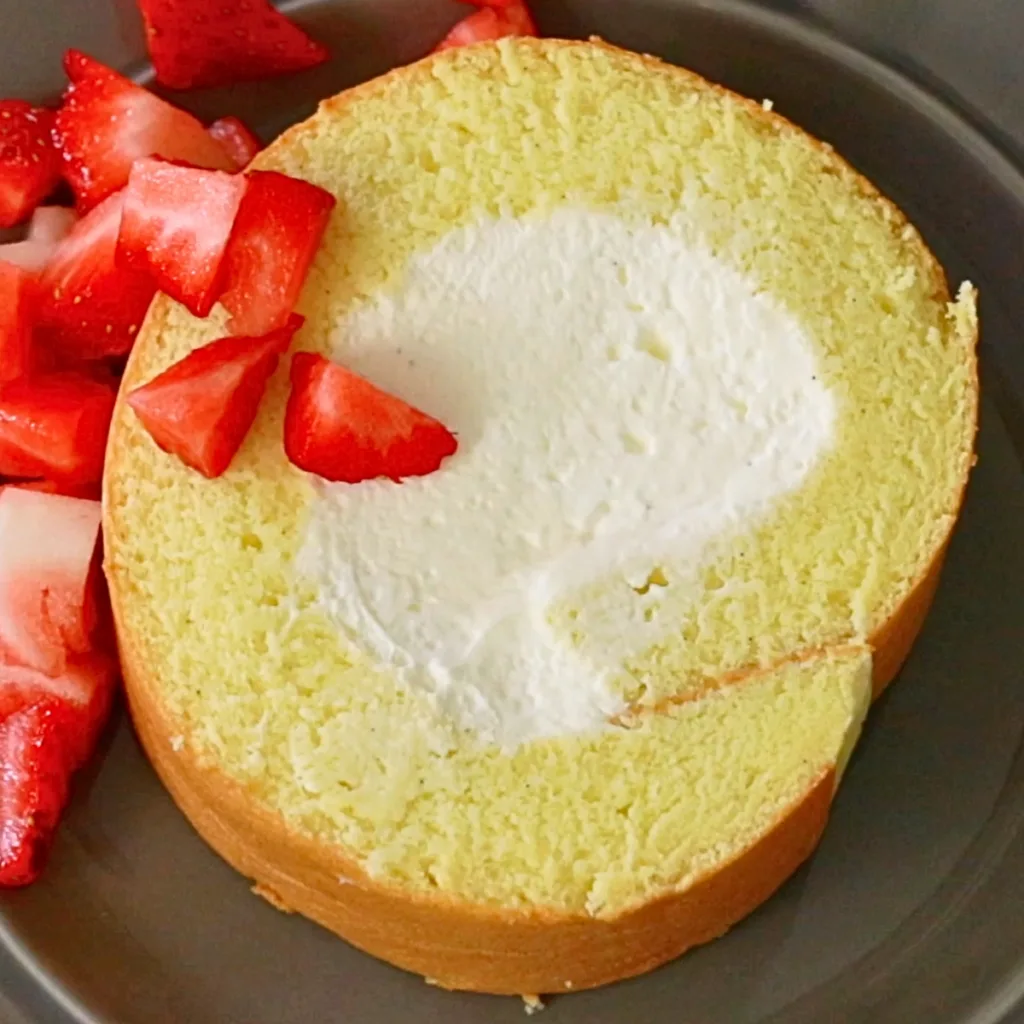
The best vanilla roll cake EVER! - with the perfectly fluffy & moist vanilla sponge cake and whipped cream (Chantilly cream). Try this recipe if you are getting tired of a dried, denser roll cake. You will not be disappointed. Follow the simple steps to make it successful at home.


📌 Why you'll love this vanilla roll cake:
Roll cake could be a little bit intimidating to make if you are new to it.
You may have encountered issues before such as:
- Flat sponge cake
- Dense texture
- Cracked sponge cake
- Sloppy look
... and so on.
After hundreds of times creating a roll cake, I finally came up with the BEST recipe I was fully satisfied. And the best part is the steps are not that complicated. A beginner-friendly!
Some of the best parts are:
- The sponge cake has the fluffiest texture EVER.
- It is perfectly moist. Say goodbye to a dried roll cake!
- You do not need to pre-roll the sponge cake since it has the perfect bounciness that does not easily crack. You can save time and omit the complicity!
- It stays moist in the fridge - Unlike some sponge cakes, this one stays moist in the fridge for a relatively long time, about 4 days.
In this post, you'll learn essential baking skills & tips, such as:
- How to properly prepare a baking pan
- Tips for making the fluffy & silky sponge texture
- Tips for baking a sheet cake
- How to roll a sheet cake successfully
- How to slice the roll cake neatly
- Other troubleshooting
... and so on.
Let's get started!

📌 What is roll cake?
A roll cake simply refers to any sheet cake that is rolled with fillings. Oftentimes, a fluffy type of sponge cake is used to roll it more easily. The most popular fillings are whipped cream, buttercream, and jam.
Some of the most well-known types of roll cakes are:
- Swiss roll: It refers to any sponge cake rolled up with any filling, such as whipped cream, buttercream, and jam. The origins of the term are unclear; despite the name "Swiss roll", the cake is believed to have originated elsewhere in Central Europe, possibly Austria or Slovenia.
- Jelly roll: It refers to a sponge cake rolled up with plenty of jam.
- Japanese roll cake: It refers to an exceptionally light and fluffy sponge cake rolled with whipped cream. The sponges are often made with lots of meringue and less flour to create the texture. This recipe is heavily inspired by this type of sponge cake.
- Roulade: Aroulade can be rolled using other pastries or can even be savory with a meat filling while a Swiss roll is always made up of cake being rolled with a filling.
- Buche de noel (Yule log cake): A Yule log or bûche de Noël is a traditional Christmas cake, often served as a dessert near Christmas. The chocolate sponge cake is rolled with chocolate filling, such as chocolate whipped cream and chocolate buttercream.
As you can see from the list, some of the definitions are very similar and that might make you feel confused. Just know that some people like to call it by many different names, depending on the country and culture they grew up in.
📌 Ingredients you'll need to make a vanilla roll cake
Sponge Cake
- Egg white: Ensure that no yolks, other oils, or liquids are mixed in the egg white and tools since they can prevent the egg white from whipping well.
- Granulated sugar for meringue: Sugar helps to stabilize the meringue a little bit more. Use any white sugar, such as granulated sugar and caster sugar.
- Egg yolks: The sponge gets rich in flavor by adding a lot of yolks.
- Granulated sugar for yolks: It helps to whip yolks a little bit more.
- Vanilla beans: You can also use vanilla bean paste or vanilla extract instead.
- Cake flour: Avoid using all-purpose flour or bread flour for this recipe to create a fluffy and light texture.
- Milk: Use whole milk.
- Oil: I used olive oil but you can use any other regular oils, such as caster oil and vegetable oil.
Cake Syrup
- Granulated sugar
- Water
Whipped Cream Filling
- Heavy cream: Use heavy cream or heavy whipped cream. The ideal fat content is between 40 - 50 % to make a very stiff meringue that can hold the body of the soft sponge cake.
- Granulated sugar
- Vanilla beans: You can also use vanilla bean paste or vanilla extract instead.
📌 Step-by-step instructions to make a vanilla roll cake
Preparations
- Separate eggs.
- Lay parchment paper on a baking sheet (10.5" | 26.6 cm x 15" | 38 cm). Make small cuts on corners so it fits nicely.
- Combine milk and oil ahead. We're going to add them at the very end of the mixing process.
- Sift cake flour with a fine sieve.
- Preheat the oven to 355°F | 180°C.


Tips💡
- Ensure that no yolks, other oils, or liquids are mixed in the egg white and tools since they can prevent the egg white from whipping well.
- Cake flour gets lumpy more easily than all-purpose flour or bread flour. I recommend sifting it to get the best result.
Make the egg yolk mixture.
- Mix yolks, vanilla beans (or vanilla extract) and sugar.
- Whip it well until it gets very fluffy and pale. By doing this, it contains a lot of air, which leads to a very fluffy sponge.


Tips💡
- After you add sugar to yolks, quickly mix them to prevent them from creating lumps that are harder to remove later.
- Clean up the side of a bowl since it can dry quickly and be difficult to clean up later.
Make the meringue.
- Whip egg white at medium to high speed using a stand mixer with a whisk attachment until it gets bubbly like hand soap.
- Add about half of the sugar and continue whipping.
- Add the rest of the sugar once it looks more fluffy like fluffy shampoo.
- Continue whipping it until it gets to the soft peaks. Toward the end, whip it at low speed for about a few minutes or more to make the air bubbles smaller.


Tip💡
Do not whip it too much until it gets very stiff since it'll be harder to incorporate it into the yolk mixture. When you mix it with a whisk and lift it, the tip should curl up. I always do the test before using it.
Combine the mixtures.
- Add about one-third of the meringue to the yolk mixture and fold it with a whisk. Repeat scooping and tossing as you turn the bowl. Watch the video tutorial to check the movement.
- Add the rest of the meringue and fold it.
- After 70 - 80 % is mixed, add sifted cake flour. Continue folding until you don't see any more flour.


- Add milk and oil and continue folding until 70 - 80 % is mixed.
- Switch to a spatula, and clean up the side and the bottom of the bowl to ensure everything is blended evenly.


Tips💡
- Do not mix the batter vigorously to prevent the air bubbles in eggs from getting eliminated too much. Much fewer air bubbles lead to a flatter sponge cake.
- I used a whisk to fold the batter in the beginning since I can finish folding with less time and it can break down lumps of meringue more effectively. You can also use a spatula as well if you prefer it.
- Check if it's folded enough, using a spatula: Scoop the batter and drop - It should flow nicely like ribbons.
Bake the cake.
- Pour the cake batter into the prepared pan and flatten the surface with an offset spatula.
- Hit the pan on a table a few times to remove some big air bubbles.
- Bake it in the preheated oven at 355°F | 180°C for about 10 - 15 minutes, depending on the oven.
- Remove it from the pan and cool it on a cooling rack.


Tips💡
- Be careful not to overbake it as the cake can crack as you roll when it's dry
- Adjust the time when you are using a pan with a different size - It bakes faster when it's bigger.
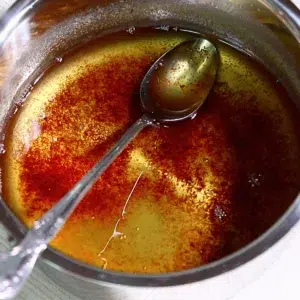
Make cake syrup.
Make cake syrup while the sponge is in the oven so that it can cool by the time you use it.
- Combine sugar and water and heat it with the microwave or in a pot.
- Mix it and check if the sugar is dissolved. Set it aside.


Tip💡
Applying cake syrup is an extra step, but I highly recommend doing it to keep the sponge very moist and exceptionally delicious.
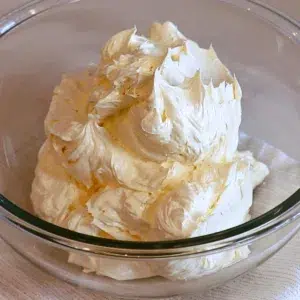
Make the cream filling.
- Whip heavy cream, sugar, and vanilla beans (or vanilla extract) together.
- Whip until it gets very stiff since the sponge is very fluffy and delicate - we want the stiff cream to support the body.


Tips💡
- Heavy cream does not whip properly or lose the volume when it's warmed. Whip it on ice water if the room feels warm.
- Do not whip heavy cream until it gets separated. It should still look stiff yet fluffy.
Roll the cake.
- Some parchment papers stick to the surface of the cake and peel off the skin - To prevent that from happening, apply a thin layer of oil all around.
- Place the new parchment paper on a cake, flip, and peel off the parchment paper attached to the bottom.
- Trim the 2 sides of the cake with a knife for clean cuts. On the opposite short end, make a diagonal cut at the edge to ensure a smoother seal for the rolled-up cake.
- Insert three to five shallow cuts parallel to the short edge with about half-inch intervals so that you can roll the cake a little bit more easily.
- Apply cake syrup all over the surface.


- Spread the cream with an offset spatula. I made a slide shape like in the image to tact the cream in the center, but this is not necessary. You can spread evenly to create more spiral shapes if you prefer. Do not apply a lot of cream on the edge so that the cream does not come out.
- Lift the parchment paper, and push the edge inward gently to make the small circle shape. Use your fingers if it's easier.


- Once the small circle is created, hold the parchment paper with the other hand to prevent it from moving and pull the parchment paper forward to finish rolling. Ensure that the edge of the sponge cake is on the very bottom.
- Tape the parchment paper or wrap it tight with a towel so that it stays tight.
- Chill it in the fridge for one to two hours before you slice it.


Tips💡
- If your table is slippery when rolling it, lay a towel on the bottom so that the parchment paper does not slide.
- Tighten the cake with a spatula if it's not tight enough - Watch the video tutorial to see the movement.
- You can also roll it toward the longer side to create more spirals with the sponge layer. Just note that the cake gets thicker when doing it.
📌 How to slice it
- To slice the cake beautifully, warm a knife with hot water.
- Wipe off the moisture and slice the cake moving a knife back and forth as you support the cake with a hand.
- Clean off the cream with a knife and repeat the process.
Enjoy the vanilla roll cake as is or with any fruits of your choice!


📌 How to store it
Wrap the surface of the cake if it's not frosted to prevent it from getting dried. The cake can be stored in an airtight container in the fridge for up to 4 - 5 days. Consume it within the first few days to enjoy the best taste.
Do not leave the roll cake at room temperature for many hours since the whipped cream can slowly lose its stability. Use buttercream instead when you need to leave it at room temperature for long hours.
📌 FAQ & Troubleshooting
Troubleshooting
There are a couple of causes I could think of, such as:
1. The sponge cake was overbaked.
2. It was left at room temperature for too long before rolling it.
The most common causes are:
1. The sponge was overbaked.
2. Too much pressure was added when rolling the cake. Touch very gently.
The common causes are:
1. The meringue was not whipped enough.
2. The cake batter was over-mixed.
3. It took too long to fold the batter and spread it on a pan, which eliminated too many air bubbles inside the whipped eggs. Move as fast as you can when combining the mixtures.
4. All-purpose flour was used instead of cake flour.
1. It might be because of the fat content in the heavy cream. I do not recommend using heavy cream with less than 35% fat content. Ensure that it is suitable as whipped cream for baking.
2. The room was so warm that it didn't whip properly. Find the coolest spot in your room and whip it on ice water to keep it cool.
Other FAQs
Yes, just note to adjust the time accordingly - The bigger the pan is, the less time it takes for the sponge cake to be baked since it's thinner. Make 1.5 - 2 baches or more if needed.
Yes, you can. Any buttercream hardened in the fridge, so leave it at room temperature ahead if you want to enjoy the softer texture.
This sponge cake rises mainly with the powder of whipped eggs - By whipping eggs, they hold lots of air bubbles inside which expands in the oven as heated. Whipping eggs a lot and baking as quickly as possible before they get killed too much is the key to making the fluffy texture.
📌 VIDEO: Watch how to make it!
To learn how to make the vanilla roll cake visually and have a deeper understanding of all, watch the video!
📌 Other variations of vanilla roll cake
You can enjoy the vanilla roll cake in many other variations by changing the filling, such as:
- Jam: Strawberry jam, raspberry jam, blueberry jam, etc.
- Whipped cream with other flavors: Chocolate whipped cream, Matcha whipped cream, coffee whipped cream, etc.
- Buttercream: Swiss buttercream, Italian buttercream, American buttercream, etc.
- Cream cheese filling
Add your favorite ingredients in addition to the cream filling, such as:
- Fresh berries
- Caramel sauce
- Chocolate ganache
- Lemon curd
Decorate the cake with:
- Fresh fruit
- Fresh herbs
- Cream filling: Frost the surface of the cake with any frosting listed above.
Try it in different ways and enjoy it on any special occasion!

📌 Other fluffy cake recipes you may like
- Buche de Noel (Yule Log Cake)
- Vanilla Sponge Cake (Genoise Sponge Cake)
- Chocolate Sponge Cake (Genoise Sponge Cake)
- Matcha Sponge Cake (Genoise Sponge Cake)
- Strawberry Cream Chiffon Cake
💬 If you loved this recipe, please share your feedback on this post! I always love hearing how you enjoyed it with your friends and family.
📌 Printable Recipe

Fluffy Vanilla Roll Cake
Equipment
- Spatula
- Sheet pan 10.5" (26.6 cm) x 15" (38 cm)
- Parchment paper
- Sieve
- Stand mixer with a whisk attachment or hand mixer
- Bowl
- Whisk
Ingredients
Vanilla Sponge Cake
- 3.5 oz Egg yolks about 6 large eggs
- 1 oz Granulated sugar for yolks
- ¼ pod Vanilla beans or vanilla extract: ½ tsp
- 6 oz Egg white about 5 large eggs
- 2.5 oz Granulated sugar for meringue
- 3 oz Cake flour
- 1 oz Milk 2 Tbsp
- 1.8 oz Oil
Cake Syrup
- 1 oz Granulated sugar
- 1 oz Water
Cream Filling
- 8.8 oz Heavy cream
- 0.3 oz Granulated sugar
- ¼ pod Vanilla beans or vanilla extract: ½ tsp
Instructions
- Preparation1. Separate eggs. 2. Lay parchment paper on a baking sheet (10.5" | 26.6 cm x 15" | 38 cm). Make small cuts on corners so it fits nicely.3. Combine milk and oil ahead. We're going to add them at the very end of the mixing process. 4. Sift cake flour with a fine sieve. 5. Preheat the oven at 355°F | 180°C.Tips💡1. Ensure that no yolks, other oils, or liquids are mixed in the egg white and tools since they can prevent the egg white from whipping well.2. Cake flour gets lumpy more easily than all-purpose flour or bread flour. I recommend sifting it to get the best result.

- Make the egg yolk mixture.1. Mix yolks, vanilla beans (or vanilla extract) and sugar.2. Whip it well until it gets very fluffy and pale. By doing this, it contains a lot of air, which leads to a very fluffy sponge.Tips💡1. After you add sugar to yolks, quickly mix them to prevent them from creating lumps that are harder to remove later.2. Clean up the side of a bowl since it can dry quickly and be difficult to clean up later.3.5 oz Egg yolks, 1 oz Granulated sugar for yolks, ¼ pod Vanilla beans
- Make the meringue.1. Whip egg white at medium to high speed using a stand mixer with a whisk attachment until it gets bubbly like hand soap.2. Add about half of the sugar and continue whipping. 3. Add the rest of the sugar once it looks more fluffy like fluffy shampoo.4. Continue whipping it until it gets to the soft peaks. Toward the end, whip it at low speed for about a few minutes or more to make the air bubbles smaller.Tip💡Do not whip it too much until it gets very stiff since it'll be harder to incorporate it into the yolk mixture. When you mix it with a whisk and lift it, the tip should curl up. I always do the test before using it.6 oz Egg white, 2.5 oz Granulated sugar for meringue
- Combine the mixtures.1. Add about one-third of the meringue to the yolk mixture and fold it with a whisk. Repeat scooping and tossing as you turn the bowl. Watch the video tutorial to check the movement.2. Add the rest of the meringue and fold it.3. After 70 - 80 % is mixed, add sifted cake flour. Continue folding until you don't see any more flour.4. Add milk and oil and continue folding until 70 - 80 % is mixed.5. Switch to a spatula, and clean up the side and the bottom of the bowl to ensure everything is blended evenly. Tips💡1. Do not mix the batter vigorously to prevent the air bubbles in eggs from getting eliminated too much. Much fewer air bubbles lead to a flatter sponge cake. 2. I used a whisk to fold the batter in the beginning since I can finish folding with less time and it can break down lumps of meringue more effectively. You can also use a spatula as well if you prefer it.3. Check if it's folded enough, using a spatula: Scoop the batter and drop - It should flow nicely like ribbons.3 oz Cake flour, 1 oz Milk, 1.8 oz Oil
- Bake the cake.1. Pour the cake batter into the prepared pan and flatten the surface with an offset spatula.2. Hit the pan on a table a few times to remove some big air bubbles.3. Bake it in the preheated oven at 355°F | 180°C for about 10 - 15 minutes, depending on the oven.4. Remove it from the pan and cool it on a cooling rack.Tips💡1. Be careful not to overbake it as the cake can crack as you roll when it's dry.2. Adjust the time when you are using a pan with a different size - It bakes faster when it's bigger.
- Make cake syrup.Make cake syrup while the sponge is in the oven so that it can cool by the time you use it.1. Combine sugar and water and heat it with the microwave or in a pot.2. Mix it and check if the sugar is dissolved. Set it aside.Tip💡Applying cake syrup is an extra step, but I highly recommend doing it to keep the sponge very moist and exceptionally delicious.1 oz Granulated sugar, 1 oz Water
- Make the cream filling.1. Whip heavy cream, sugar, and vanilla beans (or vanilla extract) together.2. Whip until it gets very stiff since the sponge is very fluffy and delicate - we want the stiff cream to support the body.Tips💡1. Heavy cream does not whip properly or lose the volume when it's warmed. Whip it on ice water if the room feels warm.2. Do not whip heavy cream until it gets separated. It should still look stiff yet fluffy.8.8 oz Heavy cream, 0.3 oz Granulated sugar, ¼ pod Vanilla beans
- Roll the cake.1. Some parchment papers stick to the surface of the cake and peel off the skin - To prevent that from happening, apply a thin layer of oil all around.2. Place the new parchment paper on a cake, flip, and peel off the parchment paper attached to the bottom. 3. Trim the 2 sides of the cake with a knife for clean cuts. On the opposite short end, make a diagonal cut at the edge to ensure a smoother seal for the rolled-up cake.4. Insert three to five shallow cuts parallel to the short edge with about half-inch intervals so that you can roll the cake a little bit more easily.5. Apply cake syrup all over the surface. 6. Spread the cream with an offset spatula. I made a slide shape like in the image to tact the cream in the center, but this is not necessary. You can spread evenly to create more spiral shapes if you prefer. Do not apply a lot of cream on the edge so that the cream does not come out. 7. Lift the parchment paper, and push the edge inward gently to make the small circle shape. Use your fingers if it's easier. 8. Once the small circle is created, hold the parchment paper with the other hand to prevent it from moving and pull the parchment paper forward to finish rolling. Ensure that the edge of the sponge cake is on the very bottom.9. Tape the parchment paper or wrap it tight with a towel so that it stays tight.10. Chill it in the fridge for one to two hours before you slice it.Tips💡1. If your table is slippery when rolling it, lay a towel on the bottom so that the parchment paper does not slide.2. Tighten the cake with a spatula if it's not tight enough - Watch the video tutorial to see the movement.3. You can also roll it toward the longer side to create more spirals with the sponge layer. Just note that the cake gets thicker when doing it.


Video
Notes
How To Store it
Wrap the surface of the cake if it's not frosted to prevent it from getting dried. The cake can be stored in an airtight container in the fridge for up to 4 - 5 days. Consume it within the first few days to enjoy the best taste.Nutrition
📌 Pin it!
Pin it if you love this recipe, and find so many other recipes on my Pinterest page!

Leave a Reply