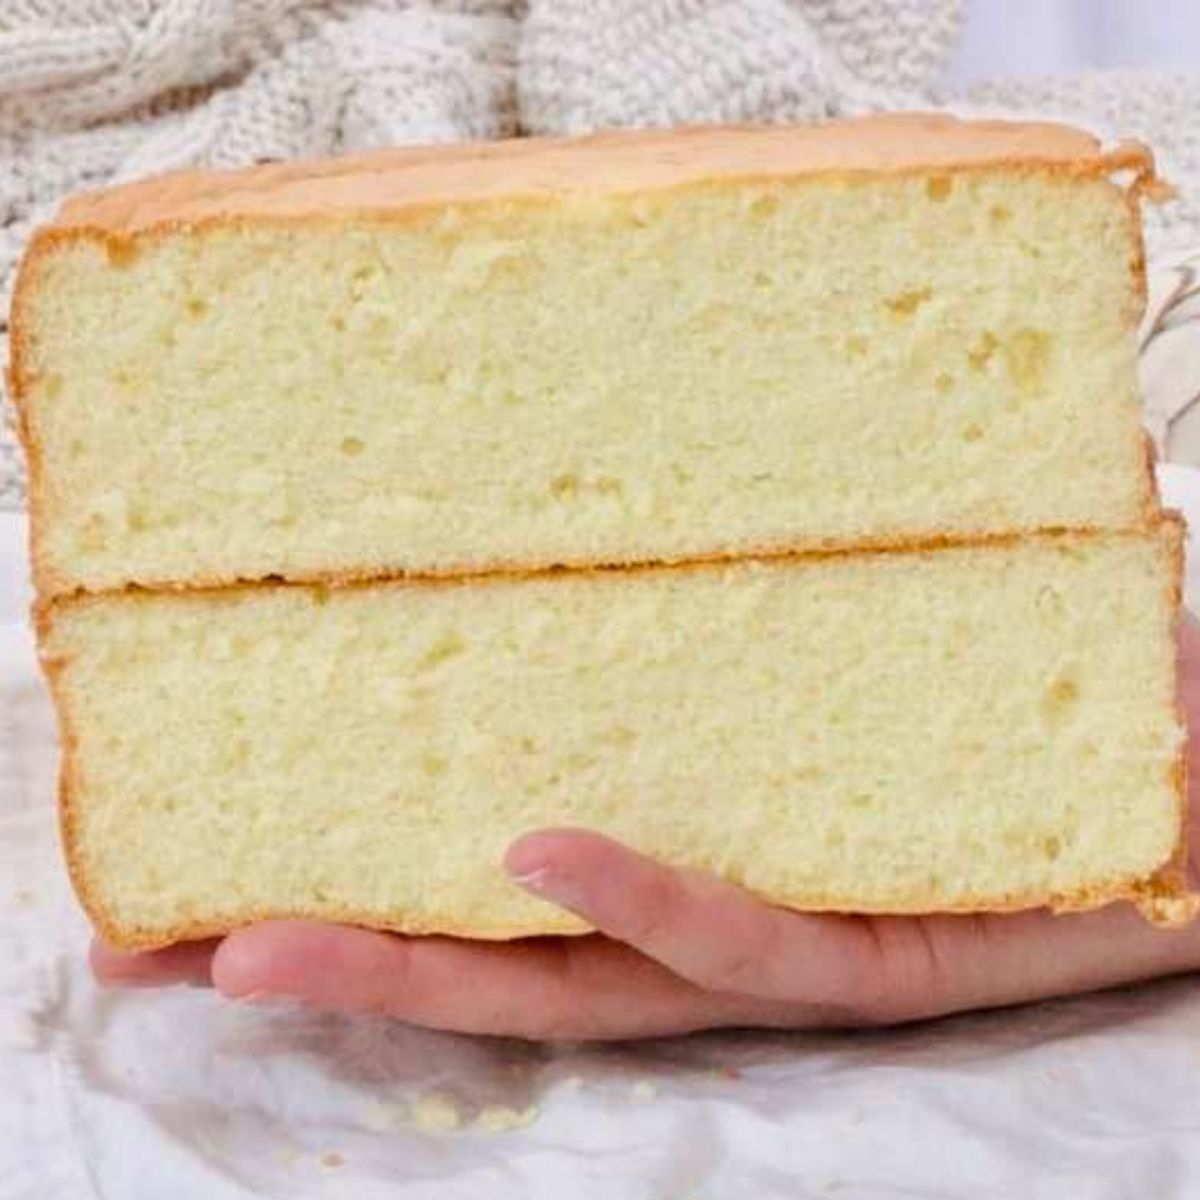
Today, I’m sharing EVERYTHING about how to make the incredibly fluffy sponge cake. Use this light, silky, soft sponge cake for various desserts, such as roll cakes, cupcakes, whole cakes, etc.
Jump to:
📌 The common issues
Even though the steps and ingredients are VERY simple, one mistake can dramatically affect the texture. You might get problems such as:
- It did not rise well.
- The texture was rough.
- The batter was so loose.
- The cake was dried.
... and so on. I encountered all the issues before. After baking sponge cakes hundreds of times, I finally figured out how to avoid them. And I'm excited to share all the troubleshooting in this post so you can make it successful at home!
📌 What you'll learn in this post:
In this post, you'll learn essential baking tips such as:
- Crucial tips to make fluffy sponge cake
- How to make the texture so fine and silky
- 4 Tips for folding the batter professionally
- How to make the cake syrup
- The difference between genoise sponge and biscuit sponge cake
... and more!
Let's get started.
📌 What's In Fluffy Sponge Cake?
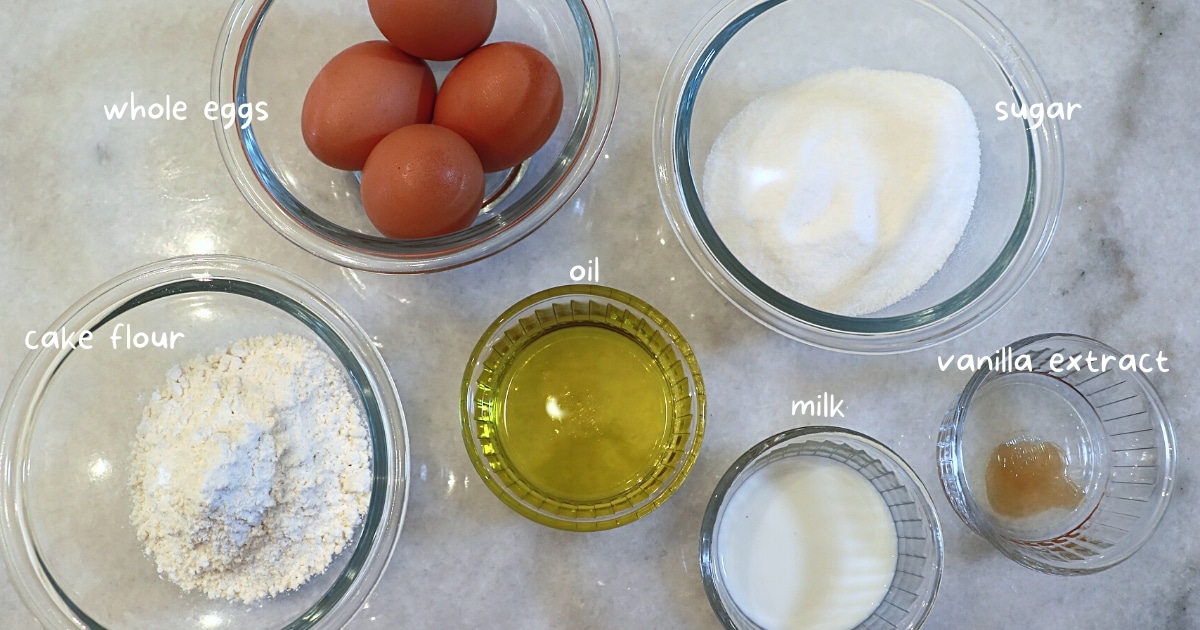
6 Simple Ingredients
- Whole eggs: The sponge rises with a power of whipped eggs today. The key ingredient for the fluffy texture!
- Granulated sugar: Sugar helps to create a fine and moist texture.
- Cake flour: For this cake, use cake flour instead of all-purpose flour to make the texture very fluffy. I tried it with all-purpose flour (With less amount or even with homemade all-purpose flour by mixing all-purpose flour and cornstarch), but the texture and height of the cake changed a lot.
- Milk: It helps to make a moister sponge cake. It also adds a nice flavor!
- Oil: I like to use olive oil as a healthier option, but any regular oils work.
- Vanilla extract (Optional): Use vanilla beans or other extracts. Be careful not to add it too much; The texture gets less fluffy and silky when you add it too much.
📌 How To Make Fluffy Sponge Cake
Preparations
- Preheat the oven to 355 F | 180 C
- Prepare hot, simmering water to warm eggs.
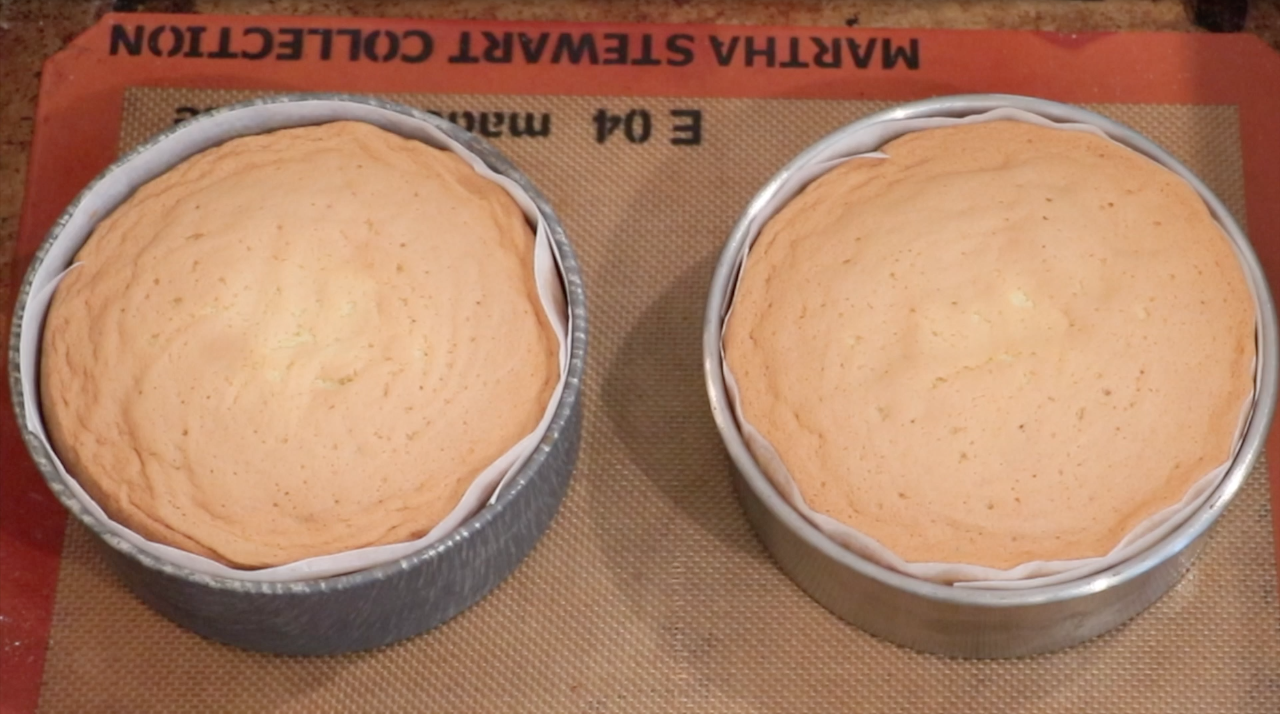
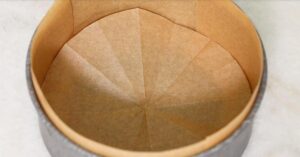
- Set up cake liners inside a pan. (Or you can coat a thin layer of butter, dust flour on top, and toss to remove excess.)
- Sift cake flour.
- (Combine milk, oil, and vanilla ahead.)
If you have not made this sponge many times yet, I recommend finishing up the preparations ahead. It'll allow you to focus on the tips in each step without feeling completely overwhelmed.
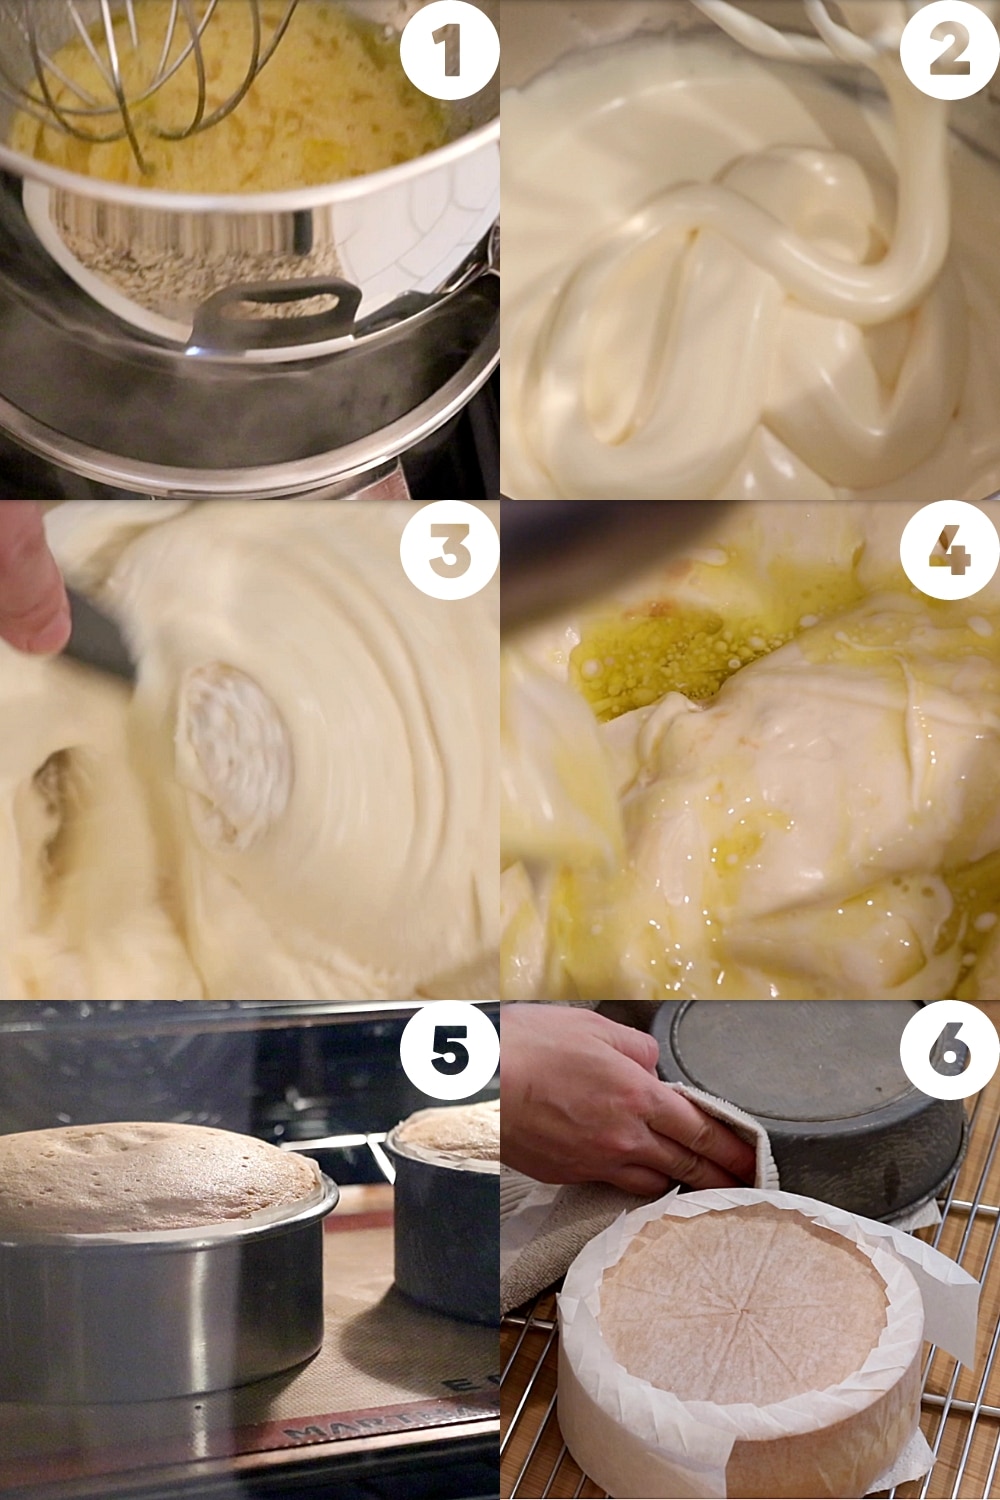
6 Steps To Make Fluffy Sponge Cake
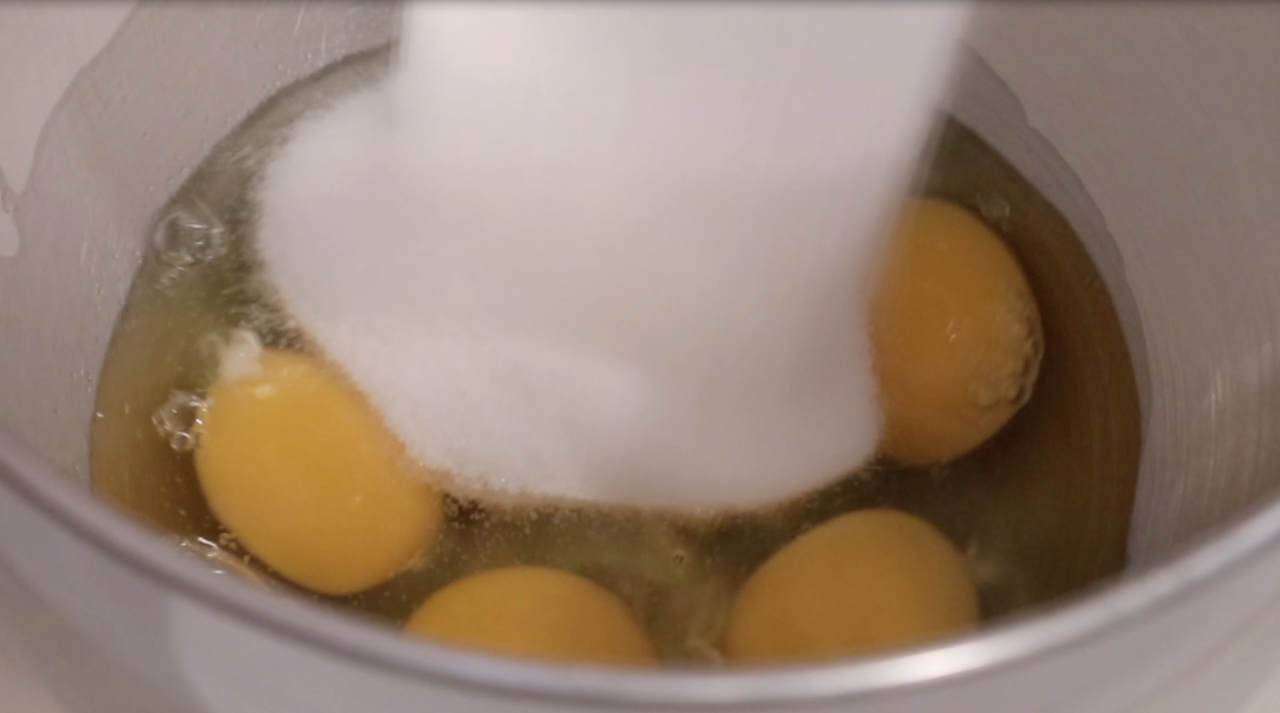
- Warm whole eggs and sugar with a water bath, constantly mixing until it feels warm, like bath water.
- Whip whole eggs and sugar.
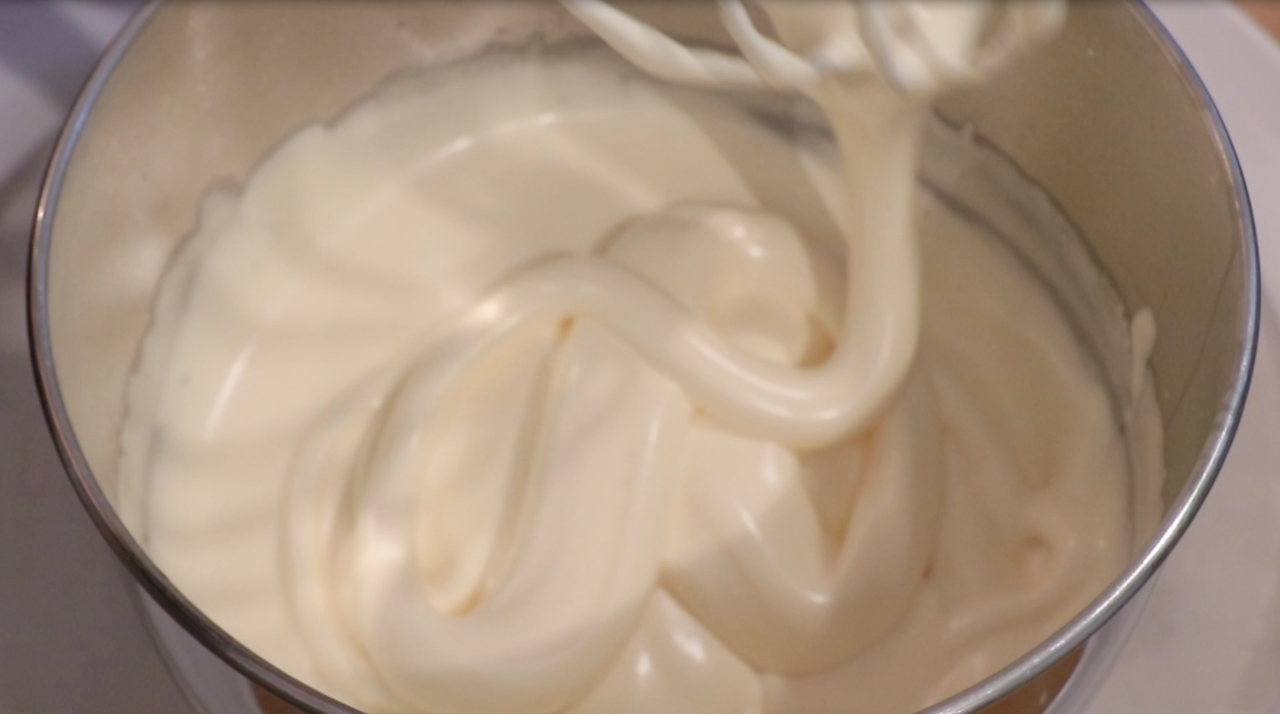
- Start whipping at high speed to make it fluffy. (Drop the batter with a whisk. It should flow slowly, and the lines should stay on the surface.)
- Finish at low speed to make air bubbles smaller until it looks very shiny.
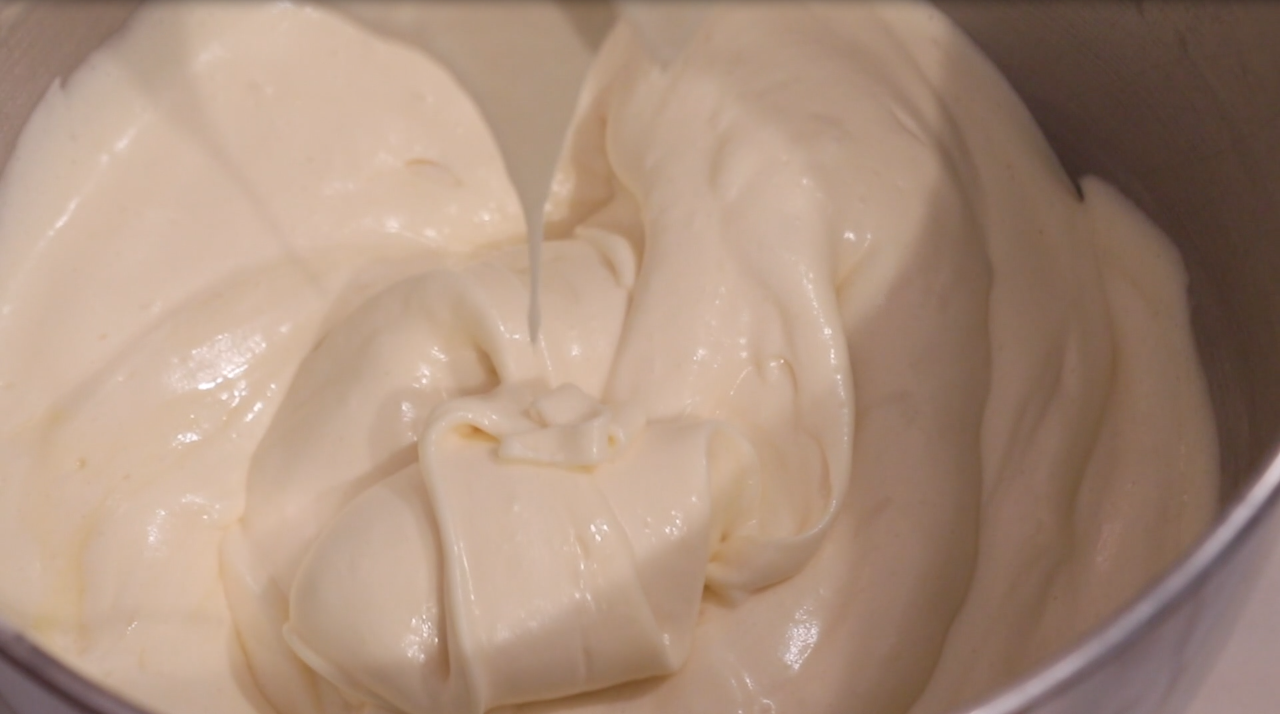
- Add the sifted cake flour and fold until you don’t see any flour.
- Add milk and oil and fold until everything is mixed evenly and the batter flows smoothly when dropping it with a spatula.
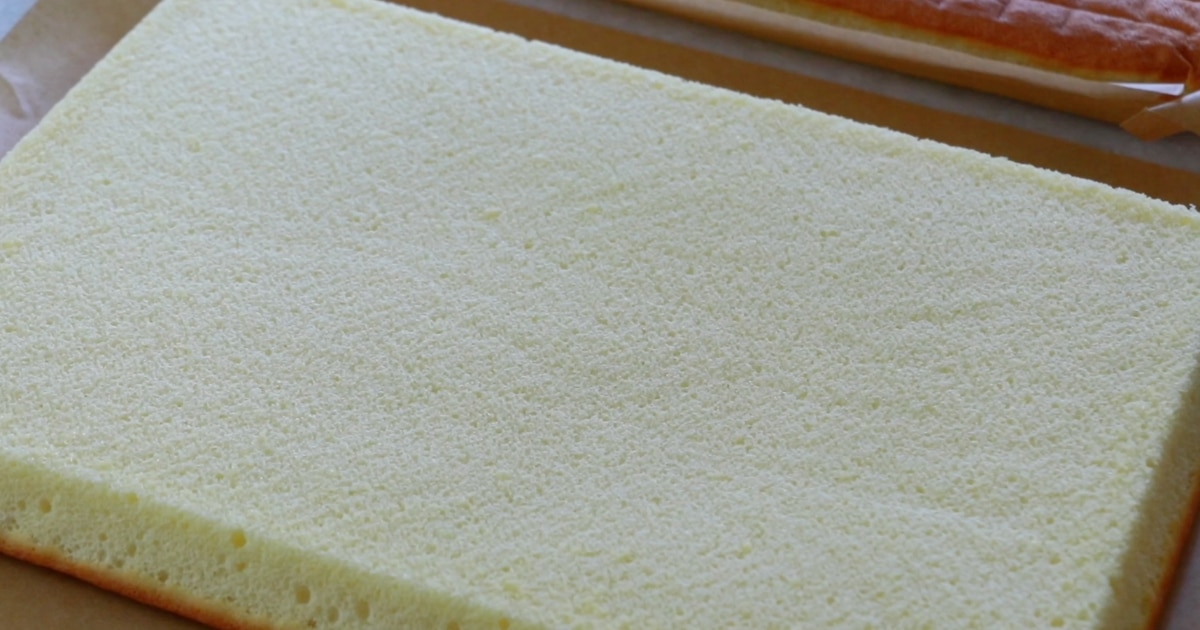
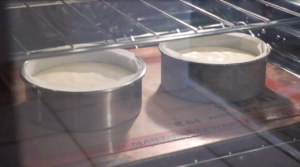
- Pour into a pan and Bake at 355 F | 180 C.
- for 25 - 30 minutes for 2 6" pans
- for 30 - 35 minutes for 1 8” pan
- Adjust the time and temperature depending on the oven.
- After it's out of the oven, flip it and let it cool completely before slicing it.
Essential Tips For Each Step
Now, let me share detailed tips on each step, which are crucial for making a fluffy sponge cake successful.
Step 1: Warm whole eggs and sugar with a water bath, constantly mixing until it feels warm.
Tips💡:
- Once you add sugar to the eggs, mix immediately with a whisk so that the egg yolks do not absorb it and create lumps.
- Warming the eggs makes them whipped enough in a much shorter time.
- To ensure that we are not cooking eggs with simmering water, there are some things we can do:
- Once the water starts boiling, I turn off the heat or lower it before use.
- Ensure that the bowl of eggs is NOT soaked in the hot water.
- Heat it until it reaches 100 - 113 F | 37.5 - 45 C. I usually do not check the temperature with a thermometer, but instead (You can if you like!), insert a finger and check: it should be comfortably warm like a baby bath.
- Mix constantly as you heat.
- When you check the temperature, try doing it quickly or remove it from heat for seconds.

Step 2: Whip whole eggs and sugar.

Tips💡:
- Start whipping right away while the eggs are still warm.
- You can use a stand mixer or hand mixer, whichever you prefer. With a stand mixer, you can do other prep work while whipping. And it also takes a lot less time to finish.
How much should I whip the eggs?
How much you whip it is EXTREMELY important. The most crucial part. A lot of people fail here by not whipping it enough.
When you don't whip enough, it does not contain enough air bubbles inside, leading to a shorter, less fluffy cake.
How to check if the egg is whipped enough
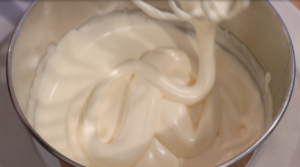
- Stop your mixer, scoop the batter with a whisk, and drop - It should flow slowly like a ribbon.
- Check if the dropped lines stay on the surface.
Whip it at low speed at the end.
After whipping eggs at high speed, it is not quite done yet! - The size of the bubbles is big at this point. And that leads to a rough sponge texture.
To finish off, whip more at low speed until it looks shiner and smoother. - for about 5 minutes with one batch of this recipe. It creates a more silky, fine texture!
Because those small bubbles do not get eliminated as easily as big ones, the sponge rises more and gets fluffier.
Before whipping at low speed:
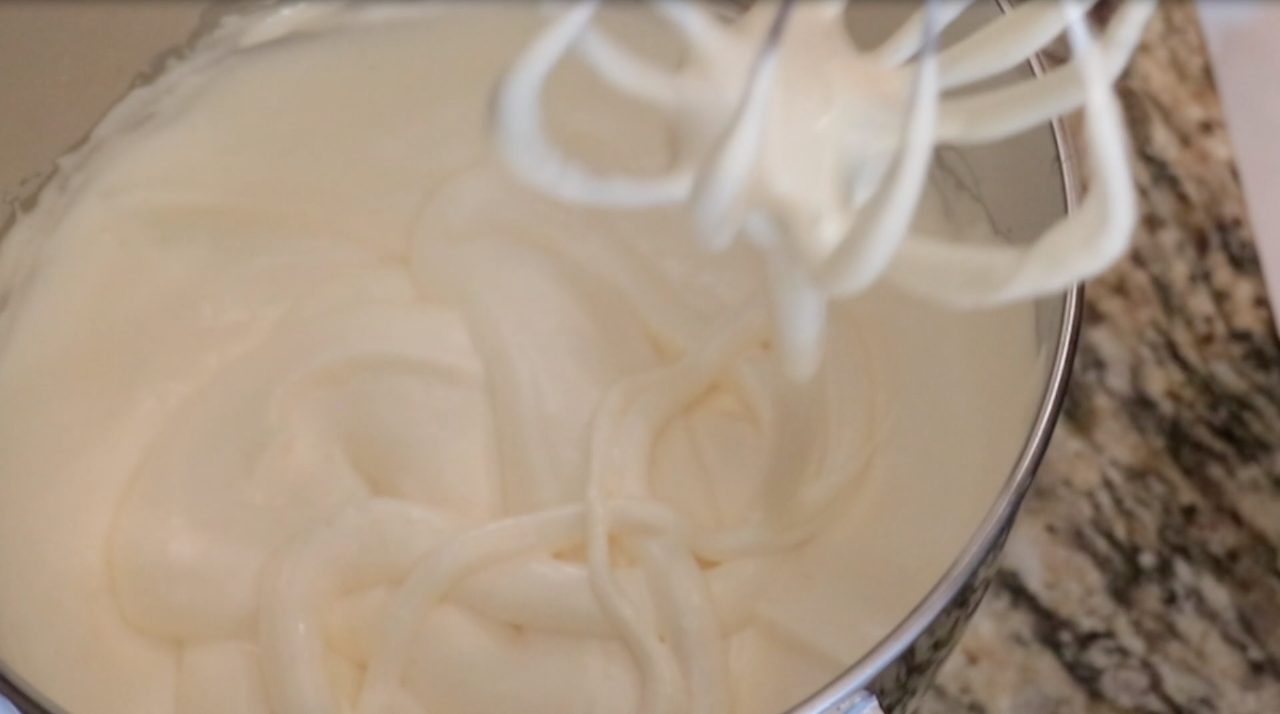
After whipping at low speed:
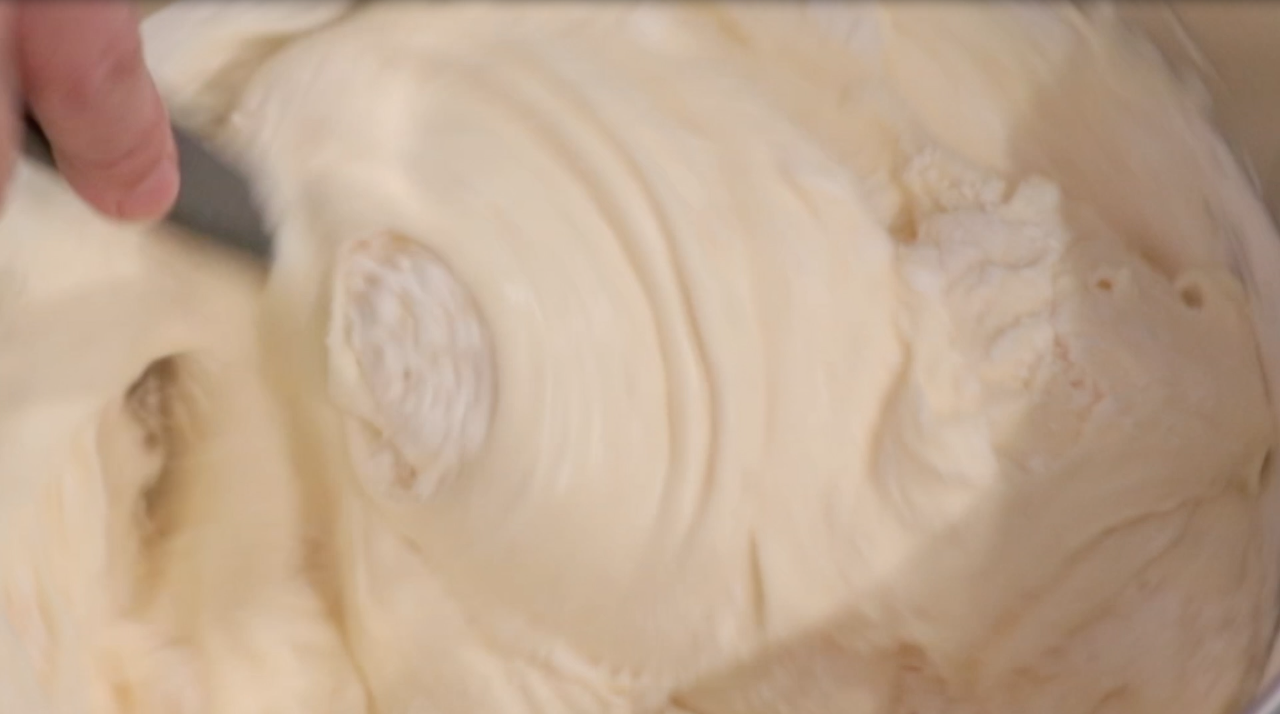
Step 3: Add cake flour and fold until you don’t see any flour.
Tips💡:
- After you add cake flour, start folding other ingredients as quickly as possible and put them in the oven while the condition of bubbles is the best. (I like to sift flour ahead to start folding right away.)
- You can avoid killing too many air bubbles by folding instead of vigorously mixing.
- 4 tips for folding sponge batter: (Check out the video tutorial to see it visually!)
- Move your spatula like you draw a "J."
- As you move your spatula, move your bowl about 45 - 90 degrees so that you can mix evenly.
- Fold fast. That helps to break down chunks of flour. The air bubbles stay more stable by finishing up faster, resulting in a taller, fluffier sponge.
- Clean your spatula and bowl on the way to ensure you do not miss any uneven parts. Ensure that no flour is left on the bottom or sides.
Step 4: Add Liquids and fold until the batter flows smoothly when dropping it with a spatula.
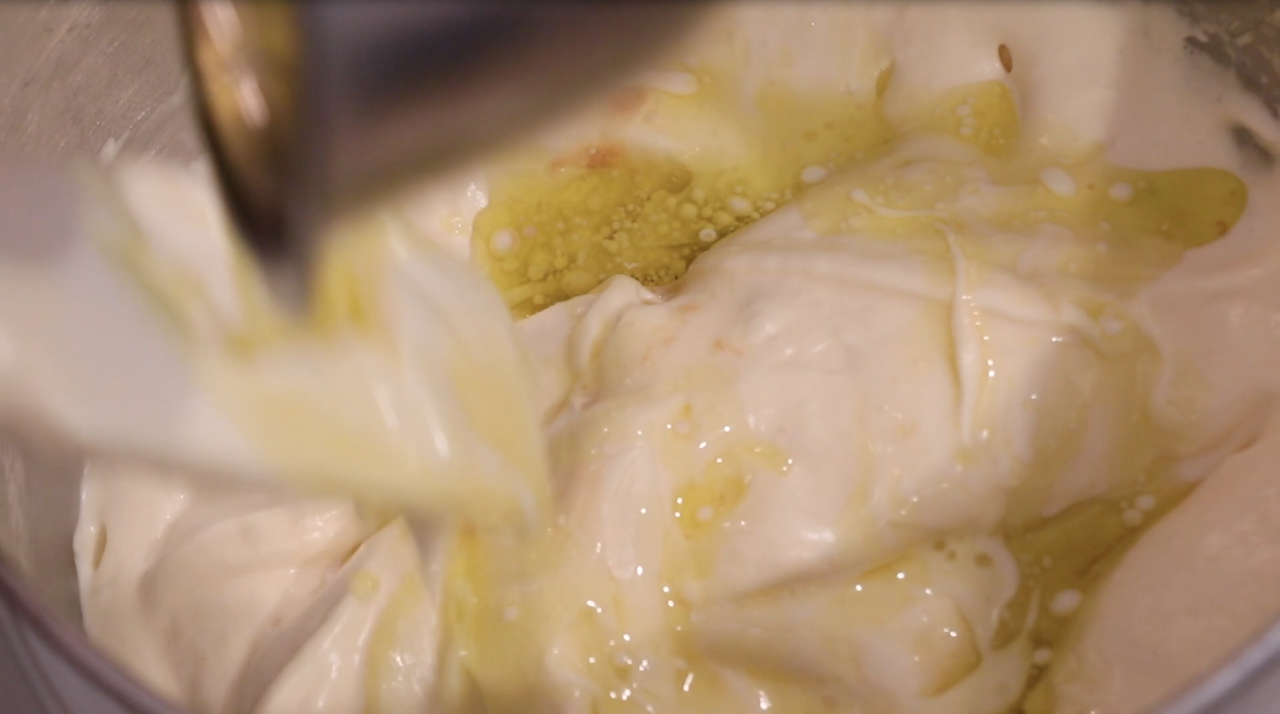
Tips💡:
- When you add the liquids while you still see flour, they touch each other directly, and it sometimes creates lumps that are more difficult to break down later. It's not a deal-breaker, but it is something to be mindful of!
- At the end, check the bottom of a bowl one last time to ensure everything is incorporated evenly.
How much should we fold the batter?
How much you fold is very important. This is the 2nd part many people fail by either folding too much or folding less:
- When you fold less, your sponge gets more volume and rises a lot, but the texture is rougher and not silky enough.
- When you fold too much, too many air bubbles get killed, leading to a shorter, less fluffy sponge.
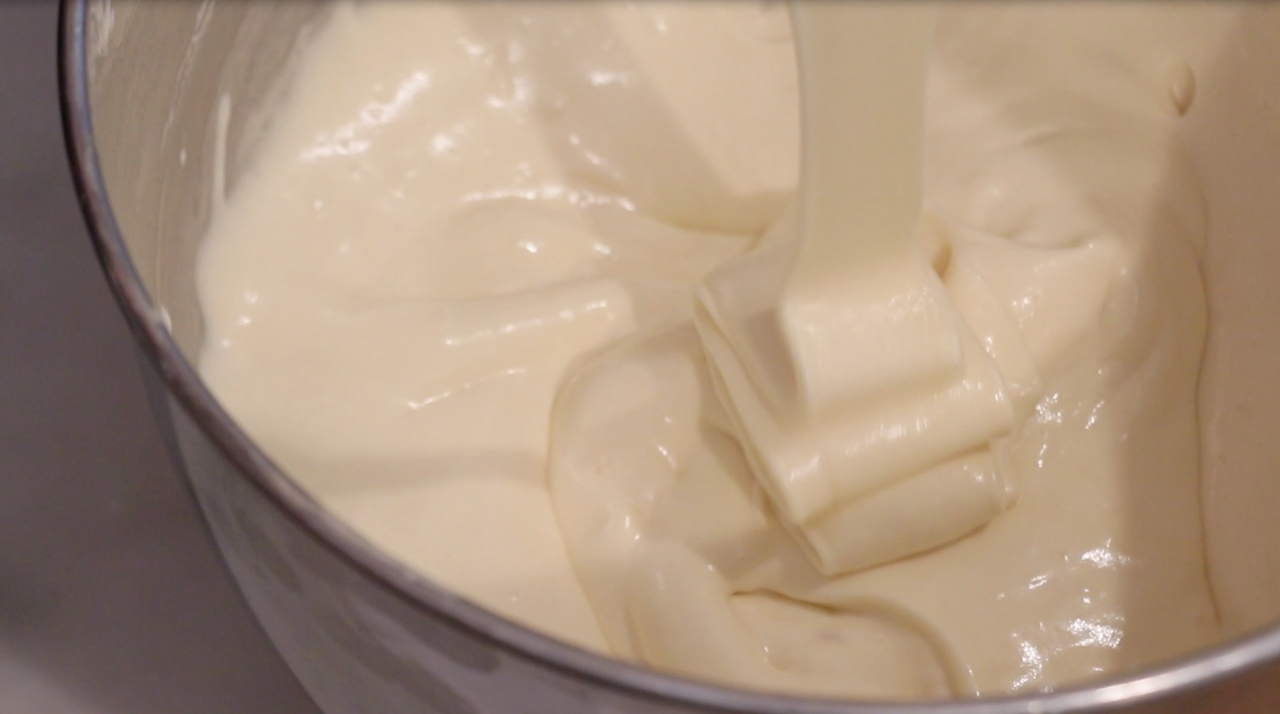
How to check if the batter is folded enough
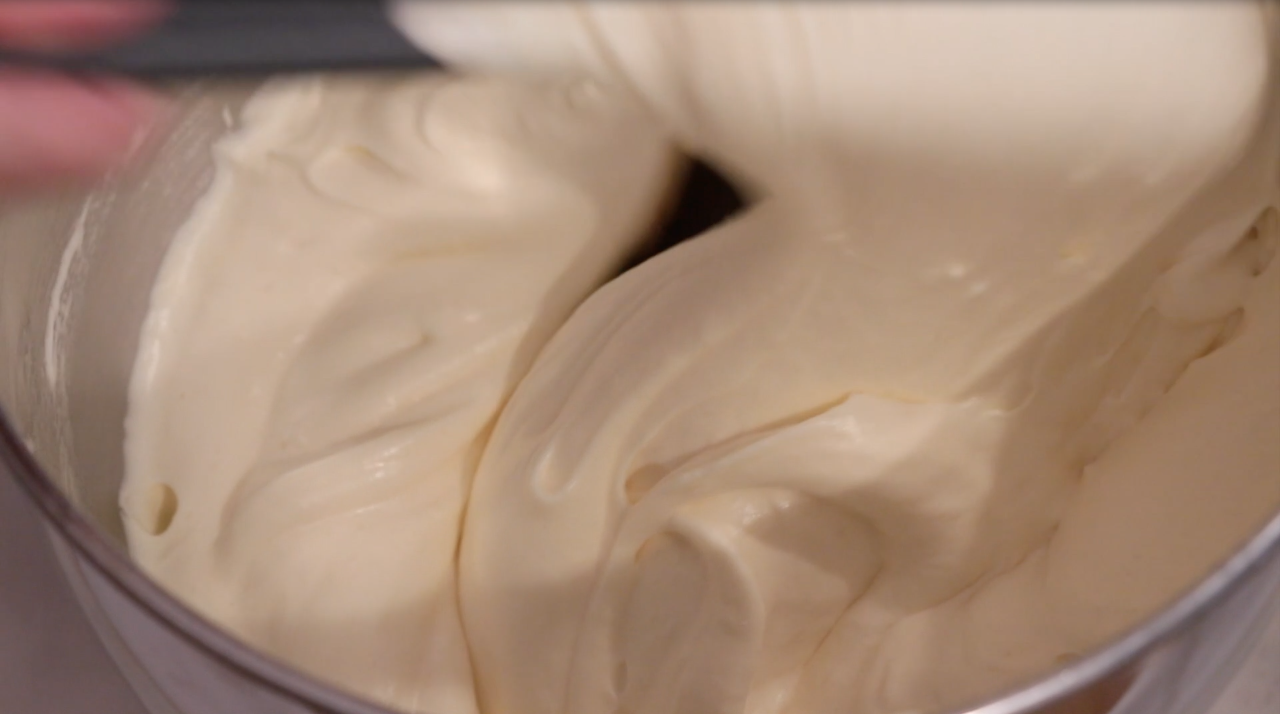
Scoop a lot of the batter and drop:
❌ When it drops and does not flow much, it is not done yet.
⭕️ When it flows smoothly like a ribbon, it is done!
Check out the video tutorial to see the movement visually.
It drops and doesn't flow. Not done yet!:
It flows like a ribbon. Done!:
Should I use butter or oil?
And as fat, some people use butter instead of oil. So what difference do they make?
Oil is a liquid base, so the sponge tends to rise more and create a lighter texture even after it's cooled down, just like chiffon cakes. Also, you do not need to let it melt beforehand like butter.
When adding butter, you'll need to melt it beforehand until it feels very warm. If it's not warm enough, it'll start getting hardened as you fold it into the batter.
The benefit of butter is adding a nice flavor to your sponge.
Pick whichever you like, depending on what flavor and texture you like!
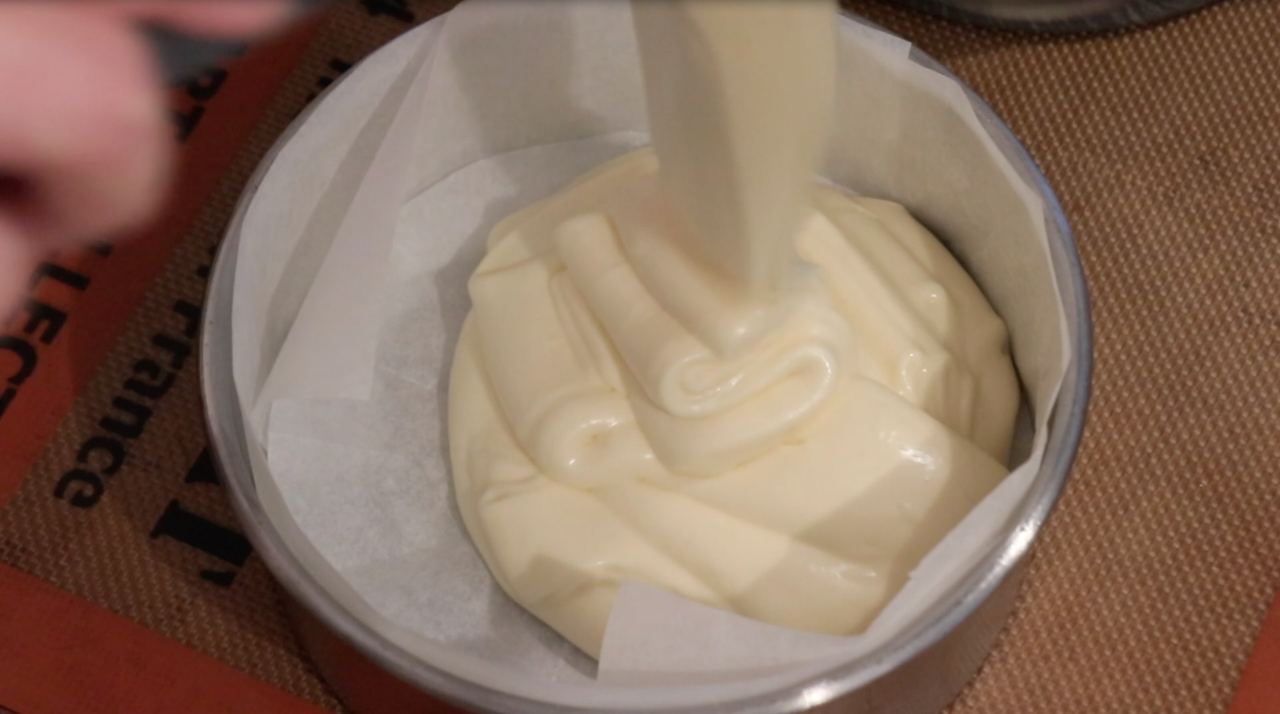
Step 5: Pour into a pan and bake at 355 F | 180 C
Tips💡:
- The most important thing at this point is to pour it into a pan as FAST as possible and bake it right away while the condition of the batter is still great.
- Even though you whip the batter at low speed to make air bubbles small, some big air bubbles get created during the folding process. Try these to resolve it:
- Toss the pan at least a few times to give it a shock.
- Swirl it with a toothpick.

How do I know if it's baked enough?
There are 2 ways you can use to check if it's baked enough:
- Touch the surface and see if it bounces back gently.
- Insert a toothpick and see if it comes off clean.
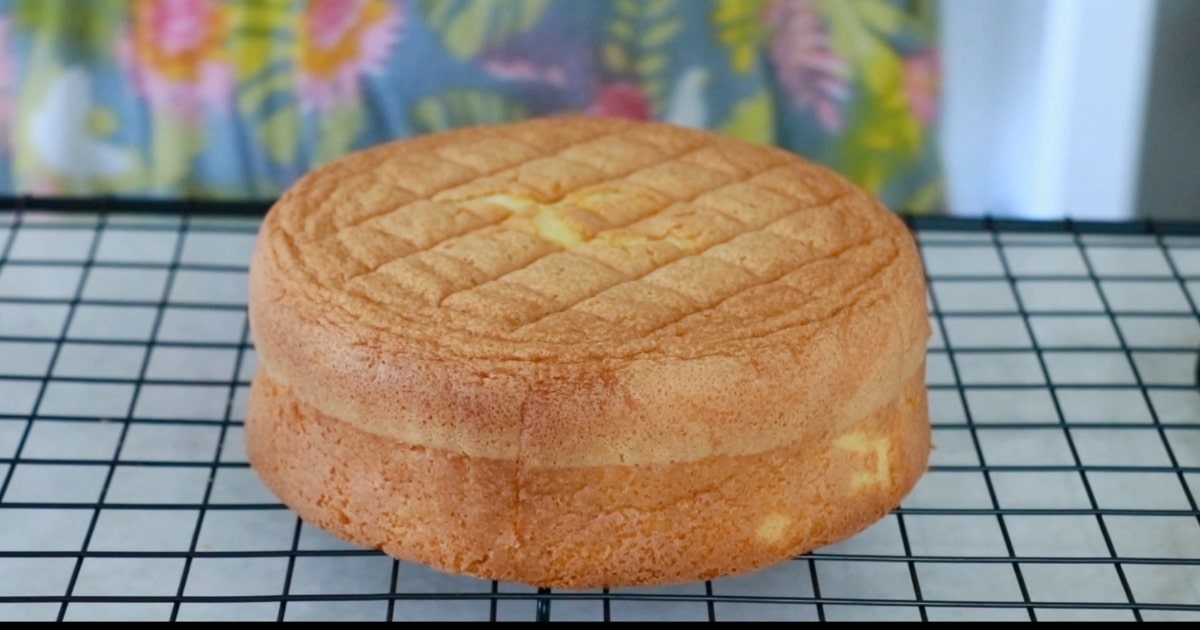
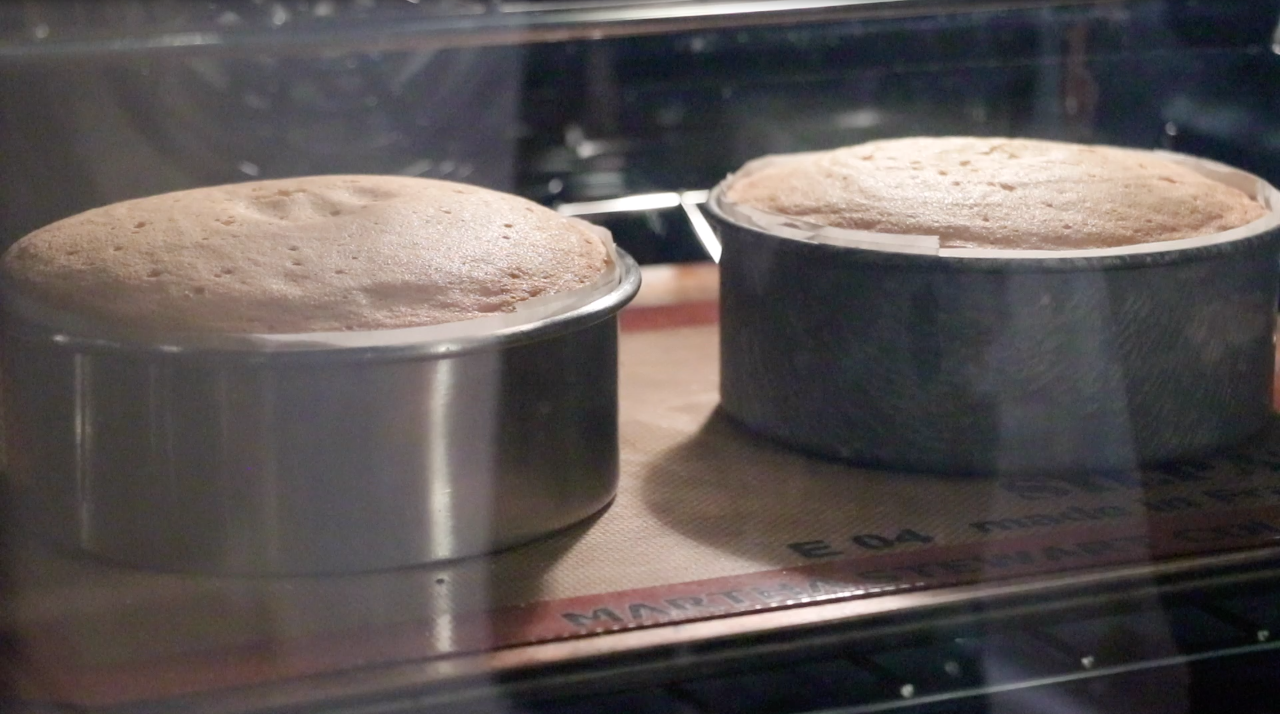
Bake until the center is cooked through. The sponge slightly shrinks in the oven when that happens.
Keep in mind that the sponge still gets cooked up with the remaining heat. I take it out from the oven when about 98% is cooked.
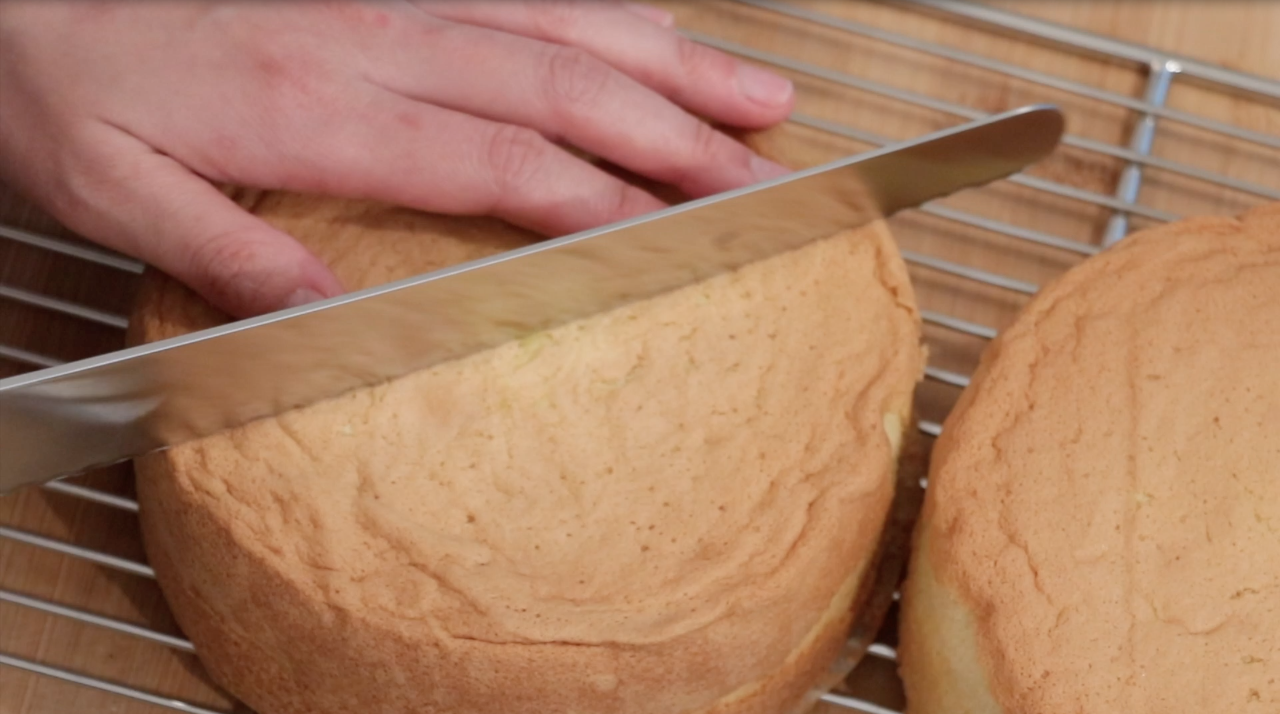
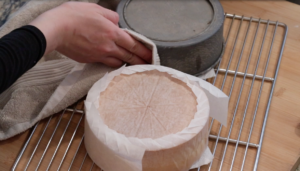
Step 6: After it's out of the oven, flip it and let it cool completely.
Tips💡:
- As soon as it's removed from the oven, I like to give it "a shock" by dropping it a few times on a table (1 - 2 inches away). The purpose is to release steam to prevent the sponge from deflating too much. *Do NOT drop from too high since the sponge can get torn off.
- The sponge is very fragile when it is hot. Do not cut the sponge while it is still warm since it'll be harder to cut clean.

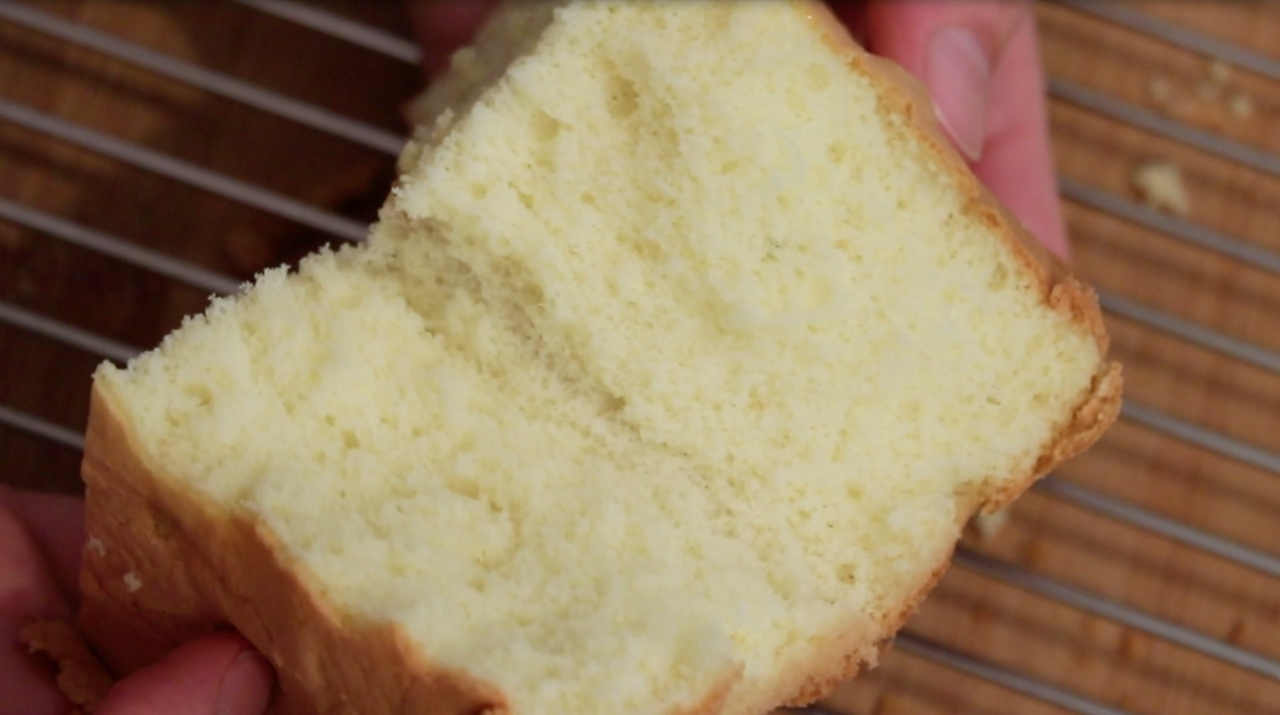
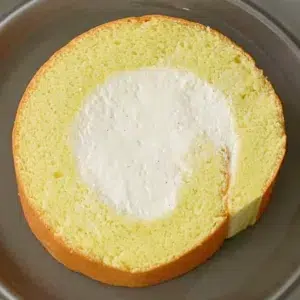
I use this sponge for many kinds of cakes, and it always turns out amazing. I especially LOVE a strawberry shortcake with this sponge! The perfectly fluffy sponge and light whipped cream is a heavenly combination.
📌 Simple Syrup for Fluffy Sponge Cake
Like any other genoise sponge cake, which does not contain lots of oil or liquid, this sponge cake can feel drier after some time in the fridge, especially after a few days. To resolve the issue, I recommend applying cake syrup to moisten it.
I often apply cake syrup when making a whole cake with the sponge cake. It feels more moist and creates more delicate softness.
How to make simple cake syrup
Melt the sugar with hot water. You can also heat them in the microwave or a pot. The most commonly used ratio is 1 (water) to 1 (sugar).
If you prefer less sweet sponge cake, try a 2 (water) to 1 (sugar) ratio.
How much should I apply for a whole cake?
For a 6" cake, I usually apply about 1.5 oz | 45 g (3 Tbsp) of cake syrup. There is no need to add lots of it. Applying too much of it can result in a soggy sponge cake.
📌 Frequently Asked Questions
To store it, wrap it tightly, put it in a ziploc bag, or wrap it one more time. And use it up within a few days, ideally. You can also freeze for up to a few months. Or eat it right away for the very best taste!
The sponge's texture will not be the same with all-purpose flour. It creates more gluten, making the sponge heavier and less fluffy. I highly recommend using cake flour if you can get it!
That can happen in these processes:
* Eggs were not whipped enough. The batter didn't contain enough air bubbles because of that.
* The batter was over-mixed after adding flour, milk, and oil.
* Many air bubbles disappeared because the batter was not baked right away. After you practice for some time, you naturally start moving faster!
Here are the possible causes:
* You did not whip at a low speed for long enough at the end of the whipping process. The air bubbles remained big because of that.
* You did not fold the batter enough. By under-mixing the batter, it contains more air bubbles and rises more in the oven, BUT you'll feel it is less silky and slightly rougher.
When it deflated more than slightly, the sponge might not be baked enough: It shrinks because the body (such as glutens, eggs, etc.) is not set enough yet.
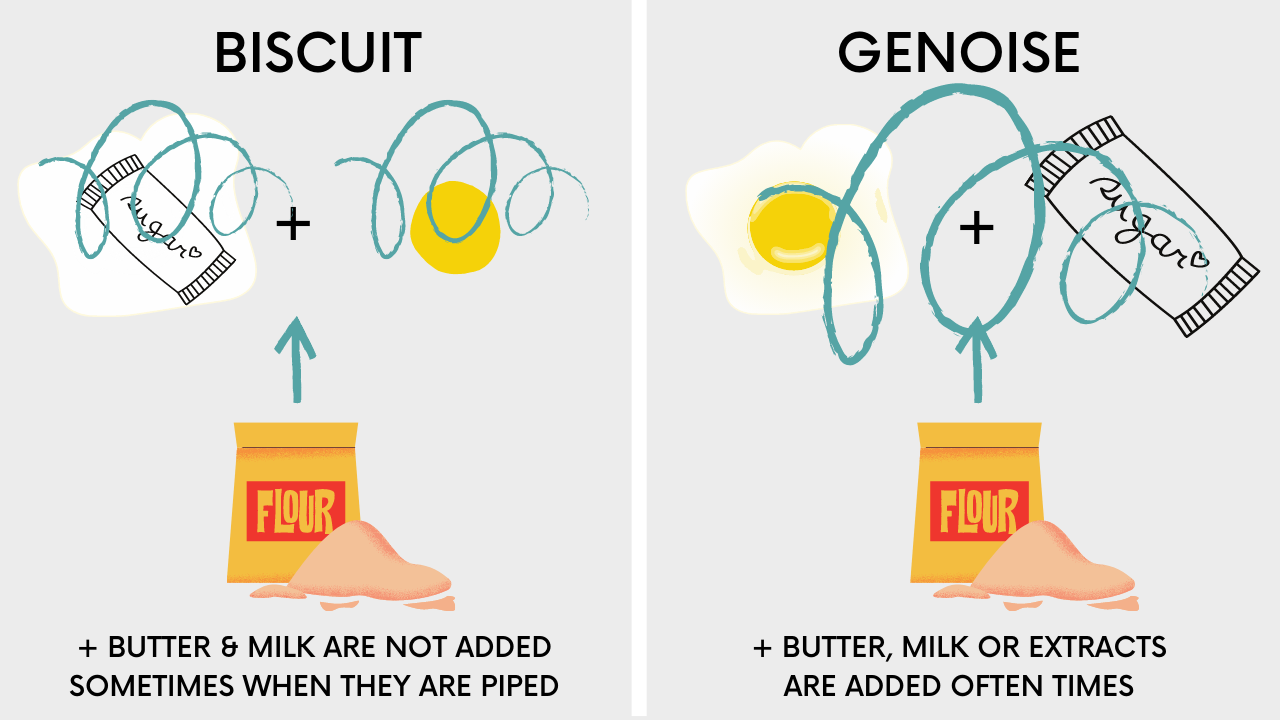
What Is Genoise Cake?
Genoise sponge cake is made by whipping up whole eggs and sugar together. That is the unique method for this sponge to create a fluffy texture.
The primary 4 ingredients are eggs, sugar, flour, and butter.
In addition to it, "Biscuit sponge cake" is also a very popular sponge widely used in the world. Genoise sponge and biscuit sponge are the BIG 2 in the sponge world.
What's different is how you whip eggs. The sponge with biscuit method is made by whipping up egg whites and yolks separately. All the other processes are the same as the genoise sponge cake.
Here is the illustration I created to explain the 2 methods:
You can also learn about various types of sponge cakes and how they are different from genoise sponge cake.
📌 VIDEO: Watch How To Make It!
Watch this video to learn how to make the sponge cake visually and have a deeper understanding of all.

Don't forget to subscribe if you liked it😉
📌 Other Sponge Cake Recipes
Check out other types of sponge cake from the list!
💬 If you loved this recipe, please share your feedback on this post! I always love hearing how you enjoyed it with your friends and family at home.
Fluffy Vanilla Sponge Cake
Equipment
- 1 8-inch round pan or 2 6-inch round pans
- Parchment paper
- Fine mesh sieve
- Stand mixer with a whisk attachment or hand mixer
- Rubber spatula
Ingredients
- 200 g (4 eggs) Eggs
- 140 g (1 cup - 1 Tablespoon) Granulated sugar
- 130 g (1 cup + 2 Tablespoons) Cake flour
- 20 g (4 teaspoons) Milk
- 40 g (2 ⅔ Tablespoons) Oil
- ¼ teaspoon Vanilla extract Optional
NOTE: For best results, measure ingredients with a scale. All recipes are designed with weighed ingredients using grams/ounces. Cup measurements (US customary units) are provided for your convenience.
Instructions
Preparation
- 1. Preheat the oven to 355ºF (180ºC)2. Prepare hot, simmering water to warm eggs.3. Set up cake liners inside a pan. (Or you can coat a thin layer of butter, dust flour on top, and toss to remove excess.)4. Sift cake flour. 5. (Combine milk, oil, and vanilla ahead.)

Sponge Cake
- Warm whole eggs and sugar with a water bath, constantly mixing until it feels comfortably warm like a bath.200 g Eggs, 140 g Granulated sugar

- Whip whole eggs and sugar at high speed until very fluffy. (Drop the batter with a whisk and check: It should flow slowly and the lines should stay on the surface.) Finish at low speed to make air bubbles smaller until it looks very shiny.
- Add cake flour and fold until you don’t see any flour.130 g Cake flour
- Add milk and oil and fold until everything is incorporated evenly. The cake batter should flow smoothly when you drop it with a spatula.20 g Milk, 40 g Oil, ¼ teaspoon Vanilla extract
- Pour the batter into the prepared pans right away and bake at 355ºF (180ºC) until the center bounces back very gently.for 25 - 30 mins for 2 6-inch pans for 30 - 35 mins for 1 8-inch panAdjust the baking time & temperature depending on the oven, the thickness of the batter, etc.
- After it's out of the oven, flip it and let it cool completely before slicing it.


Video


Bern says
I absolutely love this recipe it works well all the time for me. Would this vanilla cake be sturdy enough to be stacked on a 3 tier wedding cake?
ayacaliva says
Thank you so much, Bern!! You'll need cake dowels on each layer to support the weight since the cake is very fluffy. But it's possible! I actually used it for my own 3 tier wedding cake. I recommend using buttercream frosting if you want better support!
Ellen says
Hi Aya- I had the same question. I had been looking for the best "white" cake recipe for a wedding cake. Did you apply simple syrup to your wedding cake? Also, did you use buttercream between the layers or other fillings. If fillings, what did you use? Any other suggestions for a wedding cake? Maybe you could do a blog post just on wedding cakes.
p.s. I'm ecstatic to have found your YouTube channel and blog!
ayacaliva says
I applied cake syrup to the sponge cake for my wedding cake and used whipped cream. I released my butter cake recipe a while ago but I am hoping to add some updates and repost it on YouTube early next year. Hope you'll check it out then! (Of course, I'll share it on this blog as well)
Thank you! I'm glad you found it😊
Anonymous says
What would be the baking setting if I were to bake it in a square pan?
ayacaliva says
I always use a convection setting with my current electric oven. Some ovens work differently, so I hope you can find your favorite setting!
Claire says
Hi, really happy I found this recipe. What is the link to your wedding cake recipe please? Did you post it in the end. I will be making a wedding cake so it would be very helpful!
Aya Caliva says
I made the wedding cake ages ago, I did not film the process unfortunately! I should had! I did not know much about wedding cakes back then, I made a 3-tier whipped cream wedding cake with sponge cake without the cake dowels.. OH no... I don't recommend doing so!! haha
I hope your wedding cake will be a big success, drop me a question here when needing a help!
Liv says
Best recipe
Very easy and came out perfect on first attempt.
Thank you very much
ayacaliva says
Thank you! I'm glad it was a success!!
Olivia says
I haven’t made this yet but I’m hoping to use it for a two tiered wedding cake! I’m a little nervous but I’ll use dowels so it should be fine. Also am I able to double the recipe?
ayacaliva says
Hi, it should work as long as you use the dowels and preferably stable frosting, such as buttercream. You can double the recipe!
Ines Torres says
Hi I just tried this recipe but with normal flour as where I live there's no cake flour...is there a big difference in using normal flour? It was great by the way...thank you
Aya Caliva says
All-purpose flour contains more protein which creates gluten when moisture is mixed in. Too much gluten makes a sponge cake denser and less fluffy with lower volume. I don't know what type of flour is available in your area, but I recommend looking for the one with lowest protein - The package should say the protein amount out of the whole content. Pastry flour is like between cake flour and all-purpose flour. If that didn't work out, you may want to check out online as many companies sell cake flour online. I hope that helps!!
Natasha says
You need to take part in a contest for one of the greatest blogs on the internet.
I will highly recommend this site!
Ally says
What is the height of the 8” pan uses for a single recipe? My pans are 8” x 2”. If I wanted two layers, would I need to make 1.5 or 2 batches of the recipe? Also, is it OK to use nonstick dark pans? Thank you.
ayacaliva says
Hi Ally! The height of the 2 6" pans I used in the post is just slightly higher than 2" One batch of the recipe (with 4 eggs) is enough for 2 6" or 1 8". But! If you want to make your 8" cake higher, I recommend doing 1.5 batches. 2 batches might be too high but you could bake that amount with 2 8" pans.
Nonstick pans are not the best option to hold a height of the sponge but it does work fine. I always use parchment paper as a cake liner, so that doesn't matter for that reason😊 Especially when you make 1.5 batches with 1 8" pan, I recommend setting a cake liner in a pan and make the height a bit higher than the pan's to make sure that the batter does not float over in the oven!
Hope that helps!!
Amanda says
Hello can I use this recipe for cupcakes
ayacaliva says
Yes, you can! Bake shorter time with the same temperature, between 10-15 minutes depending on the oven! You can pour the batter up to about 9/10 of the height.
Yasmin says
Are no raising agents needed for this recipe?
Aya Caliva says
Yes, you don't need them!
Mimi says
Perfect recipe, thank you!
ayacaliva says
Thank you so much!!
Valerie Tear says
Excellent video and details - thank you. Do you have any specific tips when baked in a sheet pan instead of rounds? Best size sheet pan / bake times ?
ayacaliva says
Thank you! I usually use a half sheet and bake shorter just until the top bounces back gently. All the tips I mentioned in this post also apply. If you are interested to see how I do it, check out my past video of A big strawberry slice cake for Rei's birthday. I shared it last summer on my YouTube channel. (I'm sorry, I don't think I can attach a link in a comment section. I'll add the link in this post later!)
Valerie Tear says
Oh, Thank you for your reply !!! Again, love your posts and detailed info. I can tell you were classically trained - very talented. I'll try the 1/2 sheet size and play with timings. Thanks 🙂
ayacaliva says
Thank you!😃 I'm still new to the blogging world but I so appreciate checking this place as well!
Elizabeth Hopkins says
I made this to day was so easy to follow thanks hope it turns out OK 👍
ayacaliva says
Thank you for trying it! I hope you liked it!
Cheryl says
Thank you for this great recipe and talking through the tips, mine came out perfect! I’ll always use this!
ayacaliva says
I'm so glad!! Thank you for sharing it😊
Asraa says
Thank you very much for the amazing recipe I baked it yesterday it was gorgeous.can you please tell me if I want to bake it with double or triple ingredients what pan size I have to use
ayacaliva says
I'm so glad, thank you for letting me know! With double batches, it is enough for a 30 cm | 11.8" round pan. For a half sheet pan, you can do 1.5-2 batches depending on how thick you want. I hope that helps!
Pati says
How come it works without baking powder or baking soda? Sorry, I’m a baking novice 😅
ayacaliva says
Hi! This sponge rises mainly with the powder of whipped eggs: Egg holds LOTS of airs when it's whipped and they expand when the heat is added in the oven. So whipping eggs really well and bake the batter asap is a huge key to create the fluffy texture!
Lynn says
I discovered you on YouTube and so glad I did! My daughter's 18th birthday is coming up and my mind is overflowing with ideas for her cake. I want to use this recipe (already rated it 5 stars because I believe in your recipes and skills!), but would like to add freeze dried mango powder to flavor the sponge. Will also add a fruit filling between layers.
Two questions: 1) can you advise me on how to proceed with adding freeze dried fruit powder to batter? 2) should I still brush a sugar syrup in between layers even if I add fruit filling?
I will of course practice the recipe multiple times prior to her birthday, but she's my only child and I really want to celebrate her birthday with flavors from our Filipina heritage -mango and calamansi.
ayacaliva says
Thank you! I'm glad you found me too! That is so exciting, I'm happy you chose this recipe for such a special event.
About your question:
1) I haven't added freeze-dried powder to this recipe but I would be careful not adding it too much OR adjusting the moisture level since the powder should soak up more moistures from milk. And I would make it super powdery so that it doesn't give an unpleasant texture.
2) And yes, I recommend cake syrup. It gives even better, delicate texture. Not soaking wet though! I usually apply 30 g (1 oz) - 40 g for a 6-inch whole cake. You can do 1:1 or 1:2 (sugar:water) ratio, depending on what you like.
In the past, I mixed pureed mango and a bit of sugar to alternate it with cake syrup and the cake was pretty good. (I added a lot more amount since it is not as wet as cake syrup. I can't remember completely but I think it was about the double amount of the cake syrup.)
If you like vivid mango flavor, applying the mango syrup or spreading mango jam might be a way to go! With fresh mango, of course 🙂
I hope it helps! Enjoy, I bet it'll turn out A-mazing😊
Markus Wasono says
I want to make cupcakes for my grand niece. Would your sponge cake recipe be suitable? Thanks
ayacaliva says
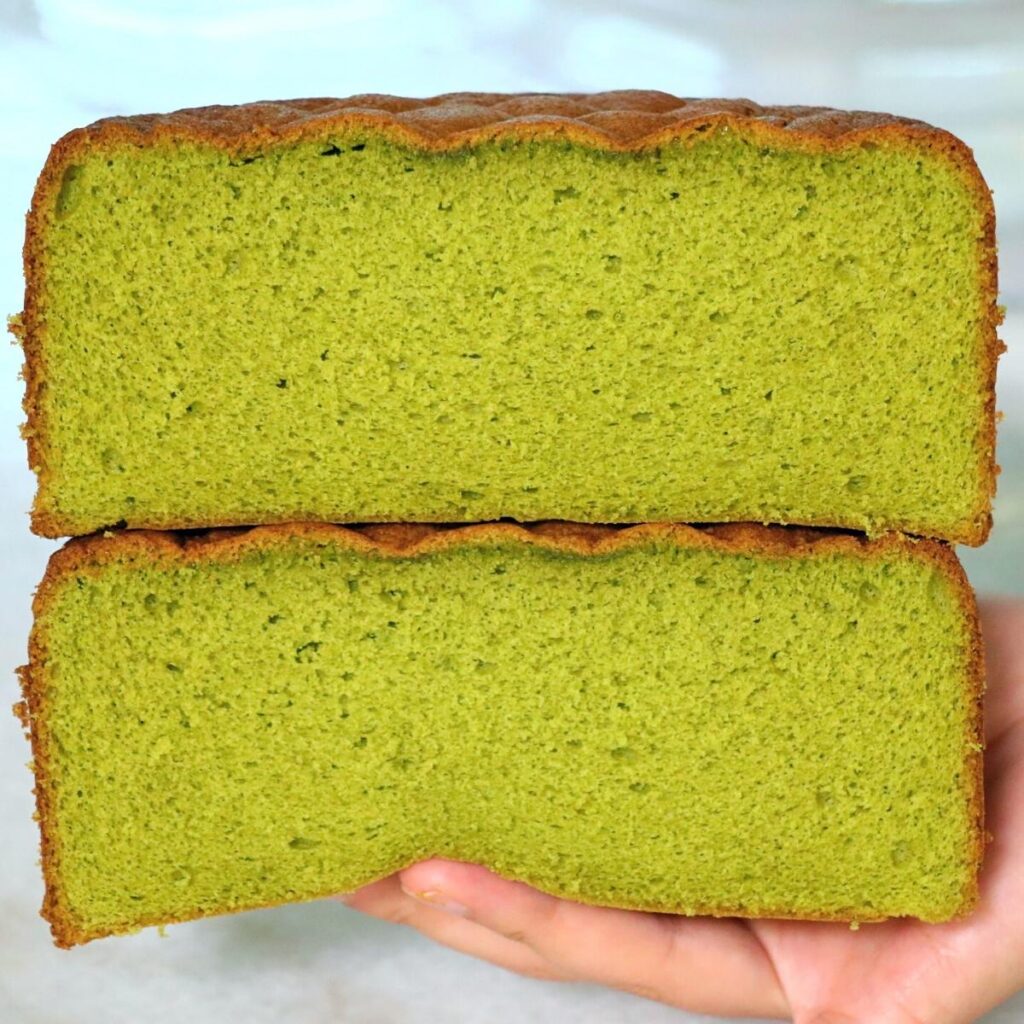
I would recommend it if you are consuming it within that day since it can dry quicker than richer cakes with more fat in it. And the baking time gets a lot shorter in a cupcake pan, usually about 15-20 mins but you may want to check how it looks easier! Check my matcha sponge cake recipe (toward the end of the post) to see how much you should pour on each and they would look as cupcakes!
Tina says
Hi, going to give this a try today. Any tip on how much batter goes into the pans … I’m assuming to just weight evenly?? Also, do you use those baking strips wrapped around the pans for it to bake evenly?
ayacaliva says
Hi, I usually judge by eyes, but you can weight using a scale to be more accurate of course! I have not used baking strips actually, I would love to try it!
Taaliyah says
Hi , I made this cake tonight & it turned out absolutely amazing! I was wondering if a bit of gel food coloring can be added & if it would affect the texture
ayacaliva says
I'm so glad! Thank you for sharing. The difference is not noticeable with just some drops!
Bertha says
The cake turned out more like omelette with flour than cake. I followed the recipe to the dot and am disappointed. I’ve been baking for a few years now.
ayacaliva says
I'm so sorry that happened to you. I might be able to find out the causes if you could describe how it looked on each steps as detail as possible - such as the thickness of the batter, before and after adding flour, if the egg was whipped very fluffy like in the image, etc.
AJ says
Hi Aya,
I love this recipe. Thank you so much for the techniques especially!
Can you pls guide me how to convert these into cupcakes which are a little denser and stable when soaked in sugar syrup? Can I add more flour and sugar to the same recipe? And use All purpose flour instead?
Aya Caliva says
Hi! Thank you so much! I use the same recipe and bake them for a shorter time (15 - 20 minutes) to make sponge cake cupcakes. I'm now testing classic vanilla cake cupcakes recipe, which might be perfect for what you described!
Shuba says
Love this recipe! thanks for sharing..How much simple syrup would you add for cupcakes? and how do you suggest adding them?
ayacaliva says
Thank you so much!! When baking cupcakes with the recipe, I often don't add syrup and consume them within a half day. (since they are small and easier to get dried.). But I would say... about 45 - 60 g (3 - 4 Tbsp) of cake syrup should be good for regular 12 cupcakes!
I would apply it on top with a brush while they are still hot/warm. (Sponge soaks syrup better while they are warm when you don't slice off the caramelized surface.)
Also, check the cupcakes in the oven after about 8 mins! They get baked quicker, depending on the oven.
Hope that help!
Shuba says
thank you so much!! I'll try that!
SJ says
thank you so much!! I'll try that!
ayacaliva says
My pleasure! I hope you'll like it!
Justine Rowe says
Is it possible to cook this as a 12inch cake? Would it tend to be overdone at the edge and under in the middle?
ayacaliva says
Hi! Yes, I did that before and it worked fine. But note that:
* It takes a lot longer time to bake it. Try not to open the oven door frequently and wait until the very end since it could affect the texture of the cake. Just like the regular size, the sponge should shrinks a bit on top when the center is cooked through. (See the image in the post.) Pay loser attention toward the end.
* Or you can pour it into a 2 or 3 12-inch pans to bake them faster. You do not have to worry about slicing it later that way. I also feel the sponge gets slightly lighter compared to one layer of very heavy and thick sponge cake.
I hope that helps!!
Aya
Remi says
Hi, I absolutely love this recipe and use it alot.
I was wondering how many cupcakes it would make though?
ayacaliva says
Thank you so much!! One batch (With 4 eggs) should make about 15-16 regular cupcakes. You can pour the batter almost all the way to the top (90-95% of the capacity) of cupcake liners. They bake a lot faster than the cake, I can't remember if it took about 15 mins or 8 mins... sorry, please check early!🙏🏻 It should shrink "slightly" when the center is cooked through just like with bigger cakes.
Leisa says
Hi, I'm in Australia and not sure that we have cake flour. You mentioned it has less gluten than all purpose flour, so wondering if you think a gluten free flour would work?
ayacaliva says
Hi, I've never tried it with gluten-free flour but I'm not sure if that works.. I'm sorry! I tried this recipe with all-purpose flour, all-purpose flour with cornstarch, etc. but nothing really worked the same as cake flour so far. I wonder if you can find it online? I wish you could find it somewhere! I will definitely share it here in the future if I ever find a flour that can be alternated with cake flour.
Sofia says
You can make cake flour with all purpose flour and cornflour together.
For every cup of all purpose flour remove 2tbsp and replace with 2tbsp cornflour
Izeki says
Hi Anya!
I love your detailed instructions and appreciate all the tips, and how to avoid mistakes that can commonly happen! A lot of baking videos don’t provide enough explanation and this is why I often visit your site to read everything before attempting the recipe!
I’ll definitely want to try out this one ! How does this difffrom making the chiffon cake? Also, what brand of whisk did you use for the chiffon cake? I tried looking for something similar but couldn’t because most French whisk saw online has thicker prong and yours seems like an ideal width prong! I think proper tools help me, too!
Thank you for sharing your experience and hope you continue to post!
ayacaliva says
Hello! Thank you so much! I'm so happy to hear that. I appreciate you've been watching video tutorials as well😊
About your questions,
Chiffon cake is made by mixing egg yolks, liquids (oil, water, etc) , and flour beforehand before adding meringue to it. By mixing the flour with the liquids first, it creates a more springy (due to the glutens in flour) yet fluffy texture thanks to the meringue.
This sponge cake is Genoise sponge cake, which is made by whipping whole eggs and sugar first, and adding flour and liquids to it later. It is not as springy as chiffon cake and tends to get drier faster since it contains less liquids. I hope that helps!
I got the whisk in Japan if I remember correctly, I like it too but my recent favorite is the ones from Matfer brand. You can see I've been using it a lot in my recent videos! (The one with a black handle) It's very steady yet not so heavy. They have a few sizes. Check it out online if you are interested! 😉
Donatella says
hello! I tried your recipe and it turned out tasting very eggy and was extremely dense, do you know what I could have done wrong.
ayacaliva says
Hi! I'm sorry that happened to you. When it was dense, check these things:
* Make sure to warm eggs and whip them A LOT! See the section to see how it should look like.
* If the eggs did not get whipped well, there might be liquids or oil mixed in the tools or the temperature of the eggs may be too low.
* Use cake flour always. All-purpose flour does not work the same.
* Once the flour is added to the whipped eggs, fold quickly and put it in the oven ASAP before the air bubbles get eliminated too much.
* Try not to over-mix the cake batter.
* Try not to open the oven door often while baking. Only open at the end to check if it's baked enough.
I hope that gives you some clues. The sponge cake may tasted eggy because it was very dense or possibly underbaked.
Brenda says
Hi! Thank you for this recipe. It's exactly what I'm looking for to make for my son's upcoming wedding. If I wanted to make a lemon variation, what changes would you make to this existing recipe?
Thank you so much!
ayacaliva says
Hi! I would add lemon zest and lemon extracts, probably not lemon juice since it can affect the texture a lot more. I would make the frosting extra citrusy to balance out the flavor. Adding lemon curd as the filling would be great too. Also, if it is a tiered cake, insert poles inside - the sponge itself can not sustain the whipped cream or buttercream frosting quite well since it is so fluffy.
Brenda Goss says
Thank you so much for the tips! I plan to use lemon curd between the layers. I will be baking the first practice cake today and will let you know how it turns out.
ayacaliva says
Awesome! I hope it'll be a success!!
Gillian Pike says
I have tried and tested this lovely cake , and I’m in love with it !
Could you give me the recipe amendment for an 8 and a half . And 9 and a half tins also cooking times ?
Thank you
ayacaliva says
I'm happy to hear that!!
1.25 batches should be enough for 1 8.5-inch round pan, and 1.5 batches or slightly more for 1 9.5-inch round pan. (You'll need more batter if they are square pans.)
It should take about 35 minutes with 8.5-inch round pan, and 40 - 45 minutes with 9.5-inch pan. With the same temperature. The baking time could vary widely depending on the oven, so I would check slightly before that, just in case!
Kate says
Felt like an expert baker making this. Turned out perfectly, instructions & videos are excellent. Sooo many compliments, so light & fluffy and delicious. Topped mine with fresh whipped cream, marbled with mixed berry jam
ayacaliva says
I'm so happy to hear that!! Thank you so much for taking the time to share it with me.
Noha El-Sergani says
Hi, I have a question concerning the ribbon stage…does the ratio of eggs to sugar affect the ribbon stage? I have a cake recipe that i’ve been baking for years and it requires the ribbon stage, however no matter how long I whisk the eggs and sugar (using stand mixer) they never reach the thick consistency as in your recipe (My ribbons disappear after a second). I have tried whisking for 10 min, 20 min, 25 min & 30 min!! (I also heat them up as per your recipe).
My recipe requires 4 eggs and 250 gm sugar (it’s a hot milk sponge cake, so it is rich and quite sweeter than genoise).
I hope you could help me out. I have searched the internet and couldn’t find an explanation🥲
Thank you.
ayacaliva says
Hi! Yes, the amount of sugar can affect the consistency of the cake batter. Typically, the batter gets looser with more sugar; Sugar has an affect of preventing eggs from whipping well while it also helps to create a finer texture. Considering the amount is a lot more than this recipe, I think you are right about that.
Also, the eggs get whipped up a lot more when it's warmer; if that eggs were cold, that could be the cause, too. It's not an issue as long as you liked the final taste, though!
Hope that helps😊
Noha El-Sergani says
Thank you so much for the insight😊Now I can put my mind at ease😁
Lili says
I have tried this multiple times without fail! Love it!!!
ayacaliva says
Thank you so much for the feedback!! I'm glad😊
WeddingsInAthens says
Can you really achieve the same level of fluffiness at home without using a stand mixer or any fancy equipment?
ayacaliva says
Yes it is possible! I recommend using a stand mixer just because it's most powerful - you can whip eggs really well in a short time. When using a stand mixer, ensure that it can whip at high speed. I noticed there are ones that the speed is not very fast, it's just difficult to whip eggs well with them.
Alero says
I tried this recipe and it was amazing! the texture and taste were phenomenal. I used melted butter instead of oil though. Thank you.
ayacaliva says
I'm glad!! Thank you for sharing!!
Uma says
Amazing recipe. Few questions, I am allergic to dairy which plant based milk can I use yo replace milk soy,oat, coconut, almond etc please advice. Also in most of my baked recipes I replace 1/4 wit almond flour will this recipe work for that? I also wanted to use wholr wheat pastry flour will that work pleasr advice
ayacaliva says
Thank you! About your questions,
* Yes, you can replace the milk with any of the liquids!
* I recommend not using almond flour for this recipe if you want to achieve the very fluffy texture. I assume almond flour makes the sponge cake slightly heavier. and the cake might deflate more due to less amount of glutens (which becomes "the bone" for the sponge cake body.)
* This may be different depending on the country, brand, etc. but often times, pastry flour is like between cake flour and all-purpose flour - it creates more glutens than cake flour but much less than all-purpose flour. So the sponge cake won't get as fluffy as when making it with cake flour. If you can not get cake flour though (I recommend looking online), I would say try it with white pastry flour and maybe reduce the amount slightly (I haven't tested, so I can not share the exact number, but I might reduce like 5g). You may want to avoid whole wheat flour since they usually contain more protein that creates gluten. The difference might not significant, but just sharing my thought!
I hope that helps a bit!
Brenda says
Hello, does this cake freeze well? I would like to freeze it for two weeks, then use it in a three tiered wedding cake. Each layer would consist of four 1" slices with lemon curd and buttercream. You mentioned supports, which I planned to use, but would I need more support than other cakes? Also, is it 1 oz per layer of syrup per 6" cake or entire cake? I plan to use elderflower cordial or simple syrup. Thank you for help!!
Diane Johns says
Hi there, thank you for this recipe. I made it just now and had a couple of issues: while the batter was lovely like yours, the cake sank slightly in the middle when cooling, even though when tested no batter came out on the cake tester. Also, one side was higher than the other!! by about half a cm. Any ideas/tips please? I'd love to nail this recipe.
ayacaliva says
Hello! I'm glad you liked the recipe! About your question:
There are 3 reasons I thought about by hearing your explanation:
1. You may want to try baking it a little bit longer. But be careful not to overbake it.
2. The heat might be a little bit stronger with your oven - The sponge cake rises a lot with higher heat, but they sink at the end because there is simply not enough structure to sustain the body. Try baking it at a little bit lower heat, especially if the cake was baked in a shorter time or about the same time as the recipe.
3. Ensure that the cake batter is combined evenly and folded enough.
Aside from that, baking it with a fan setting might be something you want to try to bake it evenly. if you haven't tried it yet!
Also, note that the cake deflates s little bit as it cools down and that is totally normal, just like chiffon cake, since the cake is very fluffy.
I hope you can get a better result next time!
Portia Daquinag says
Hello!! Just wanted to know if your oven is fan forced or convection?
Thank You
ayacaliva says
Hi! I used a convection setting with a fan. But this really depends on the oven - In the past, I had an oven worked much better with a conventional setting.
Ishita says
Hi! What if i baked a double batch but have one pan to bake the cake! Will the batter be fine if it sits out for 30mins? If not, is there a way I can save it?
ayacaliva says
Hi! The air bubbles in cake batter pop as they sit, and the sponge cake gets a lot more flatter after it's sit for 30 minutes. You can bake one batch at a time or if you need to bake a double batch to get more layers to complete a cake, baking the whole batter in a large sheet pan lined with parchment paper and cutting the sponge cake later with a cake ring can be another way to go. The baking time will be shorter in that case.
Or you could use a glass dish, a pan in different shape or size, etc. to pour the leftover into. Adjust the baking time accordingly.
Hope that helps a bit!
Ishita Islam says
Hi! Just wanted to give an update. The second batched worked! It was definitely a bit flatter but I can work with it. I only had one heart shaped cake pan and was kinda freaking out but it came out beautifully even after letting the batter sit of 30mins.
Thank!
ayacaliva says
Thank you for the update! I'm glad it worked out😊
CW says
Didn't work at all. Didn't rise and tastes a lot like eggs.
ayacaliva says
I'm sorry it did not work well for you. I would be happy to help you guess the causes if you could describe how the batter looked like on each step. Or any other detail you noticed while making it!
Katie says
How many cups(liquid) of cake batter does one recipe make or how many times recipe should I use I am using wilton sheet cake pan 11x15x2.
ayacaliva says
I haven't checked it with cups before, so I won't be able to answer that first question preciously, but for 11 x 15 x 2 rectangle pan, I assume you'll need about.. 2.5 - 3 batches depending on how tall you want it to be! Bake a lot longer time and try not to open the oven door until the very end to get the best results. The sponge should shrinks slightly on top when it is cooked through. Then you can open the door and check the doneness.
Erika says
My eggs are taking SO LONG (over 30 minutes)to fully whip like they do in the video. I think this is what is then causing my cake to turn out dry. Am I doing something wrong?? Please help
ayacaliva says
Hi! Did you use a hand mixer or stand mixer? If the hand mixer is not so powerful, it takes longer to get very fluffy. I also might be because the eggs were not heated enough. It should feel very warm when touching it. Or maybe the eggs were cooked partially when heated..? It could cause a dry sponge cake. I might be able to give you better assumptions if you could share more details.
N says
This recipe is so easy to follow! I have used it to make birthday cakes and it turns out so fluffy and perfect. Thank you.
ayacaliva says
Thank you! I'm glad you loved it!
Liv says
How tall does the 8” one turn out? I’m wondering how many layers I should make for a wedding cake. I’m doing a bottom 8” tier and a top 6” tier. Any idea how many batches/layers I should make?
ayacaliva says
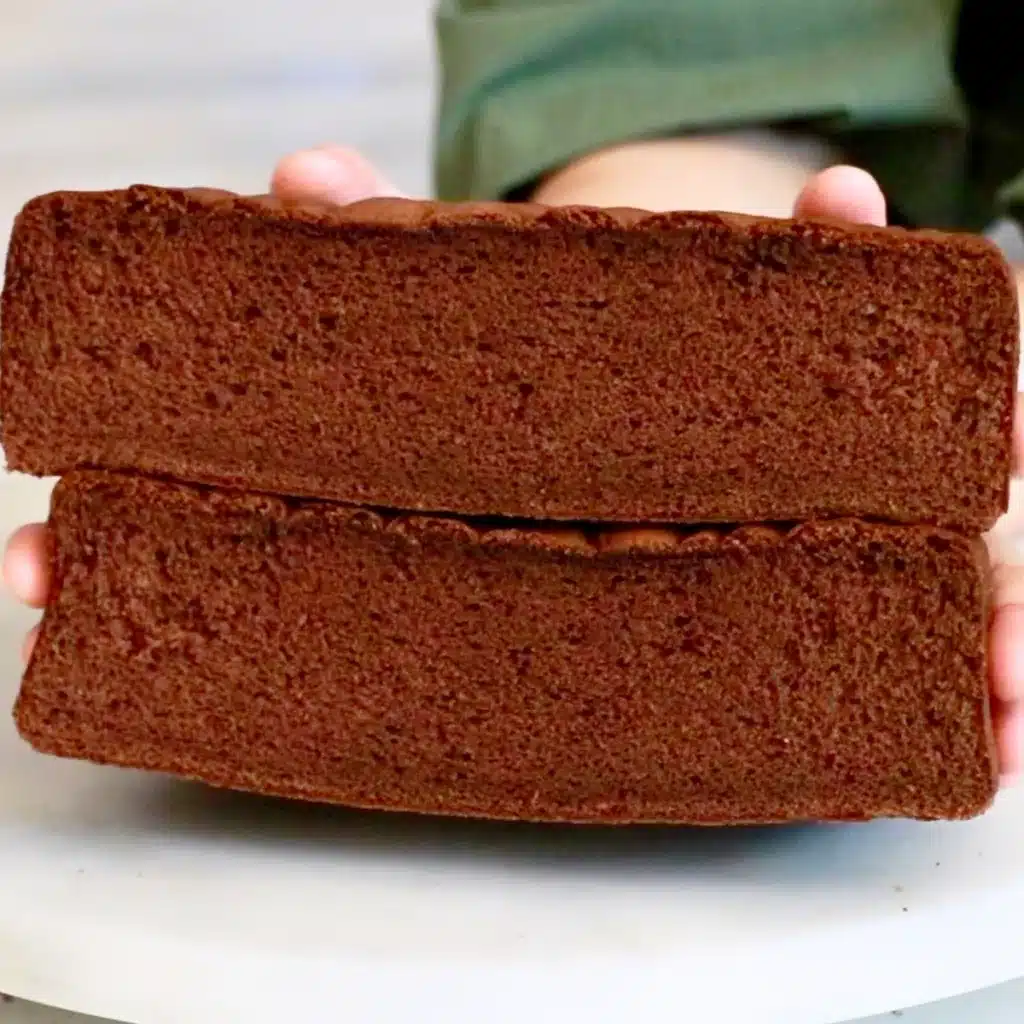
Hi! I'm sorry for the late response. It's about the same thickness as the 6-inch cake in the post. You can also see how it would look like in my chocolate sponge cake recipe. If it's a wedding cake, I would make 2 batches (or maybe slightly more) to make the cake taller. Taller cakes usually look better as a tiered cake. You can use 2 8-inch pans to make 2 layers to bake them in shorter time. Hope that helps!
Emma says
So excited to make this! I want to add a syrup to the sponge but I am baking the cake two days in advance. Should I add the syrup to the sponge before wrapping and storing in the fridge, or should I add the syrup before icing the cake when I assemble it? Thank you!!
ayacaliva says
Hi! I usually apply the syrup right before finishing the cake. You can also freeze the sponge cake, you can keep the freshness better. Wrap tightly with plastic wrap, ideally twice before freezing it.
Katia says
Would this hold up well if I want to soak it up with tres leches? Thanks for the recipe again.
ayacaliva says
Hi! Thank you for the feedback. I actually tried it once, but the sponge cake gets a bit too mushy with lots of liquids due to cake flour. I recommend using the sponge cake recipe in my tres leches cake post which I created specifically for the cake.
Jenny says
I made this cake for my mom's birthday, and I'm devastated. I've made recipes like these before but my cake ended up completely wrong. The texture was underbaked and cheese-like, and overly firm. I followed the recipe to the letter, and I'm sure I baked it for 30 mins. It wasn't a particularly large cake. I feel horrible for messing up a birthday cake.
ayacaliva says
I'm so sorry that happened for your special event. I'd like to find out why that happened, so you can bake it successful next time. Was the eggs whipped fluffy like in the image? How did the batter look like right before pouring it into the pan? Did it rise in the oven? What's your oven type? ... If you can share more details like them (as detail as possible for me to judge most accurately), I can give you a better assessment of the cause.
Gina Nomachi says
I love this recipe. It took me ages to perfect because I used the wrong flour. Now my cakes are perfect. I love Japanese style strawberry shortcake, so this recipe makes me so happy. Arigatou gozaimasu 🙂😍
ayacaliva says
I'm so glad you love the recipe and found out what was not working! Thank you so much for sharing. Arigato😊
Claire says
I would like to freeze this cake already layered with swiss buttercream and jam. Would that work? As I won't have time to put it together on the day. I was even hoping to frost it all earlier too and freeze it, just put the different sized tiers together on the day
Aya Caliva says
Yes, you can do that!
Willow says
Did not rise well and came out too dense
Aya Caliva says
I'm sorry that happened to you. Were eggs whipped fully like in the instruction? Or was the cake batter not loose after everything is incorporated? I will help finding the possible causes if you could share more details!
Kavitha Sebastian says
Hi. I haven’t tried this recipe yet, but, I am going to. I just wanted to know if you weigh your eggs with the shells or without the shells. Thank you.
Aya Caliva says
Hi, I weight without shells! If the eggs are not excessively small or large, you can get the 100 grams from 2 eggs. or 200 grams from 4 eggs.
Claire says
Beautiful recipe. I have used it several times now and everyone loves it. I have also successfully made gluten free versions by replacing the flour 1:1 with Doves Farm Gluten Free Bread flour. Delicious!
Aya Caliva says
Thank you so much! And thank you for the tip about the gluten-free flour!