In this post, I'm sharing how to frost a cake step-by-step with clear tips, images, and a video so that you can follow easily even if this is your first time doing it. Apply the tips & techniques for any layer cake to create a beautifully frosted cake for your special event!
I totally understand frosting a cake beautifully can be a struggle, especially if you are a beginner baker, I had no idea what I was doing when I first frosted my first cake. All I knew was that it was so fun! ...But the cake looked like it fell on the ground from 1 foot high unfortunately😅
Sometimes though, the cake does not have to look so pretty. What's most important is that you made it to share a heartwarming message and you kind of enjoy it - But this tutorial is for you if you want to brush up your skills. Maybe you want to open up your own bakery business or do a better job as a cake decorator at work. Or simply may want to make a better-looking birthday cake for your kids. Whatever the reason is, I hope this post can provide you with useful info.
Everyone has slightly different ways to frost a cake oftentimes. (For example, some people use a dough scraper more often while others use a spatula.) And today, I am sharing the way that works best for me after trying multiple ways for decades. Ultimately, I recommend trying the tips and techniques besides those from other chefs and finding which ones feel most comfortable for you!
It took years for me to feel very comfortable with frosting a cake and I am still practicing to get better. Please don't feel discouraged even if you can not frost well after a few practices. Keep practicing and you'll slowly get better each time. Guaranteed!!
Let's get started.💪🏻

📌 VIDEO: Watch How To Frost A Cake!
I think it is difficult to fully understand the process and movements just by instructions in writing forms - That is why I also included a video tutorial so that you can go over all the steps and techniques I'll be sharing in this post.

And don't forget to subscribe there as well if you liked it😉
📌 Tools You'll Need To Frost A Cake
- Cake turntable: I recommend using one that is steady and turns smoothly.
- Icing spatula: Use any of your favorite spatula. Mostly, I find it easier to frost 6 - 8-inch cakes with a small offset spatula and bigger cakes with a large offset spatula.
- Bench scraper: Use it to smooth the sides at the end. You can also smooth out the surface with an icing spatula if it's easier for you.
- Rubber spatula: Use it to scoop the frosting.
- Piping bag and tip: (optional) Use it to pipe decorations on top.
- Cake board: (optional) Frost a cake on it when you are gifting the cake in a box.
📌 Step-By-Step Instructions To Frost A Cake
Preparation
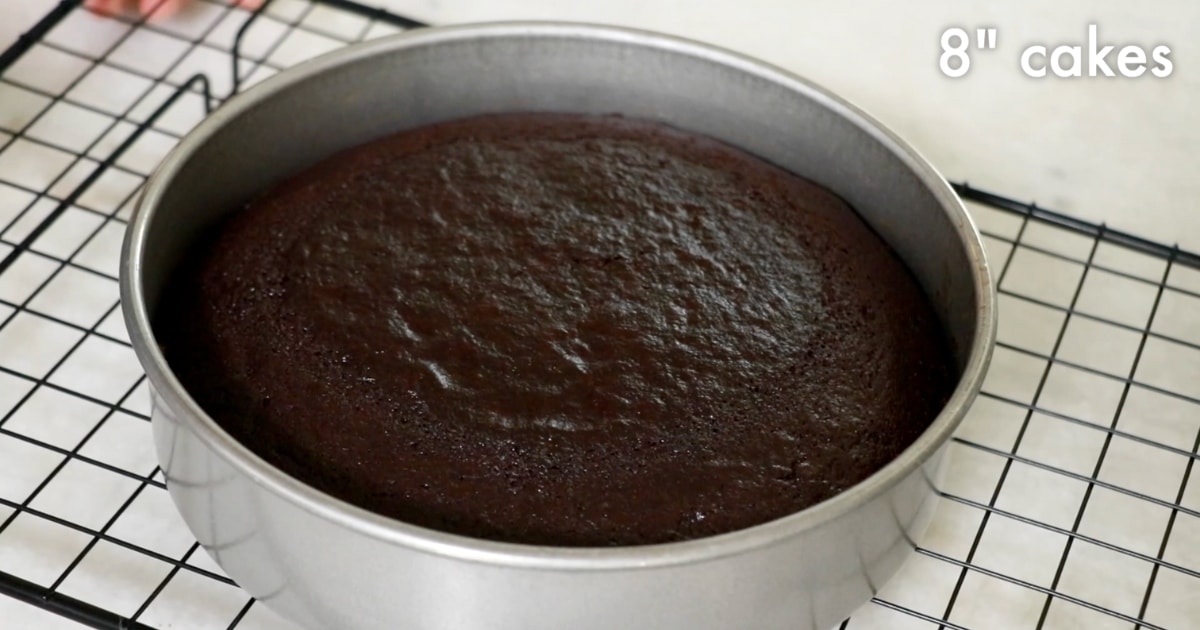
Chill the cakes beforehand.
Oftentimes, I like to chill cake layers in the fridge before frosting them. By doing so, the butter in the buttercream slowly gets harder as you spread frosting and stack each layer on top and the layers are not going to slide as easily as when frosting the ones at room temperature. Also, the frosting gets set with less time in the fridge after the crumb coat.
When you are using whipped cream frosting, this is also beneficial to hold the better condition of the cream by keeping it cool.
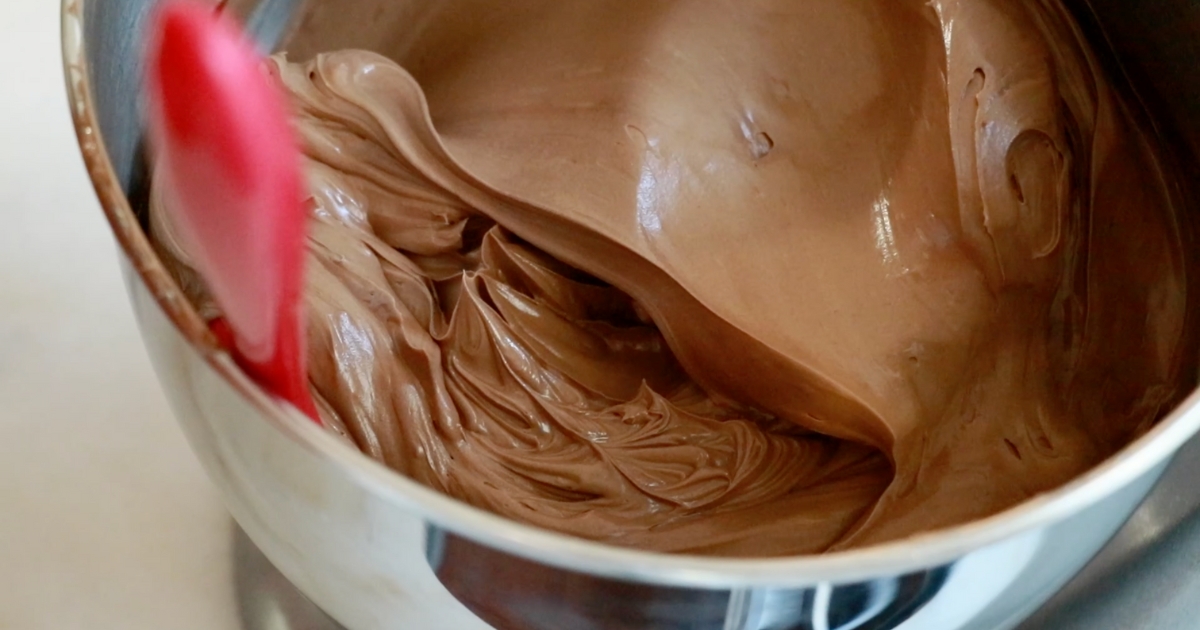
Leave the buttercream at room temperature ahead.
Any buttercream gets hardened when it's chilled in the fridge. Always leave it at room temperature ahead to soften it again. This can take 3 - 6 hours depending on the room temperature.
When you are using whipped cream frosting on the other hand, keeping it cool is important to hold the condition. I recommend soaking the bowl of whipped cream in ice water, especially when your room is not cooling.
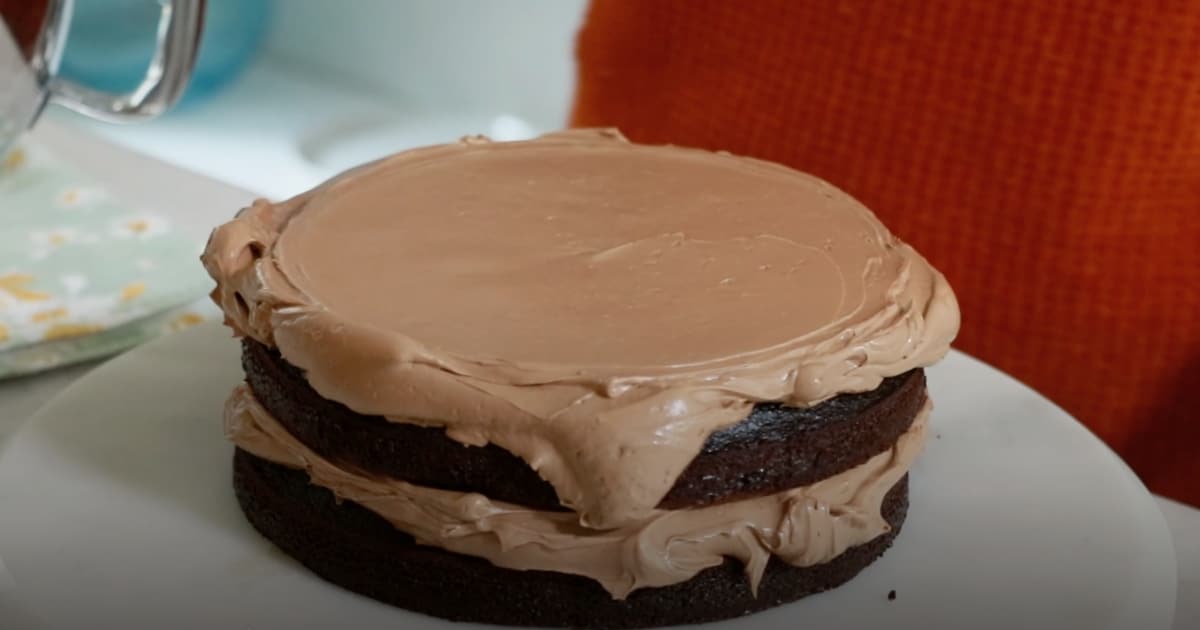
Stack each layer.
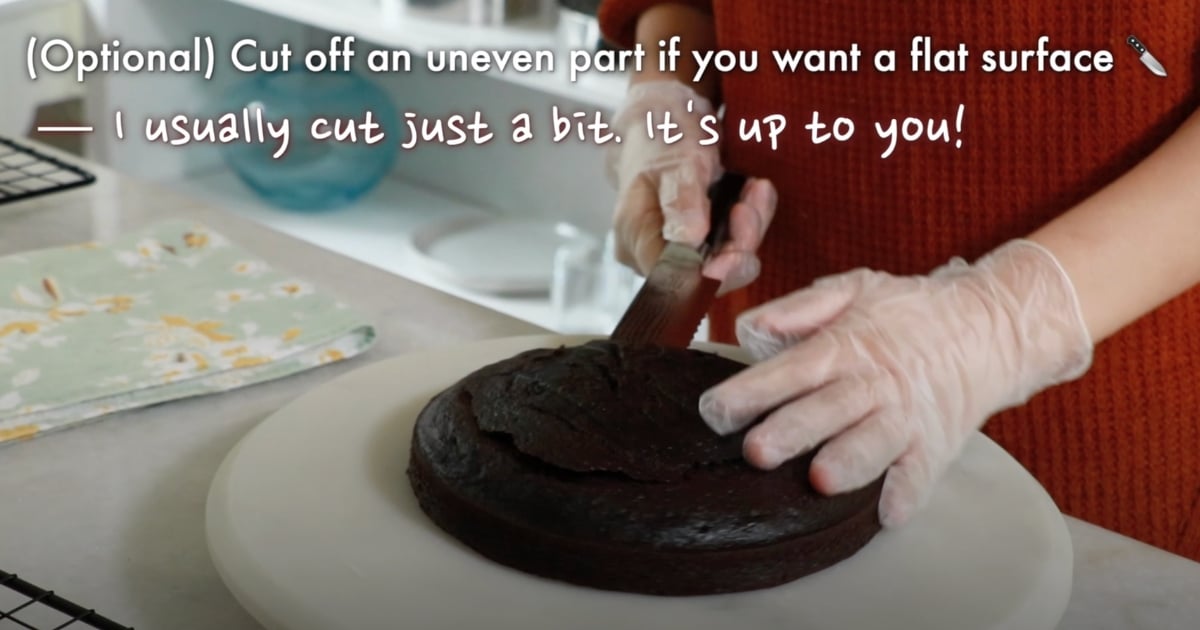
Level the cake. (optional)
In case the layers are uneven, trim the surface to level them off. It'll be easier for you to stack each layer straight.
Place the first layer on a turning table.
Ensure that the layer is at the very center of the turning table.
Spread frosting evenly on top.
- Drop a big scoop of frosting with a rubber spatula.
- Flatten the domed top roughly with an icing spatula.
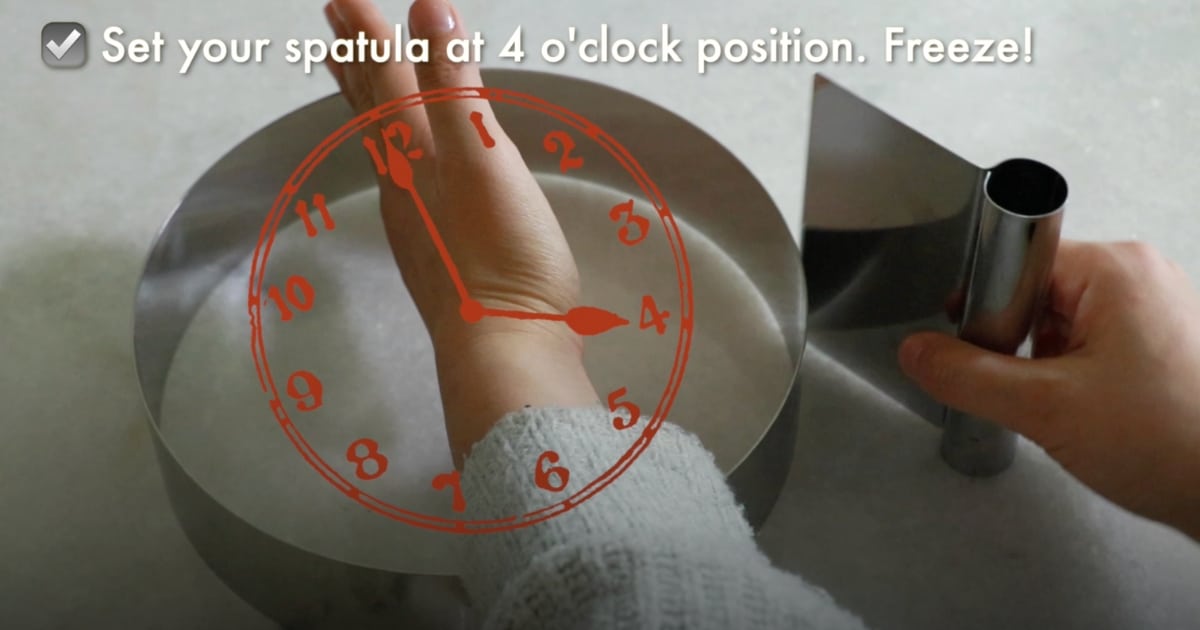
- Set an icing spatula at around 8 o'clock position (4 o'clock if you are left-handed.)
- Angle the spatula a little bit (25 - 45 degree angle).
- Turn the turning table as you freeze the position to smooth out the surface.
- When you are done, slide an icing spatula out.
By setting a spatula at around 4 o'clock position (8 o'clock if left-handed), you can view how the spatula and frosting are moving to frost more easily.

Repeat the process for the second layer.
- Lay a next layer. Ensure that the layer is placed right in the center again.
- Spread frosting evenly on top, just like how we did with the first layer.
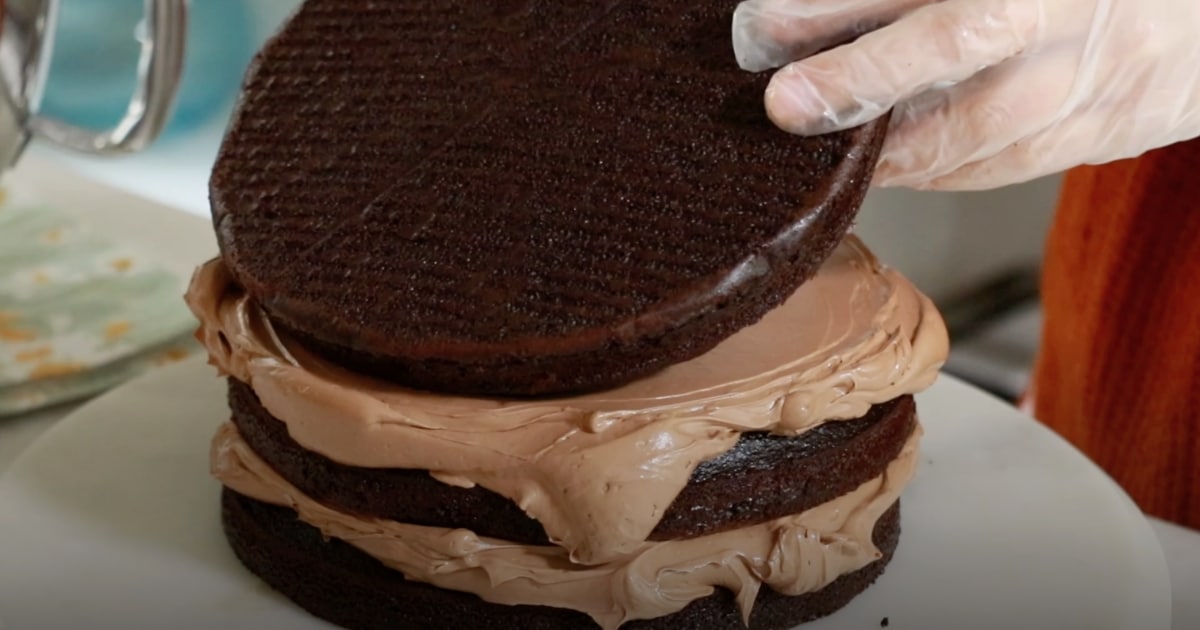
Place the final layer on top.
Lay a final layer, the bottom side facing up. Ensure that the layer is placed right in the center again.
For the final layer, flip it and face the bottom side facing up because it has a more seamlessly flat surface with sharp corners, which makes it easier to create a better-looking cake with sharp edges. You also do not have to worry about cake crumbs coming out as you frost the top. (When you trimmed the surface.)
As you stack each layer, check the cake is standing straight 360 degrees so that you won't end up with a whole cake looking like a leaning tower of Pisa!
Crumb coat
A crumb coat is like a primer for your makeup to hide any imperfections and seal any cake crumb that might come out later. You do not need to frost thick - Apply a very thin layer of frosting.
Spread frosting thinly on top of the final layer.
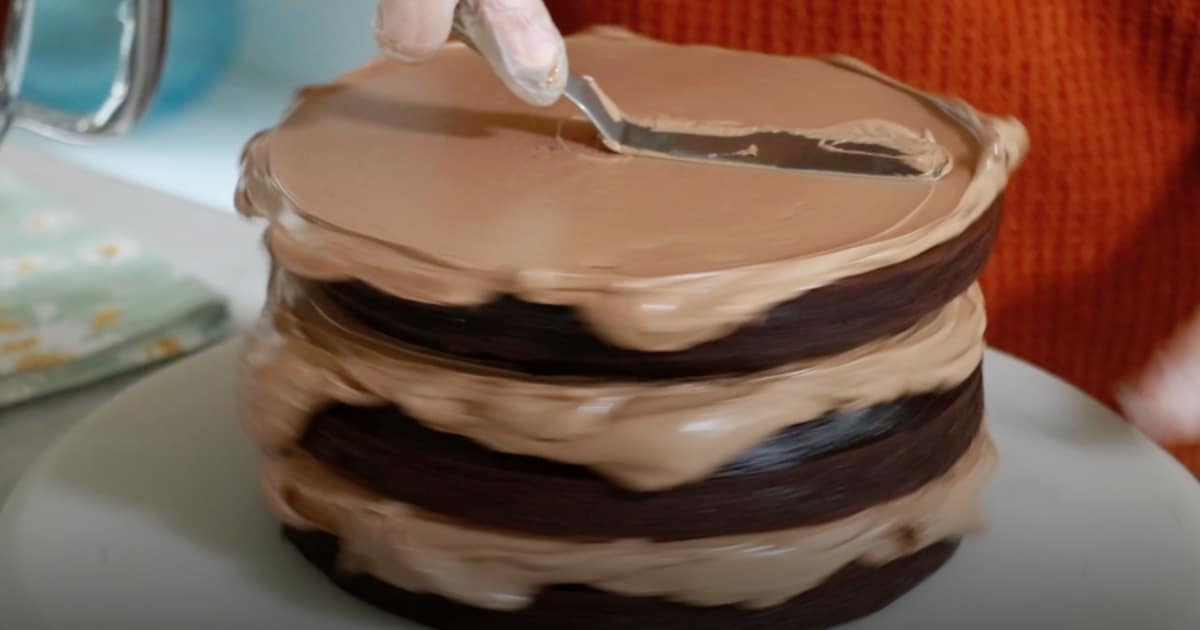
Spread frosting thinly on the sides of the cake.
Fill all the gaps between each layer for a smooth finish.
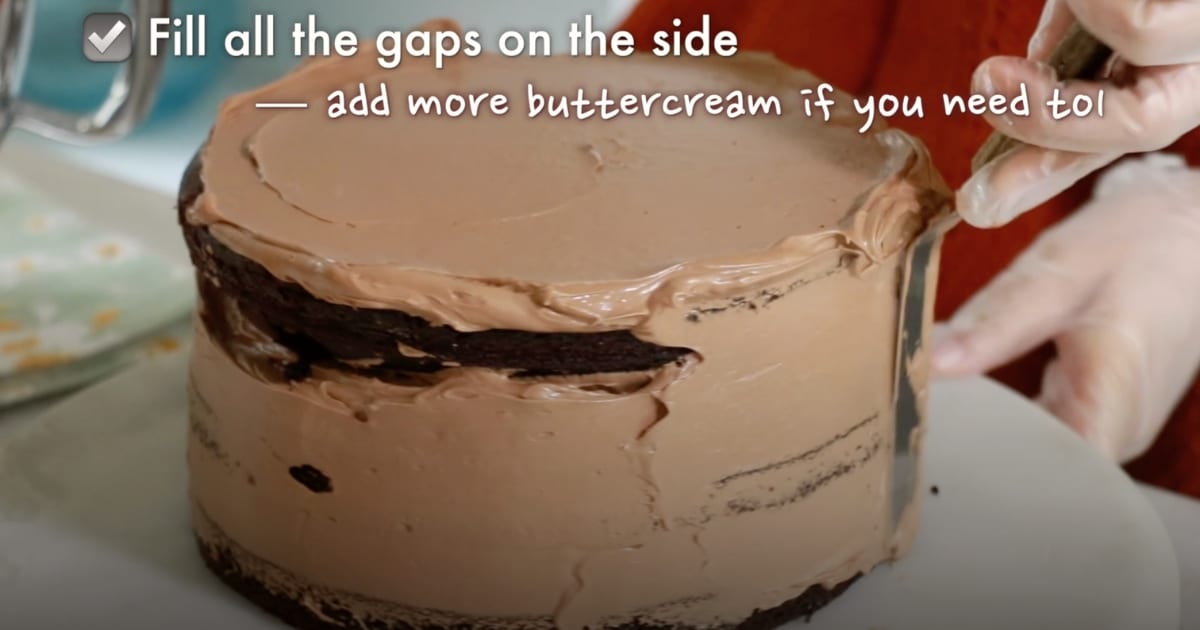
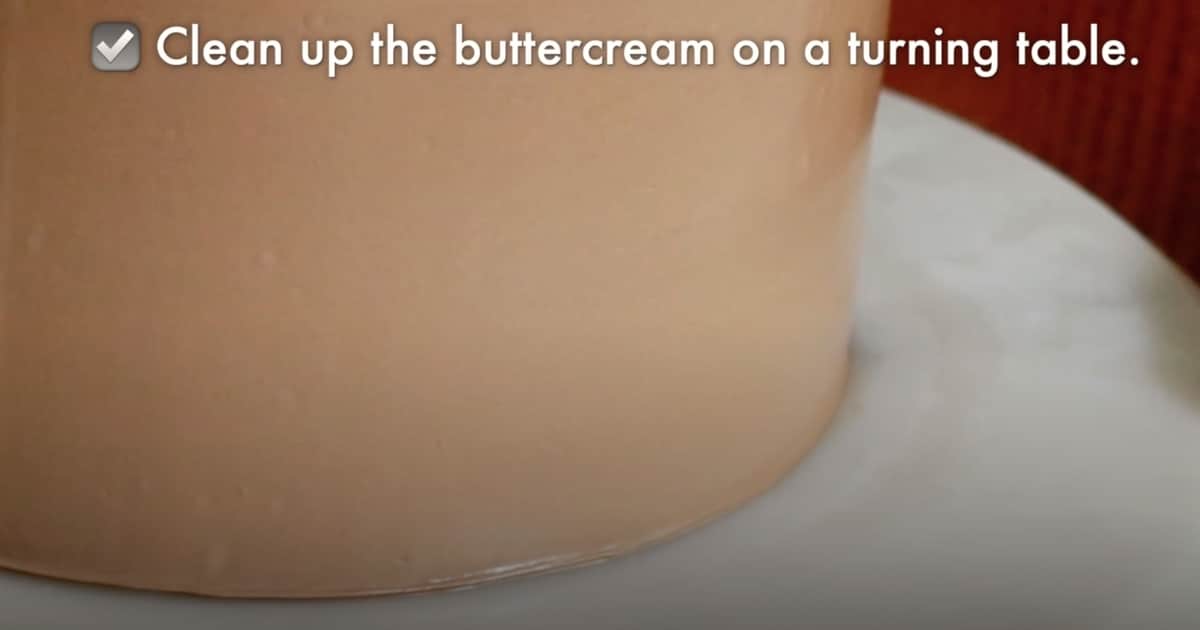
Clean off frosting on a turning table.
Scrape it off with an icing spatula as turning the table.
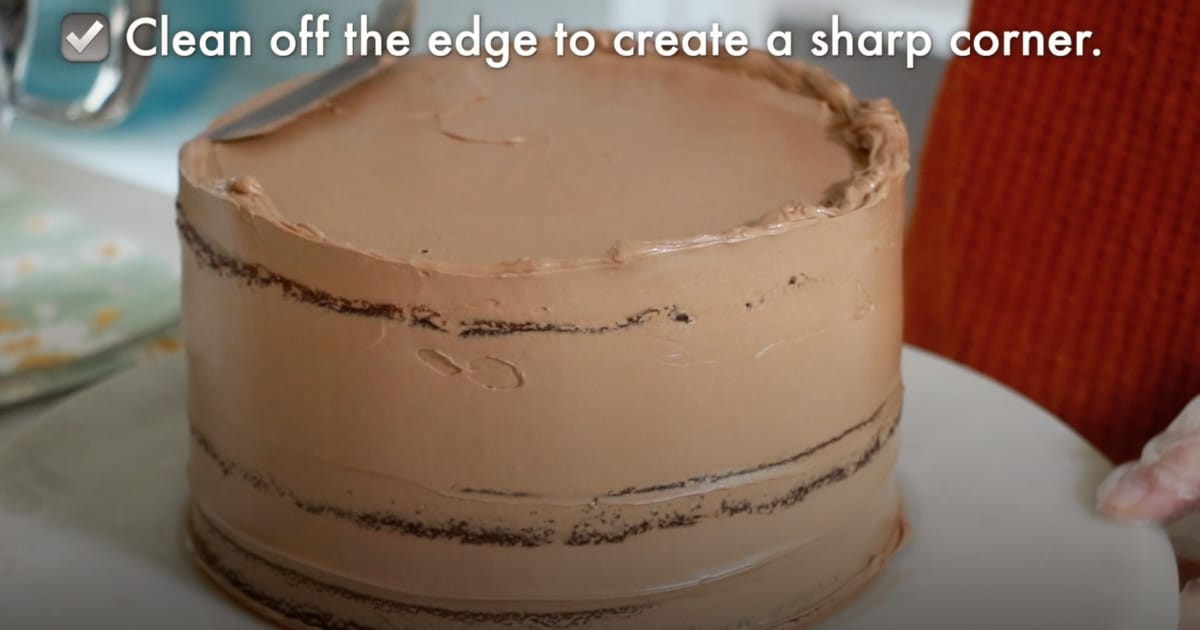
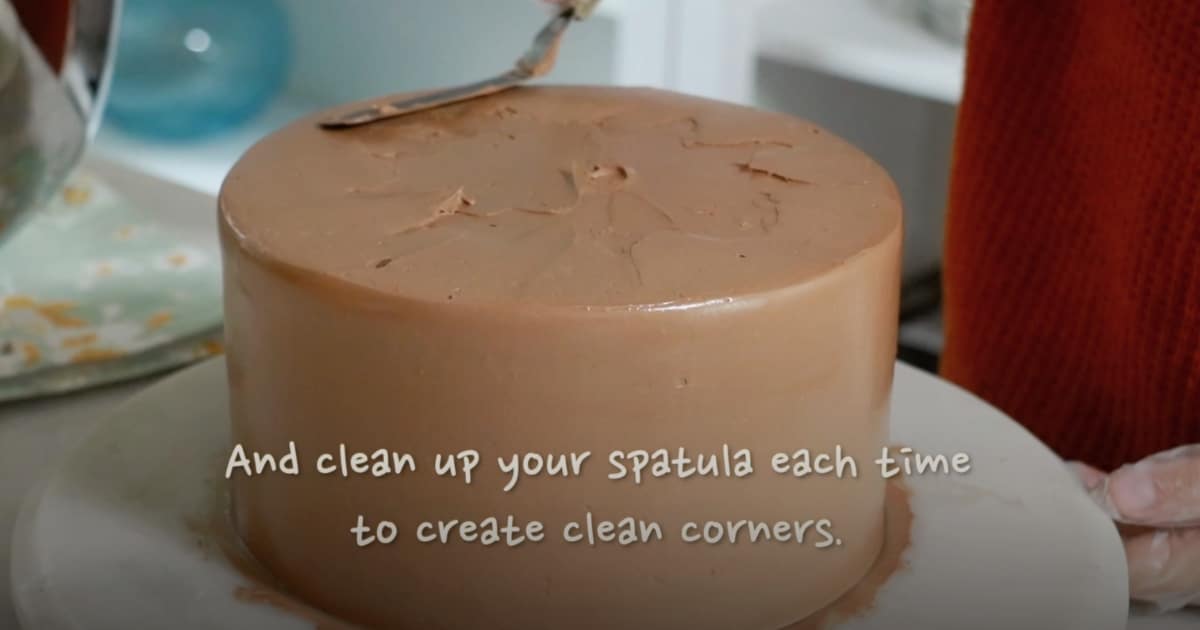
Create sharp corner edges with an icing spatula.
Angle your spatula a little bit like in the image below (20 - 40 degree angle) to clean off the excess buttercream and fade in. I always imagine an airplane landing on the ground🛩️ Since this is just a crumb coat, practice here many times so that you can do better for a final coat! (We'll do the same process then!)
Chill the cake in the fridge.
By chilling the cake, you can prevent the cake from getting shaky as you finish the final coat.
Today, I did not chill it in the fridge here and finished the final coat right after as I was in a rush. But I highly recommend chilling it if you want to finish frosting it with more ease, especially if you are a beginner. Still to this day, I do so about 90% of the time!
If you are making naked cakes, there is no need for the final coat, just jump to the decoration section!
Final coat
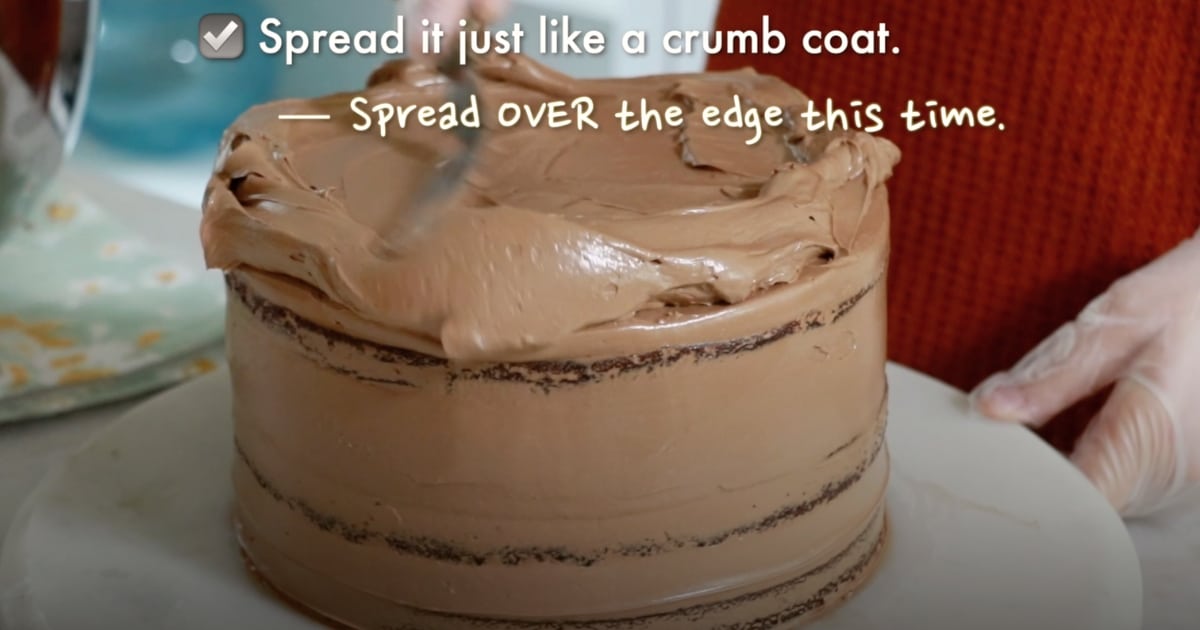
Spread the frosting evenly on top of the cake.
Drop a big scoop of frosting on top and spread evenly, just like how we did earlier to stack each layer.
Coat the sides with the same thickness.
Focus on making the thickness even all around the side first. There is no need to make it smooth yet!
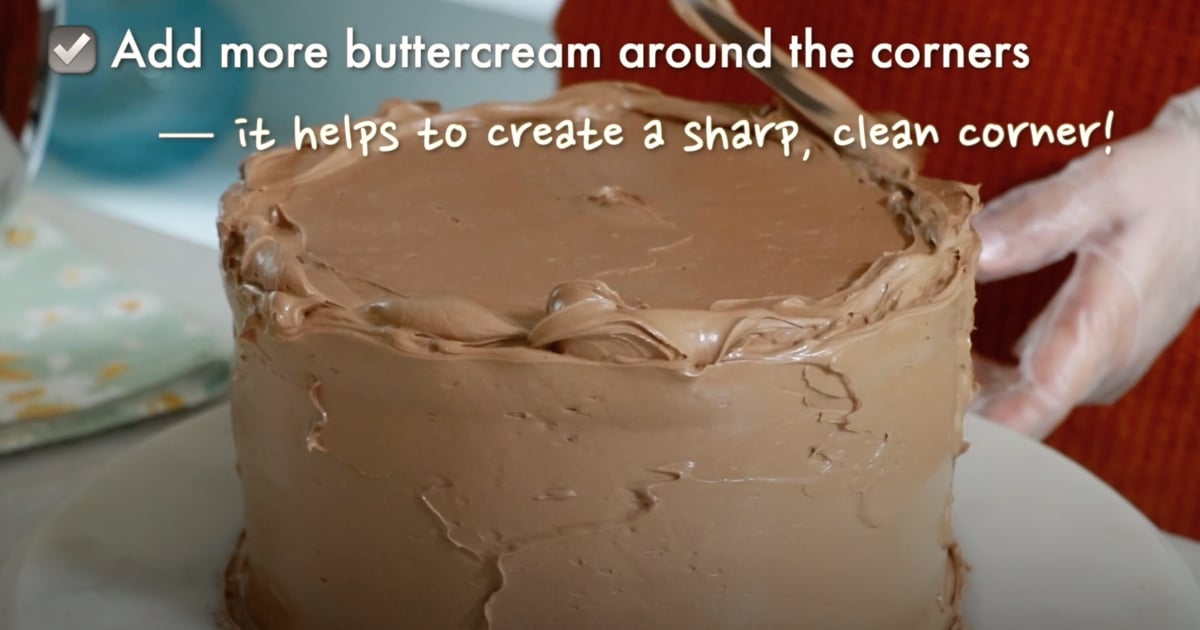
Add additional frosting on the top corner edges.
This is to create sharper corner edges 360 degrees later.
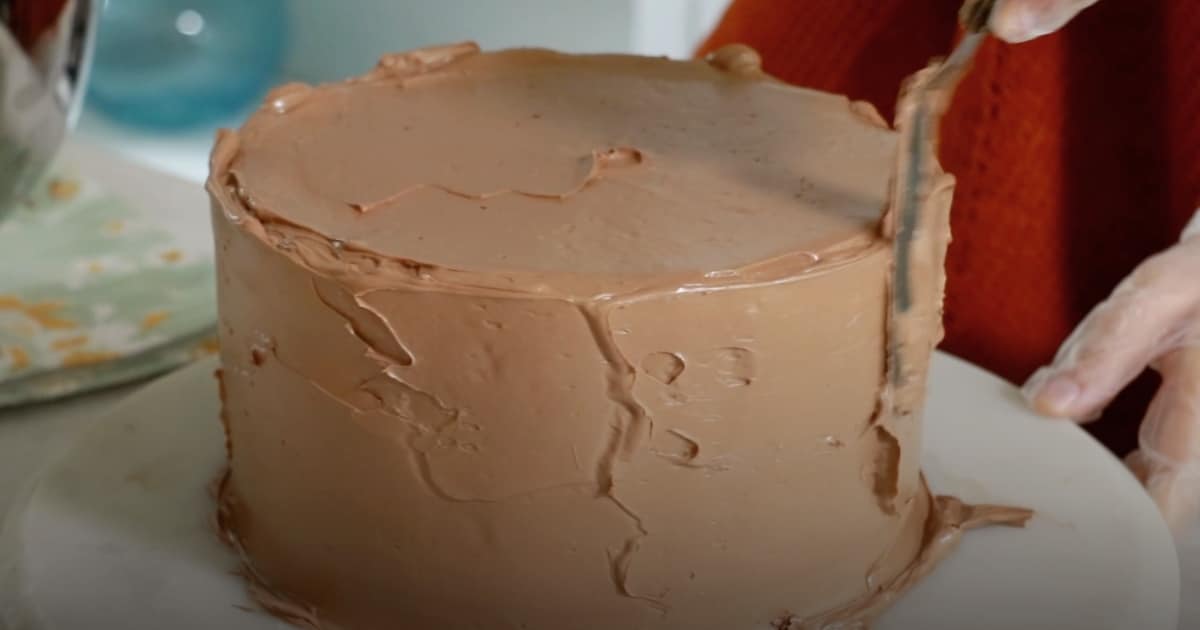
Smooth the sides with a dough scraper.
Now, it's time to smooth it out!
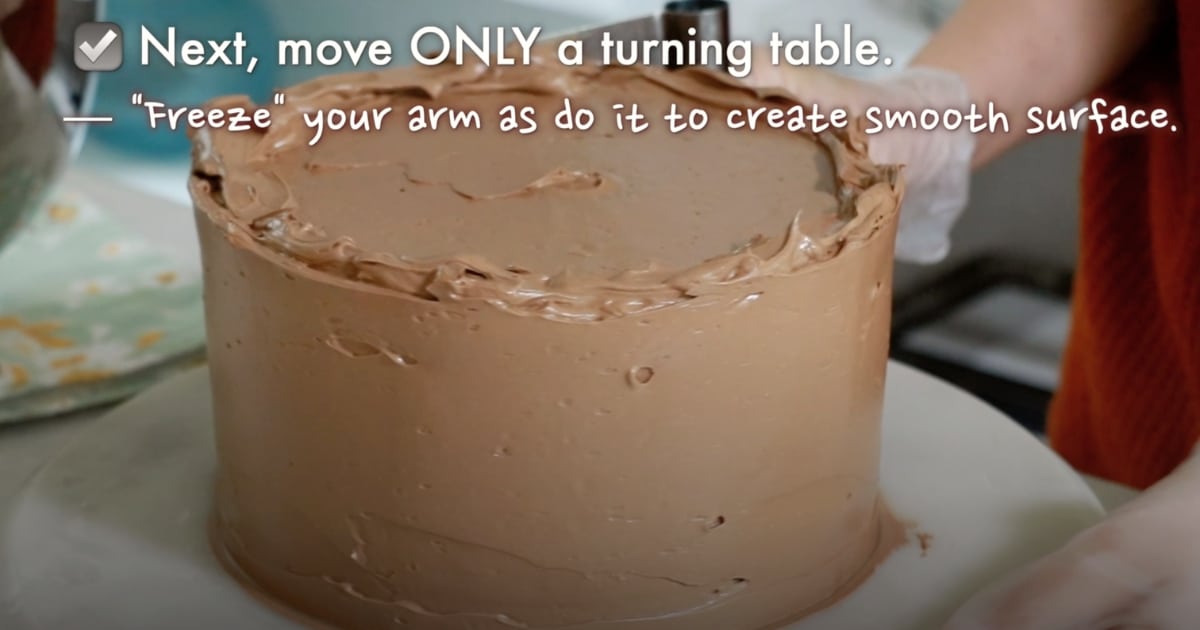
- Freeze your arm and dough scraper at 4 o'clock (or 8 o'clock if left-handed.), ensuring that it's standing straight.
- Move only a turning table with the other hand.
- Fade out the dough scraper when you are done.
Try to "freeze" your arm and scraper as much as you can while turning the table to avoid a wobbly surface. Using a good turning table that turns smoothly is very important to do this part easily. Mine does not move super smoothly as you might be able to see in the video. (We gotta use what we have right?) It's on my shopping list for this year😊
Also, you won't be able to frost well in case the cake is not at the very center of the turning table at this point.
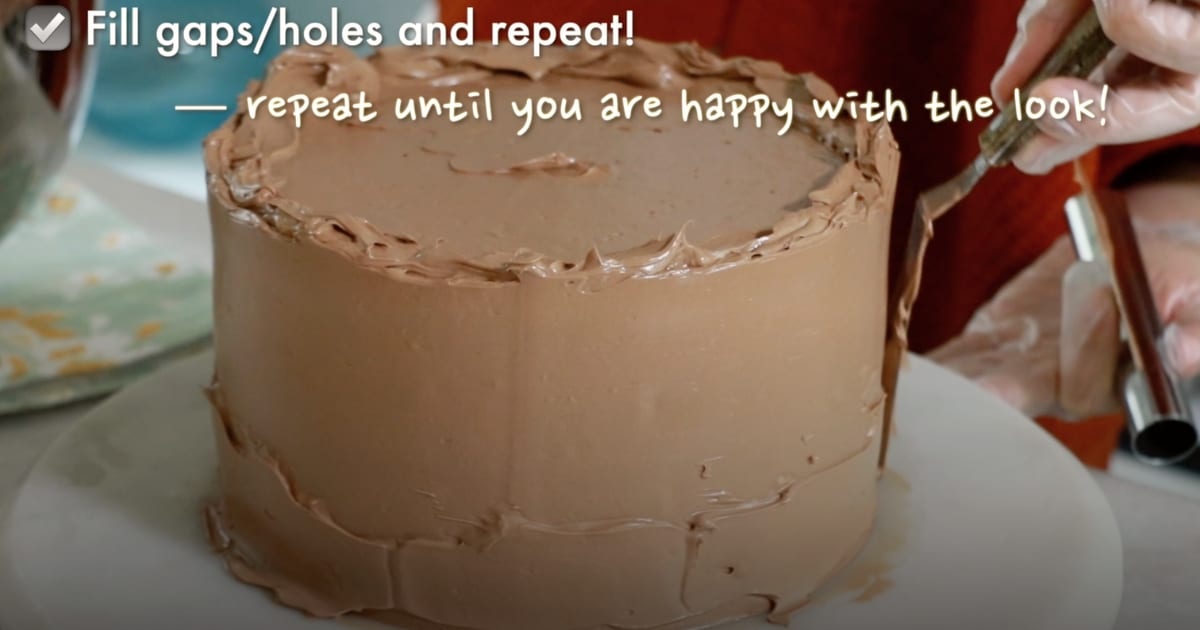
Fill gaps and holes on the surface if there are any, and smooth it out again.
Add additional frosting on any imperfection and repeat smoothing it out until you are happy with the look!
When you are using whipped cream frosting, try not to repeat this too many times since it gets thicker and rougher as you touch more. It is going to lose its smoothness.
Clean off the top corner edge with a spatula.
Angle your icing spatula a little bit, and slide in to create sharp corner edges, just like how we did for the crumb coat.
Clean off the frosting on a turning table.
Scrape off the extra frosting on the edges using an icing spatula, just like how we did for the crumb coat.
Chill the cake in the fridge.
I recommend chilling the cake before piping frosting on top if the time allows. That is because the frosting on the edges might get squished slightly as you pipe frosting on top, depending on the type of frosting, room temperature, etc.
Decorations
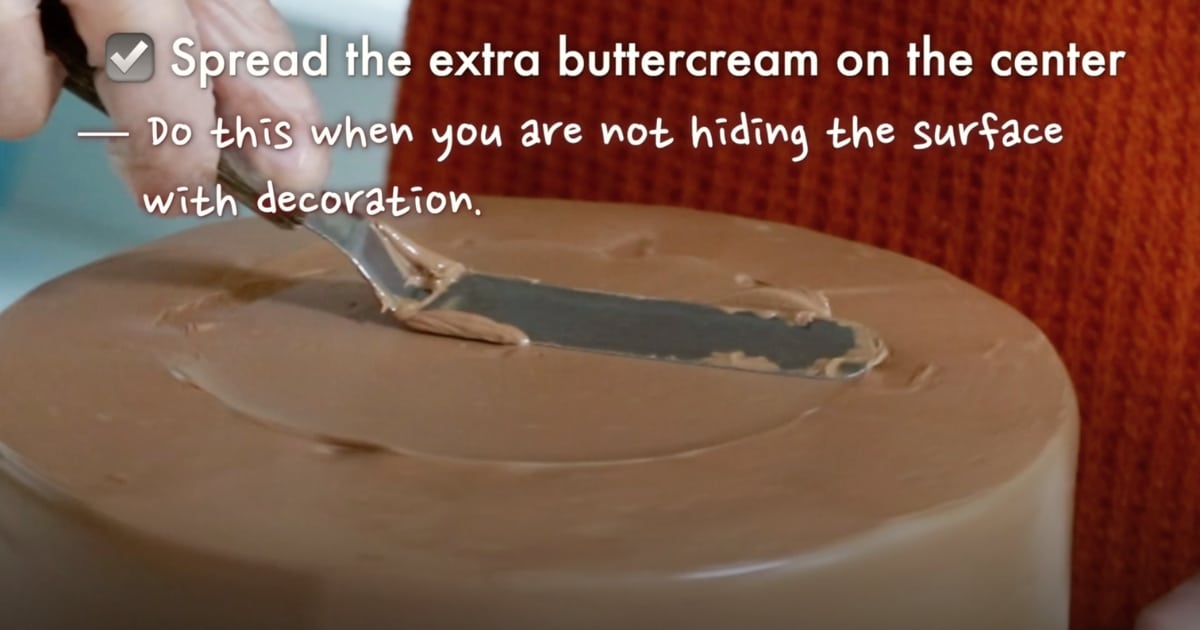
Spread extra frosting on the center and spread thinly. (optional)
Add more frosting and smooth out the surface only when you don't hide it with decorations. When you are hiding it with fruits or chocolate glaze, for example, you can skip this part!
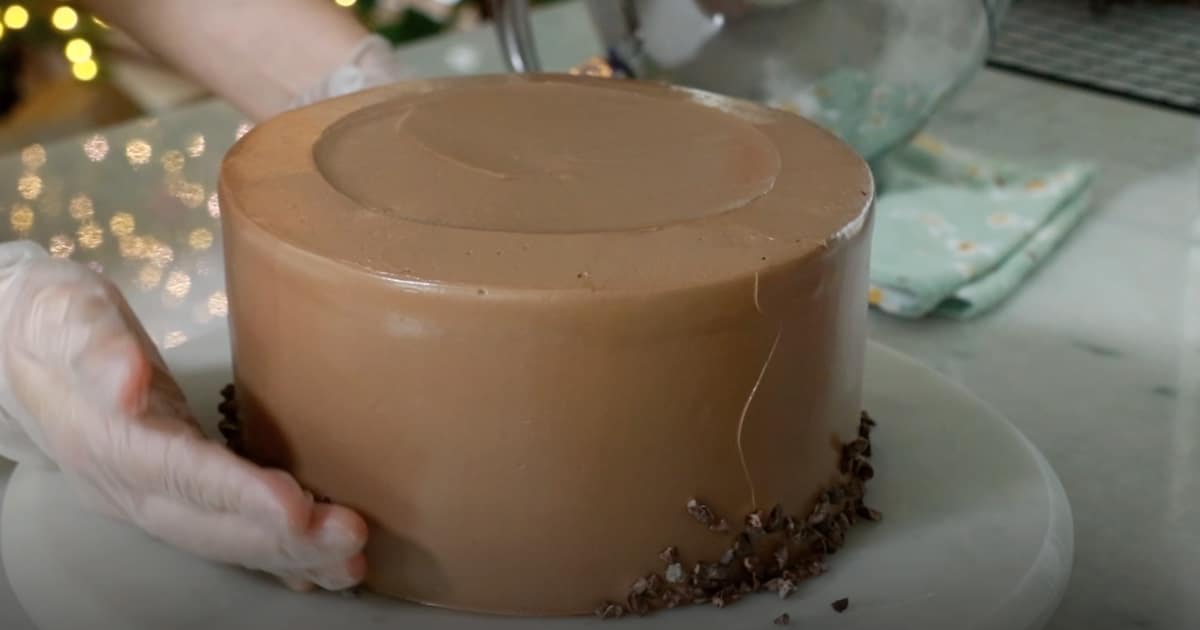
Attach any ingredient of your choice on the bottom edge. (optional)
I sometimes like to add the accents to make the cake look more festive.
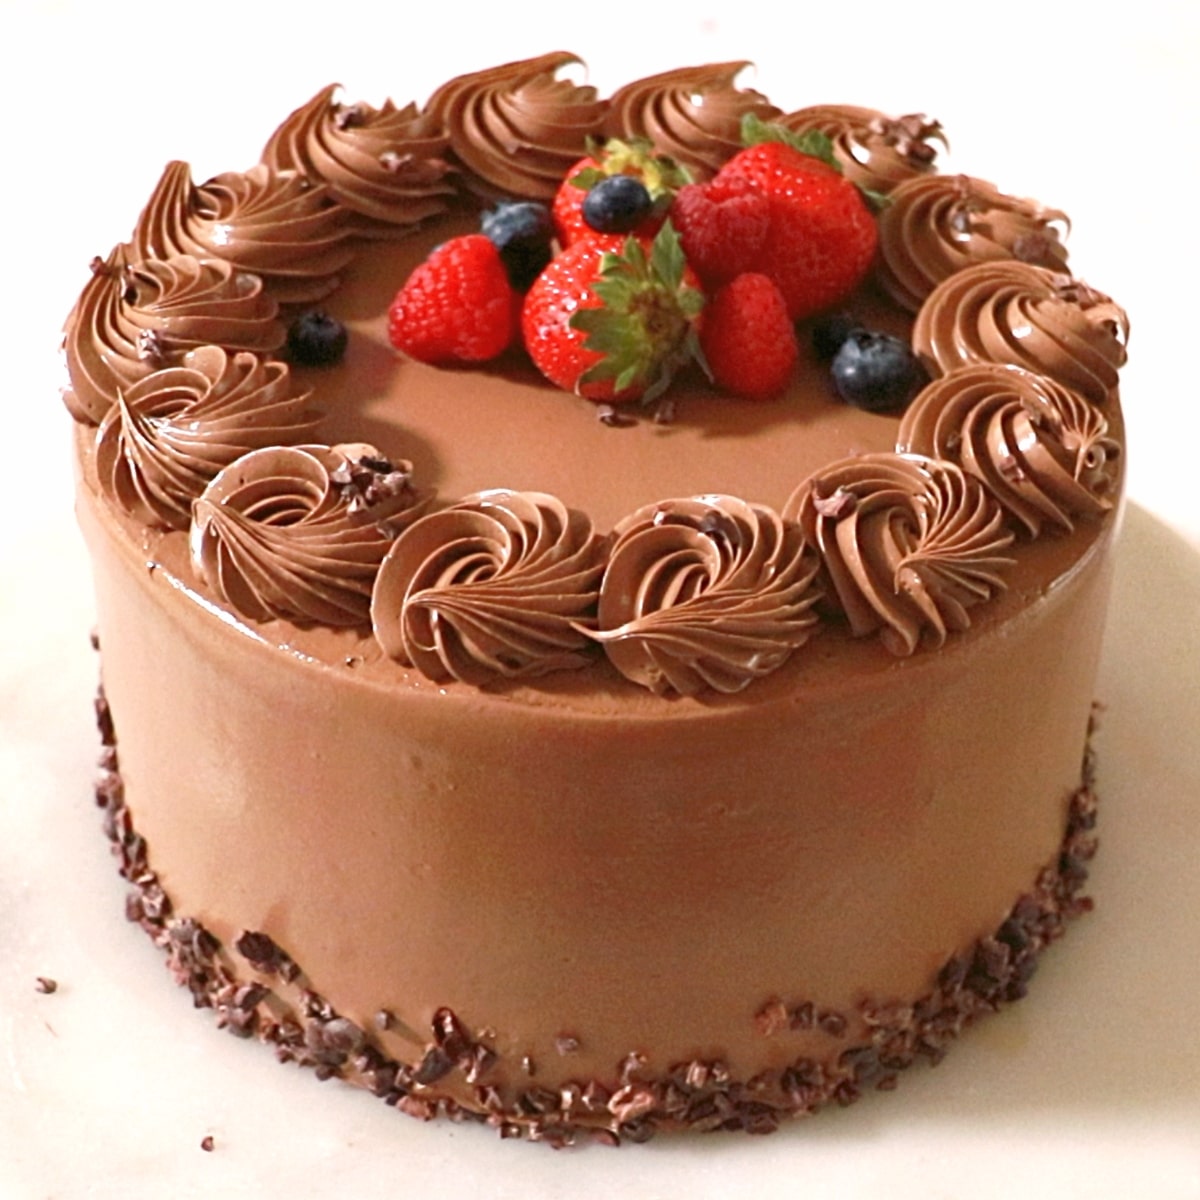
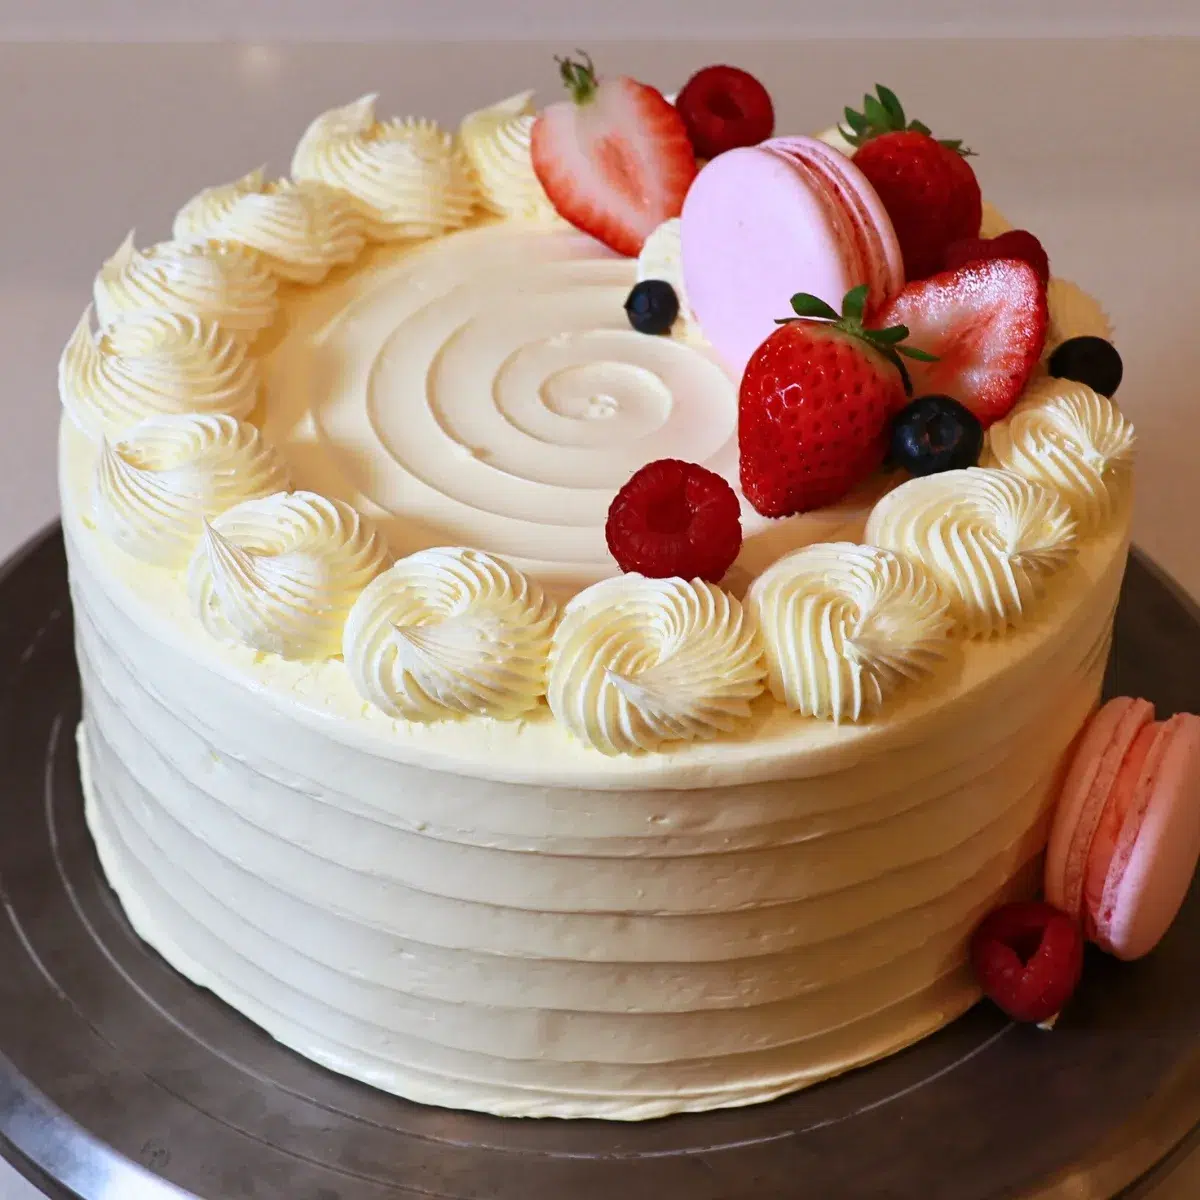
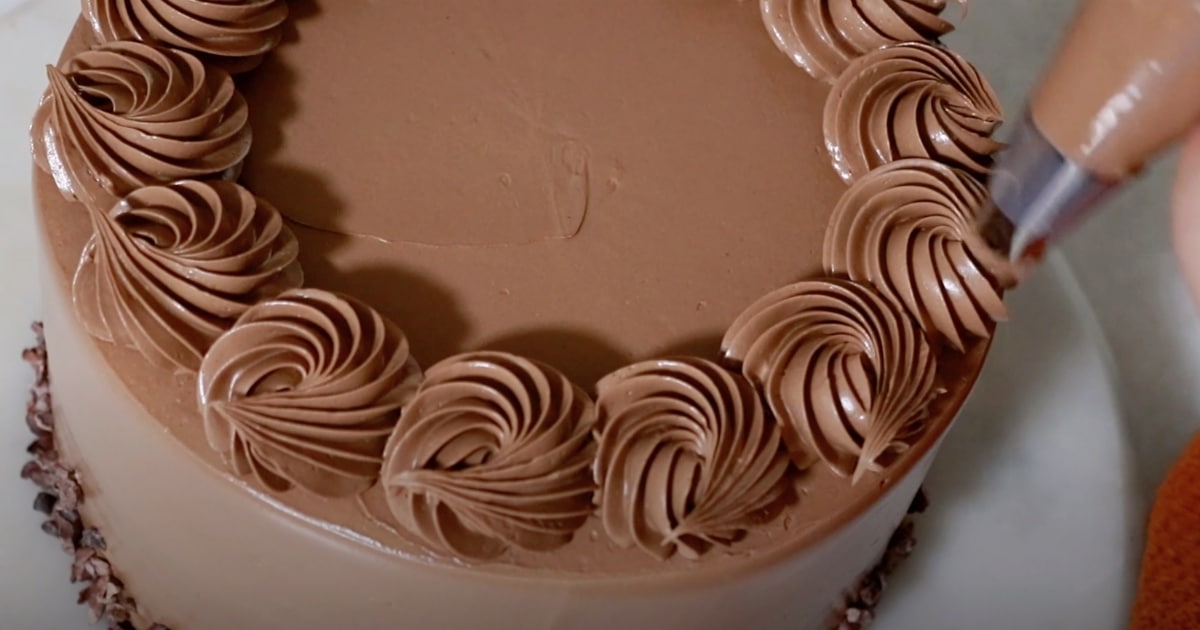
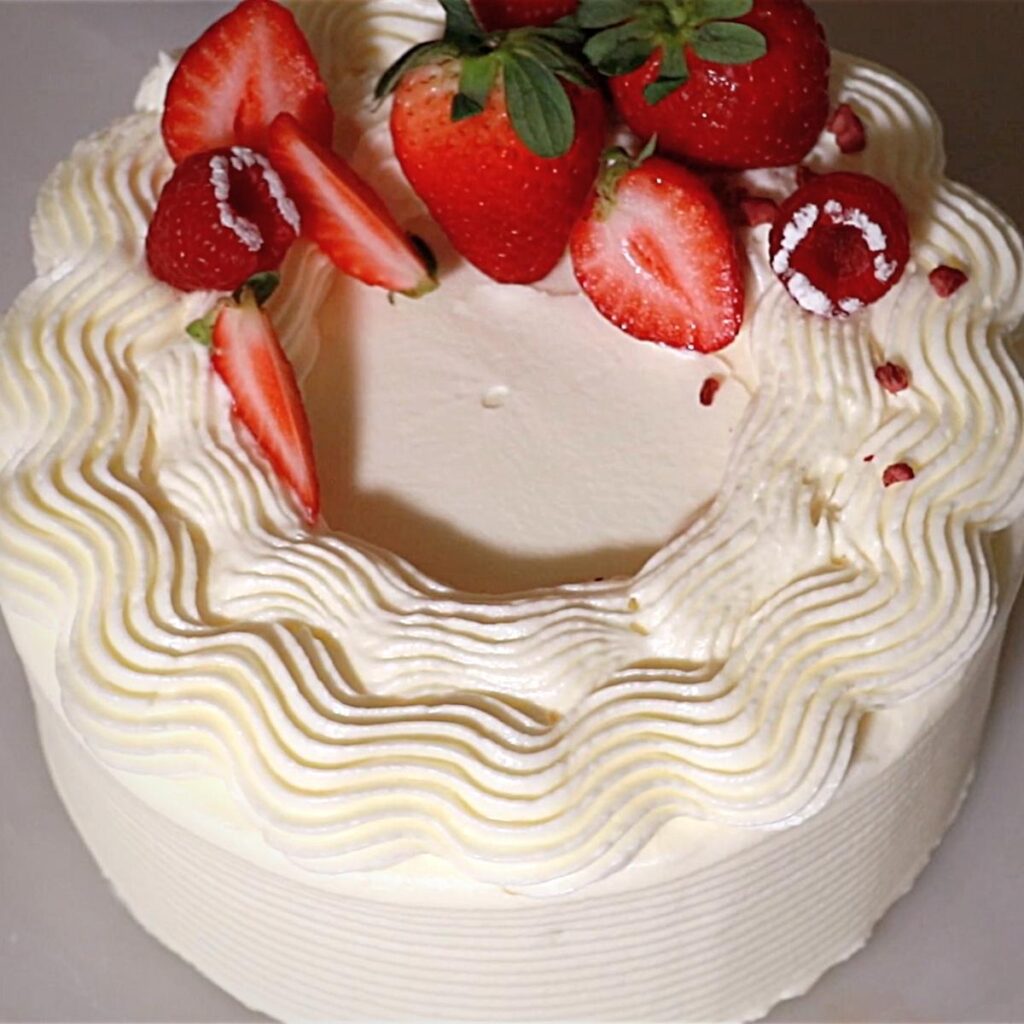
Pipe frosting on top of the cake.
Transfer the extra frosting into a pastry bag with a tip inserted and pipe it on top of the cake. Try to frost it with the same size, volume, and intervals to create a clean look. I piped very simple swirls this time. Pipe any shape you like!
How to pipe with a star tip
Check out 30 ways to pipe with a star tip to get the design ideas for your next cake project!
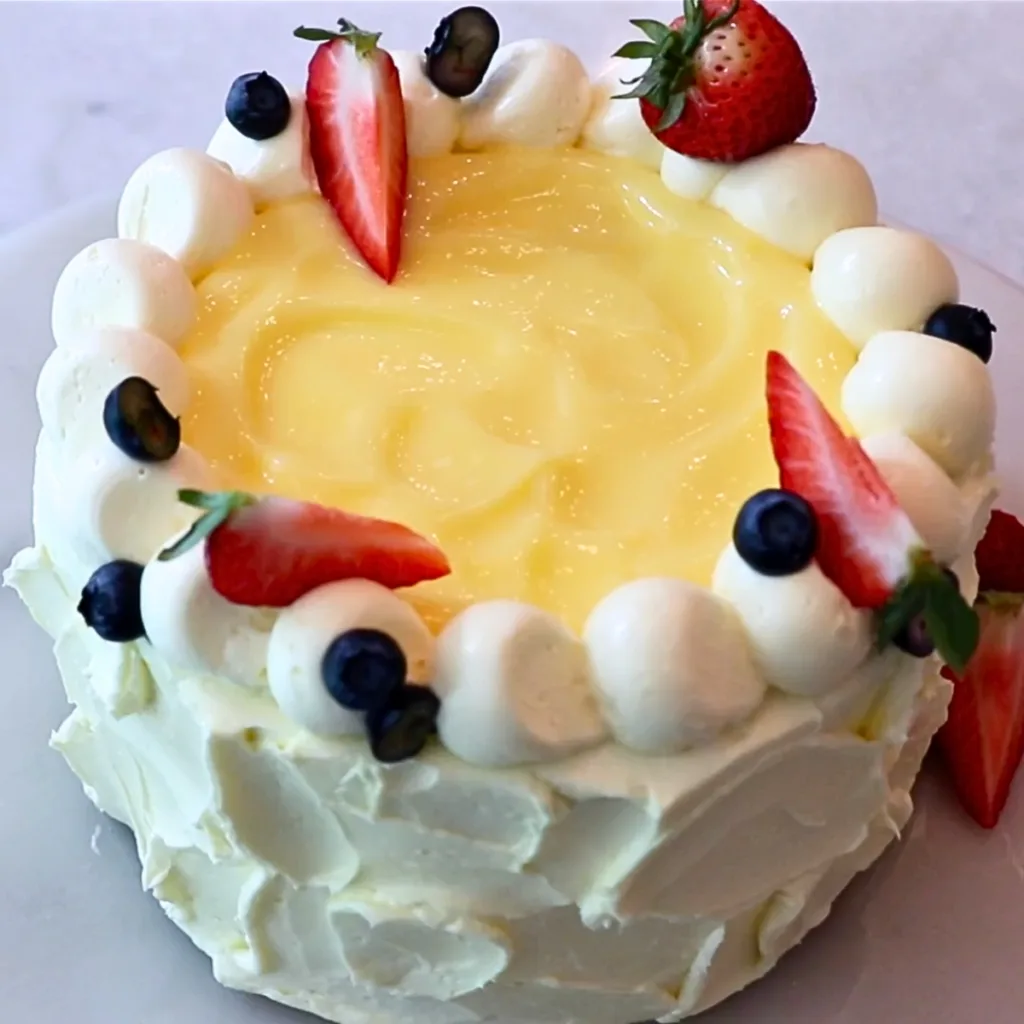
Decorate the top of the cake with any topping.
Finally, decorate on top of the cake with any topping you like. Here are some ideas for the toppings.
The topping idea to decorate a cake
- Fresh fruits
- Fresh herbs
- Chocolate chips
- Chocolate decorations, such as chocolate curls and spirals.
- Gold leaf
- Sprinkles
- Powdered sugar
- Macarons
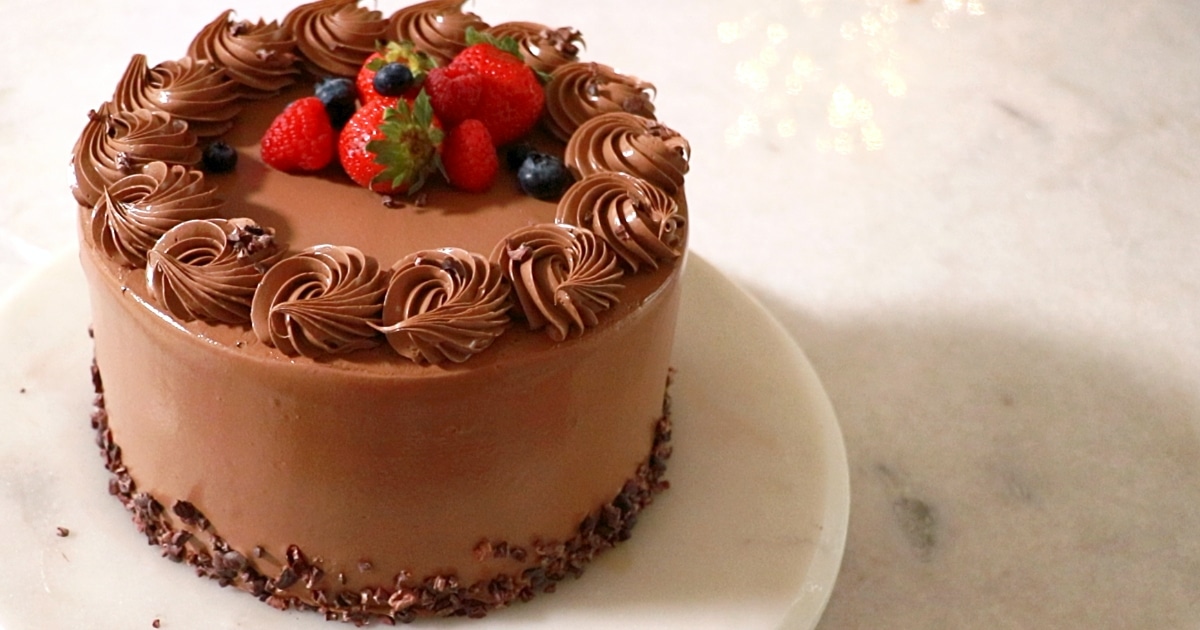
Start decorating bigger toppings first and fill in the unwanted gaps with smaller ones. It'll look more balanced and natural that way.
And that's it! You made it to the end! Applause to yourself if you finished completing a whole cake.👏🏻
📌 How To Transfer A Cake
In case you need to transfer the cake to a cake plate or cake stand from the turning table, follow the steps below:
- Insert the tip of an icing spatula around the edge and turn a turntable in case the frosting might be still attached there.
- Insert a large cake spatula under the bottom of the cake. Move it under half of the cake.
- Lift it slightly as you quickly insert the other hand under the spatula to support the weight balance.
- Lift the cake flat while holding a balance and let it land on the center of the plate or cake stand.
- Quickly remove the other hand as you place down the spatula.
- Hold a plate or cake plate on the other hand and remove the spatula quickly as you press it hard on the ground. You'll end up dragging a cake when doing it without pressing down the spatula firmly.
📌 How To Store The Frosted Cake
Store it in an airtight container so that the surface of the frosting does not get dry. Once you slice them, cover the cut sides directly with plastic wrap or cake films to prevent the cake from getting dried. Store it in the fridge or freezer, depending on the cake. The shelf-life depends on the types of cakes and frostings.
How can I store the extra buttercream?
Store it in an airtight container or wrap it and store it in the fridge or freezer. The shelf life depends on the type of frosting.
📌 Cake & Frosting Recipes To Practice
You can apply the tips and techniques for any cake and frosting! Here are some options to pick from.
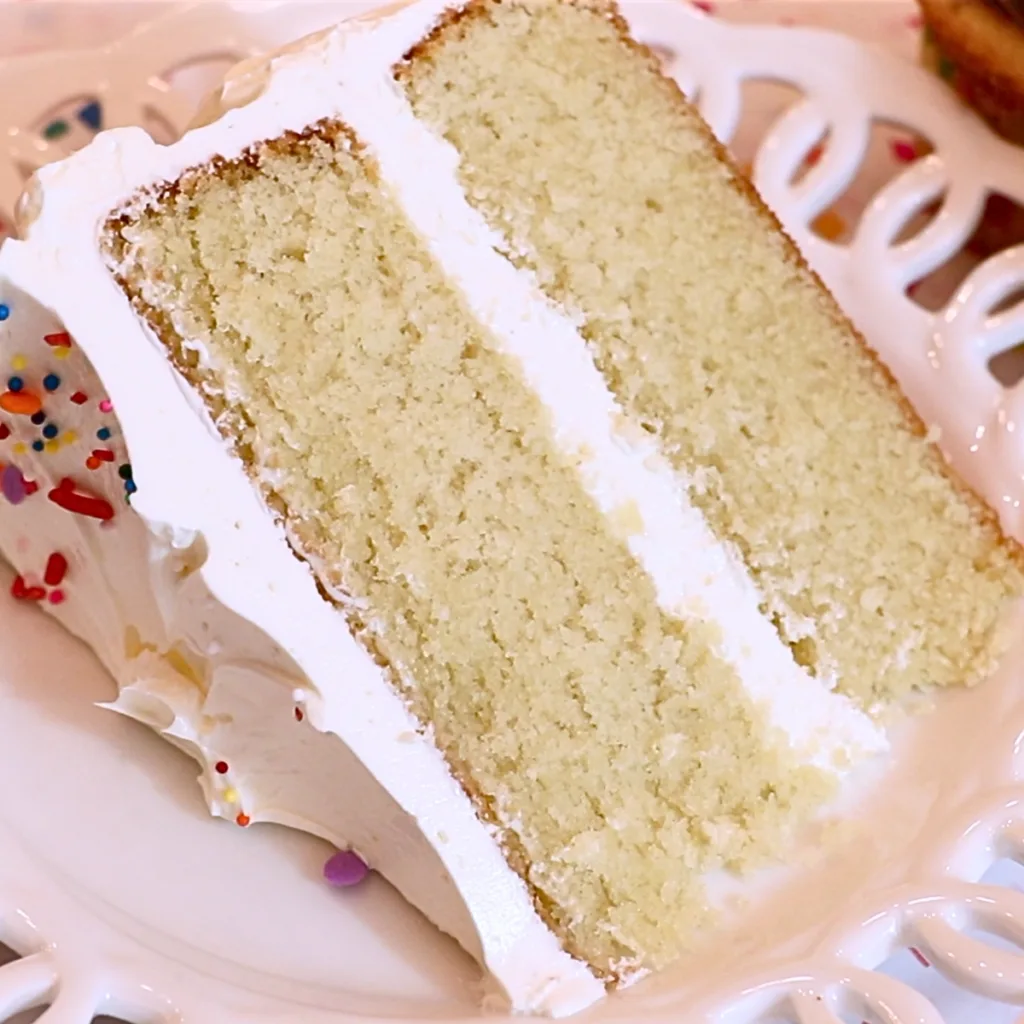
Cakes
Frostings
- Swiss Meringue Buttercream
- Italian Buttercream
- French Buttercream
- Cream Cheese Frosting
- Lemon Buttercream Frosting
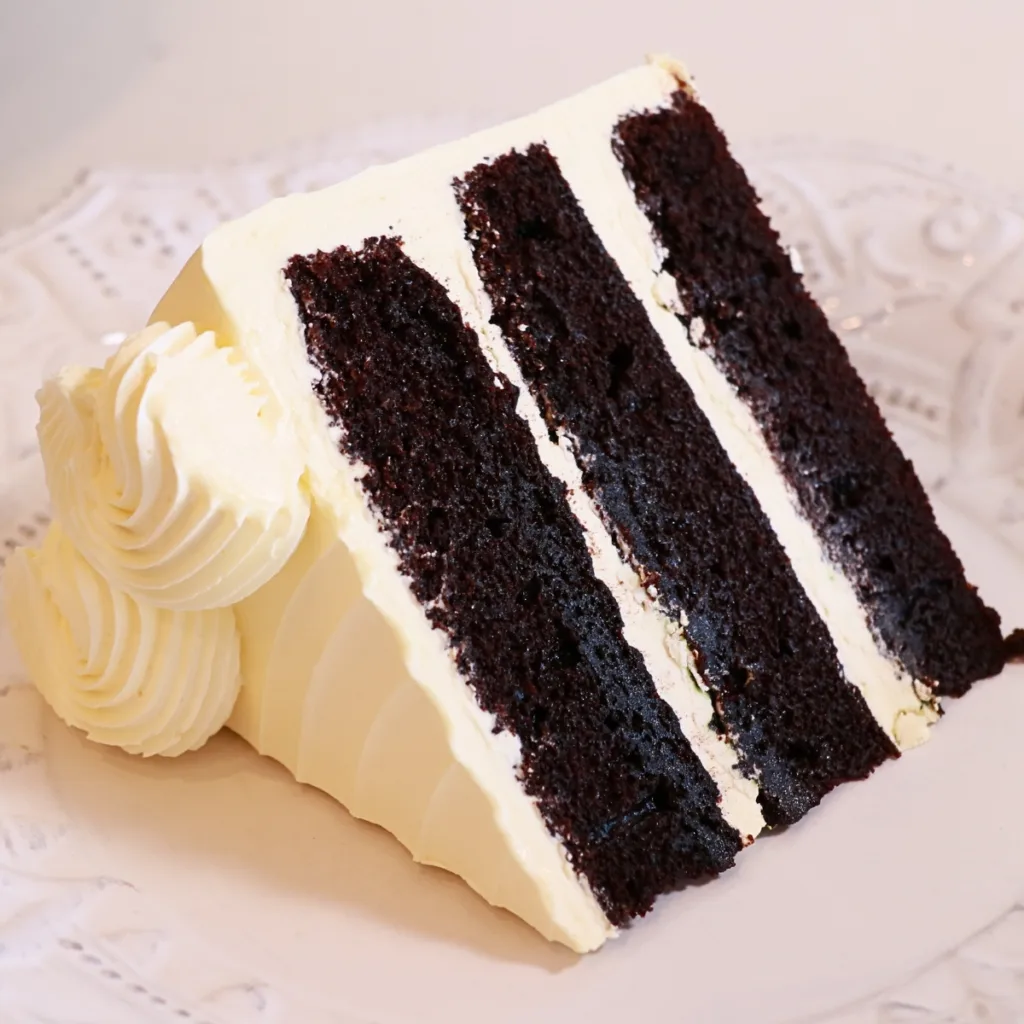
Today, I used my chocolate cake and chocolate buttercream recipes to frost the cake.
Check out the video to learn how to make the chocolate buttercream:
https://www.youtube.com/embed/48uRzkojV54 (Inside the video tutorial, I am sharing 2 ways to make chocolate buttercream; with cocoa powder or melted chocolate using any plain buttercream as a base. I used my Swiss buttercream recipe and the melted chocolate this time.)


Khuzaimas says
Would you mind giving me simple buttercream receipe
Thank you😀
ayacaliva says
Hi! I have Swiss buttercream and Italian buttercream recipes in this blog (You can find them from Frosting categories.), I am hoping to add American and French buttercream recipes here as well! I shared them already in my Youtube channel, Pastry Living with Aya. Check them out if you are interested!
Lynn says
Hi Aya, appreciate your tips to decorate smoothly! where did you buy your marble turntable for the cake decorating? Thanks 🙂
Aya Caliva says
Hi! I got it at Target about 4-5 years ago. They might still sell it in their online shop. But I have to say, it doesn't move so smoothly😅 The design is nice, though!