
Crème brûlée might seem a bit intimidating to make, but you'll be surprised to know how easily you can make it with just 5 simple ingredients. The classic dessert is often the most popular menu at restaurants - A decade ago, I was also one of the pastry chefs who were making them daily at work.
After making it hundreds of times and encountering some failures, I finally mastered how anybody can recreate the perfect, top-notch creme brulee at home that tastes as good as 3 Michelin stars restaurants. Or even BETTER.
My family fell in love with this crème brûlée recipe. We can't stop making sounds like "hmmm......", or "umm umm" as we eat them every time😁.
Although there is no such thing as "perfect" in all aspects, this one might be an exception.


If you made crème brûlée before, you may have encountered problems such as:
- The baked filling was too loose or thick.
- The custard contained lots of air holes.
- The caramelized sugar was burnt too much or too thick.
... and so on.
Today, I'm spilling the step-by-step instructions, techniques, and troubleshooting tips to make a perfect creme brulee from the comfort of your kitchen.
Let's dive in!
📌 What is Crème Brûlée?
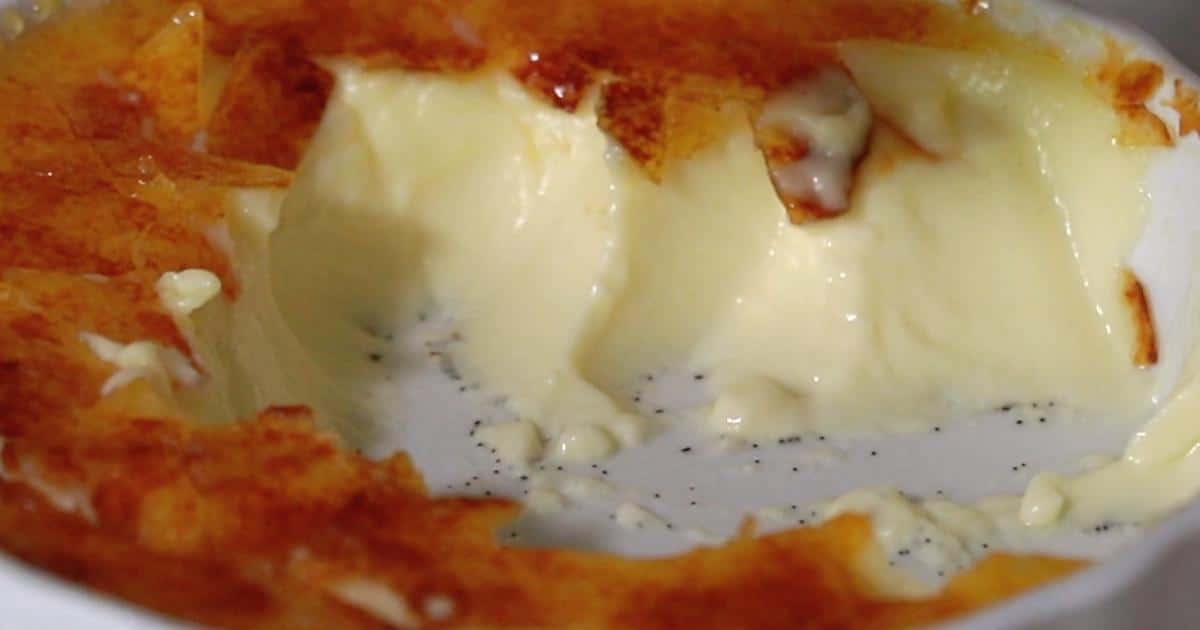
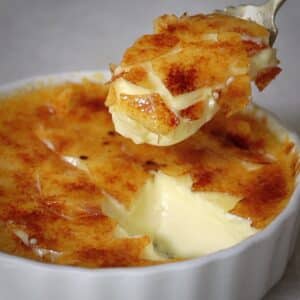
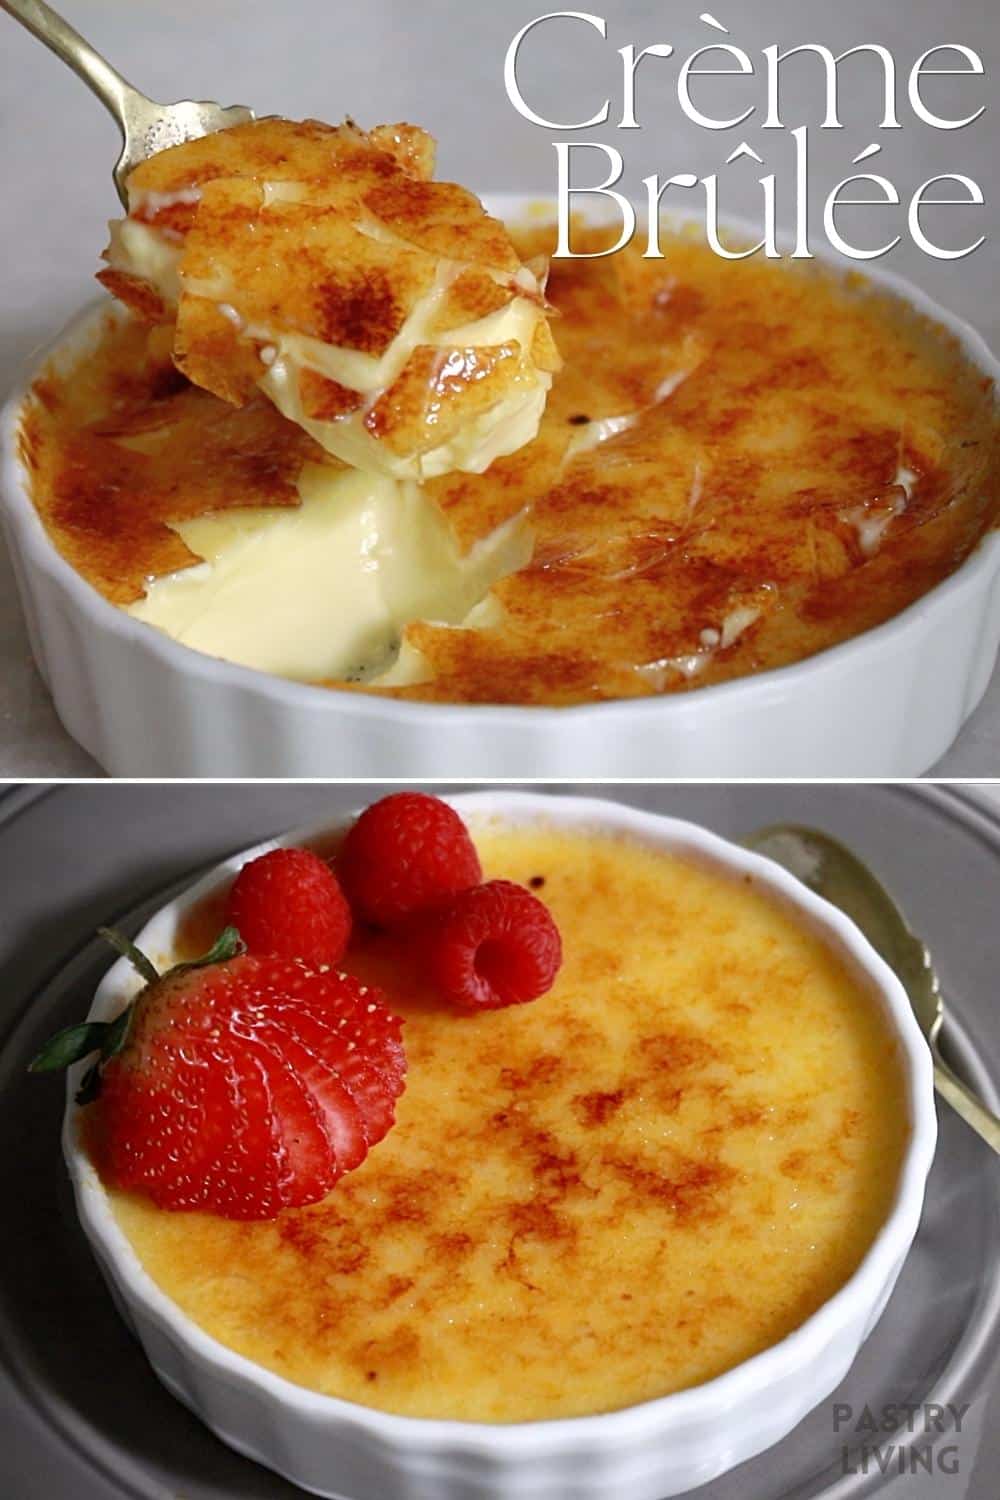
Creme brûlée is a baked creamy custard filling with a thin layer of crunchy caramelized sugar on top of the custard.
It is one of the most beloved classic French desserts of all time. The combination of rich and creamy texture, amazing aroma of vanilla beans, and a perfectly thin layer of caramel will give you the most luxurious time you deserve.
It is a perfect dessert to share with your loved ones on special occasions, such as Valentine's Day, and anniversaries, or just to surprise your family and friends while they are visiting.
What does Crème Brûlée mean?
Crème brûlée means "burnt cream" in French. (Crème = cream, brûlée = burnt) Simple, just like how it's made!
How is it different from Flan?
Creme brulee is richer and creamier in texture because of the higher content of milkfat and yolks than flan or custard pudding.
Flan contains more milk or half-and-half and often adds whole eggs with yolks to create a lighter, pudding-like texture.

📌 5 basic Ingredients to make Crème Brûlée
Custard filling
- Heavy cream: Heavy cream is essential for creme brulee to create a rich custard base. You can also use heavy whipping cream - Choose the one with more than 36% milk fat for the filling to set properly.
- Milk: Use whole milk for the filling to set properly and give a richer flavor.
- Vanilla: The sweet vanilla flavor adds another layer of deliciousness to the creme brulee. Read the section below to see more about the types of vanilla and my recommendations.
- Sugar: I recommend using white sugar, such as granulated sugar or caster sugar.
- Egg yolks: For creme brulee, yolks are essential because they create such a rich flavor and firm enough yet melty texture.
Caramel on top
- Sugar: I recommend using white sugar, such as granulated sugar or caster sugar. Check below to see the other options.

What type of vanilla should I use for creme brulee?
Vanilla beans
I highly recommend using vanilla beans to get the best results. There are many recipes I do not mind switching with vanilla extract but creme brulee is one of the few that makes a significant difference without it. You can easily find them online nowadays, plus the quality is often much better and the price is cheaper than buying at local grocery stores. I find most of them sold at grocery stores to be dried and stale.
There are many types of vanilla beans from different regions, but I like to use Madagascar vanilla beans, which are the most widely sold worldwide. It has an exotic, sweet bourbon smell and flavor that goes perfectly with creme brulee.
Vanilla bean paste
If you can not get vanilla beans, vanilla paste is another option for you. Although the flavor is not as intense as whole vanilla beans, it still does a greater than vanilla extract.
Vanilla extract
Now, vanilla extract is not something I usually recommend using for creme brulee, especially when you want to make authentic ones just like from a fancy restaurant. But! I am a firm believer in starting from what you have. If you can not get vanilla beans or paste or if it's pricy for your current situation, don't hesitate to make it without them.
What type of sugar should I use to caramelize the surface?
Granulated sugar
I use regular white sugar, such as granulated sugar or caster sugar.
Turninado sugar or Demerara sugar
Some people use turbinado or Demerara sugar for the richer flavors, but I rarely use them since they are a lot more difficult to get and I rarely use them for other recipes.
Brown sugar
Stickier sugar, such as brown sugar does not spread thinly easily and it burns a lot more quickly than white sugar. It is not most suitable to make the caramelized sugar.
📌 Basic tools you'll need to make Crème Brûlée
- Ramekins: One batch of the recipe is enough for 4 - 5 8-oz ramekins with a 5” (12 cm) width.
- Baking sheet tray or large baking pan: We'll place the ramekins on top of the tray and bake the creme brulee with a hot water bath, which is an essential method to deliver the heat to them very gently to make an incredibly smooth texture.
- Medium saucepan: Use it to heat the water for a water bath.
- Blow torch: The tool is going to burn the sugar on top and complete the dessert.
- Large bowl
- Whisk
- Fine mesh strainer
What type of ramekins should I use?
I recommend using wide and shallow ramekins so you can enjoy the perfect balance of the creamy filling and crispy layer of caramelized sugar on each bite. It also takes a lot longer time to bake them with deeper ramekins.
You can use ramekins with different sizes, just ensure to adjust the baking time accordingly. The bigger they are, the longer it usually takes to bake them.
📌 6 Steps to make Crème Brûlée
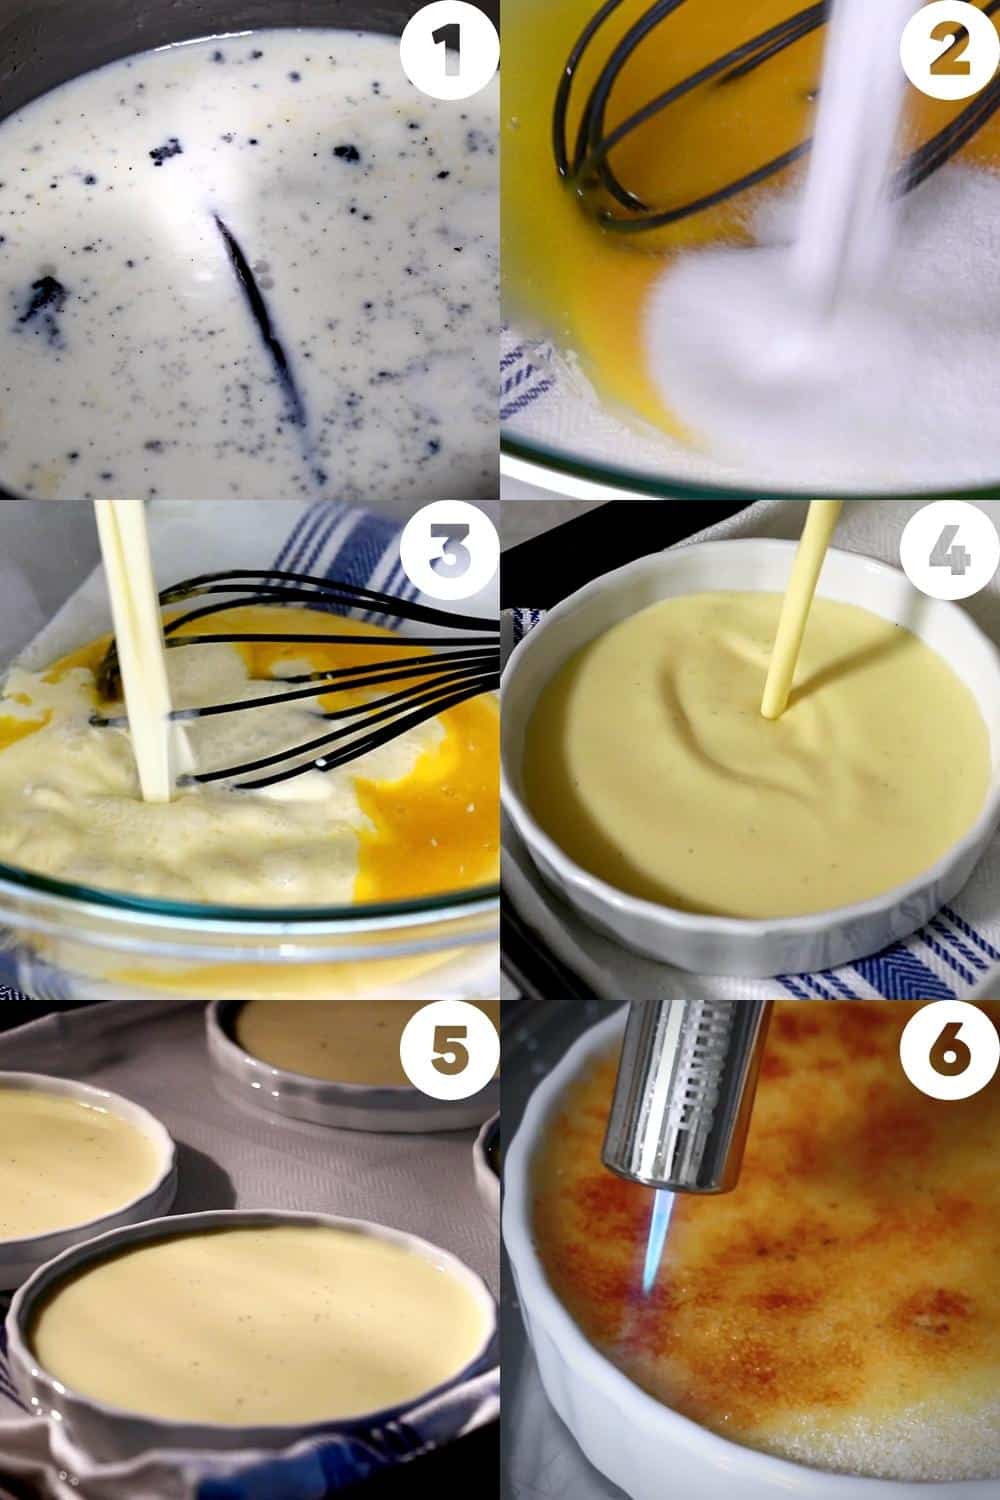
- In a medium saucepan, add heavy cream, milk, vanilla beans (scrape off the seeds inside and add them to the pot with the empty pod), and about half of the sugar. Heat them at medium heat until it starts simmering gently. Keep a close eye on it to prevent it from boiling out or evaporating too much. Remove from the heat, cover the top with a lid, and wait for about 10 minutes to infuse the vanilla flavor.
- In a large bowl, mix the yolks and the rest of the sugar. There is no need to whip them - Stop as soon as they are incorporated evenly.
- First, add about ⅓ of the heated liquids to the egg yolk mixture and mix with a whisk gently until it looks even. Add the rest of the liquids as you mix. Mix it with a spatula at the end to ensure it's mixed evenly.
- Strain it with a fine sieve to discard any cooked egg and pour it into ramekins equally. One batch is enough for 4 - 5 6 oz ramekins with a 5-inch (12 cm) width.
- Place the sheet tray in the oven rack, lay a thin cloth or paper towels, and pour hot simmering water so that a little over ½ to ⅔ of the height of ramekins can dip in it. Carefully place ramekins onto it and bake at 300ºF | 149ºC for 25 - 30 minutes (23 - 26 minutes with 5 ramekins and 27 - 30 minutes with 4 ramekins.) until the filling jiggles slightly like a pudding or jello when adding vibrations. Take them out carefully and cool them on a wire rack. Move them to the fridge to chill them for more than a few hours. Start checking a bit earlier, just in case. Adjust the time and temperature depending on the oven, thickness, amount, etc.
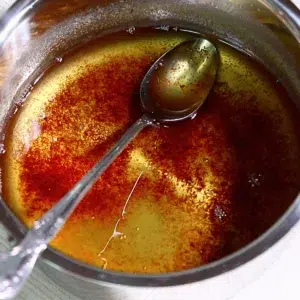
- Spread the sugar over the surface evenly and burn it with a torch to create a thin layer of caramel crunch. Wait for a few minutes until the caramel cools down. As an option, top it with fresh berries, mint, or any ingredient you desire and enjoy!

📌 Pro Tips for successful Crème Brûlée
The custard filling
- Try not to mix sugar and yolk vigorously to prevent them from containing lots of air inside. The texture of creme brulee won't be so smooth when that happens. The same tip applies when adding liquids as well.
- If you see a lot of air bubbles on the surface of the filling after pouring it into ramekins, heat them for just a blink second with a kitchen torch to pop them.
- Be careful not to spill the hot simmering water on the filling in ramekins when placing them. It'll affect the consistency of the baked filling.
- You can also chill the baked creme brulee in the fridge overnight. In that case, wrap each ramekin after they cool down completely. The cream gets thickened slightly more compared to chilling it for a few hours although the difference is not significant.
The caramelized sugar
Burning sugar at the end is my favorite part. It is quite exciting to see them firing up! Here are my tips for creating beautiful caramelization:
- Ensure that the filling is very cold before finishing it with caramelized on top. Cold filling tastes so much better than room temperature filling with the caramelized sugar crust.
- When you store ramekins with plastic wrap on top, check if there is no excess water attached to the surface and gently remove it with a kitchen towel if you see it.
- Do not add too much sugar on top to prevent the caramel crust from getting too thick since it doesn't feel very pleasant. Spread it thinly so it delicately breaks when hitting it with a spoon.
- After burning the sugar on top, do not let it sit for too long to prevent the caramel from starting to sweat.
- Start torching sugar from the sides of the ramekins and slowly move inward to burn sugar evenly a bit easier.
- Decrease the strength of the blowing strength if you find it difficult to caramelize evenly.
Can I make creme brulee without a torch?
Although an oven's broiler is often introduced as another method, this one never worked great. The result was not nearly close to the one with a torch. I highly recommend investing in a torch and saving yourself a lot more time and effort. There are a variety of options for a small inexpensive torch online if you can't find it at local stores.

📌 Other Frequently Asked Questions
Move them to the fridge after they cool down enough and wrap each after they are cooled completely if you don't eat them right away. *Caramelize the sugar on top right before serving as the caramel starts getting softened as it sits.
Store them in the fridge for up to four days. I highly recommend enjoying them within that day or the next day for the best taste.
One of the biggest causes of this is that the heat was too strong in the oven. The filling starts bubbling when it is too strong, and the bubbles end up remaining as the air holes after the filling is set. Try reducing the temperature and see if it solves the problem.
Baking them with hot water and laying a cloth under the ramekins also helps to deliver the heat more gently, which leads to a more silky, smoother creme brulee.
Also, avoid mixing the filling base vigorously when mixing all the ingredients, which can lead to this issue.
The most common cause of this is that it was simply not baked long enough. Always check the firmness, just like I shared in this post. It should giggle just a little bit like a pudding or jello when adding vibrations. Also, don't forget to adjust the baking time, depending on the oven, the thickness and amount of the filling, etc.
📌 Explore more French desserts
If you loved this creme brulee recipe, also try these classic French desserts!
📌 VIDEO: Watch How To Make It!
Watch the video to learn how to make the crème brûlée visually and get a deeper understanding of all the processes.
Don't forget to subscribe if you liked it😉
📌 Printable Recipe
💬 If you loved this easy crème brûlée recipe, please share your feedback on this post! I always love hearing how you enjoyed it with your friends and family.
Perfect Crème Brûlée
Equipment
- Saucepan
- Knife for vanilla beans
- Bowl
- Whisk
- Fine sieve Use a fine sieve.
- Baking sheet tray to pour hot water in
- Thin cloth or kitchen towel to palce on the sheet tray
- Ramekins One batch is enough for: 4 - 5 5” (12 cm) ramekins
Ingredients
Filling
- 16.9 oz Heavy cream 2 US cups
- 4.2 oz Whole milk ½ US cup
- 1 pod Vanilla beans
- 3.1 oz Granulated sugar ½ US cup - 1 Tbsp
- 3.5 oz Egg yolks about 6 eggs
Caramel
- Some Granulated sugar 1 ¾ teaspoon for each 5-inch wide (12cm) ramekins
Instructions
The 6 Steps
- In a medium saucepan, add heavy cream, milk, vanilla beans (scrape off the seeds inside and add them to the pot with the empty pod), and about half of the sugar. Heat them at medium heat until it starts simmering gently. Keep a close eye on it to prevent it from boiling out or evaporating too much. Remove from the heat, cover the top with a lid, and wait for about 10 minutes to infuse the vanilla flavor.16.9 oz Heavy cream, 4.2 oz Whole milk, 1 pod Vanilla beans
- In a large bowl, mix the yolks and the rest of the sugar. There is no need to whip them - Stop as soon as they are incorporated evenly.3.5 oz Egg yolks, 3.1 oz Granulated sugar
- First, add about ⅓ of the heated liquids to the egg yolk mixture and mix with a whisk gently until it looks even. Add the rest of the liquids as you mix. Mix it with a spatula at the end to ensure it's mixed evenly.
- Strain it with a fine sieve to discard any cooked egg and pour it into ramekins equally. One batch is enough for 4 - 5 6 oz ramekins with a 5-inch (12 cm) width.
- Place the sheet tray in the oven rack, lay a thin cloth or paper towels, and pour hot simmering water so that a little over ½ to ⅔ of the height of ramekins can dip in it. Carefully place ramekins onto it and bake at 300ºF | 149ºC until the filling jiggles slightly like a pudding or jello when adding vibrations. Adjust the time and temperature depending on the oven, thickness, amount, etc. * Bake them for about 25 minutes with 5 ramekins. (24 mins with my oven) * Bake them for about 30 minutes with 4 ramekins. (28 minutes with my oven)Take them out carefully and cool them on a wire rack. Move them to the fridge to chill them for more than a few hours.
- Spread the sugar over the surface evenly and burn it with a torch to create a thin layer of caramel crunch. Wait for a few minutes until the caramel cools down. As an option, top it with fresh berries, mint, or any ingredient you desire and enjoy!Some Granulated sugar
Pro Tips
- The custard filling* Try not to mix sugar and yolk vigorously to prevent them from containing lots of air inside. The texture of creme brulee won't be so smooth when that happens. The same tip applies when adding liquids as well.* If you see a lot of air bubbles on the surface of the filling after pouring it into ramekins, heat them for just a blink second with a kitchen torch to pop them.* Be careful not to spill the hot simmering water on the filling in ramekins when placing them. It'll affect the consistency of the baked filling.* You can also chill the baked creme brulee in the fridge overnight. In that case, wrap each ramekin after they cool down completely. The cream gets thickened slightly more compared to chilling it for a few hours although the difference is not significant.The sugar caramelization* Ensure that the filling is very cold before finishing it with caramelized on top. Cold filling tastes so much better than room temperature filling with the caramelized sugar crust. * When you store ramekins with plastic wrap on top, check if there is no excess water attached to the surface and gently remove it with a kitchen towel if you see it.* Do not add too much sugar on top to prevent the caramel crust from getting too thick since it doesn't feel very pleasant. Spread it thinly so it delicately breaks when hitting it with a spoon.* After burning the sugar on top, do not let it sit for too long to prevent the caramel from starting to sweat. * Start torching sugar from the sides of the ramekins and slowly move inward to burn sugar evenly a bit easier.* Decrease the strength of the blowing strength if you find it difficult to caramelize evenly.
Video
Notes
How to Store it:
Move them to the fridge after they cool down enough and wrap each after they are cooled completely if you don't eat them right away. *Caramelize the sugar on top right before serving as the caramel starts getting softened as it sits. Store them in the fridge for up to four days. I highly recommend enjoying them within that day or the next day for the best taste. One batch of this recipe is enough for 4 - 5 6-oz ramekins. (Use 5 ramekins when you don't mind it getting a bit shallower. ** For best results, measure ingredients with a scale. All recipes are designed with weighed ingredients using grams/ounces. Cup measurements are provided for your convenience. **Nutrition
📌 Pin It!
Pin it if you love this recipe, and find so many other recipes on my Pinterest page!
Leave a Reply