
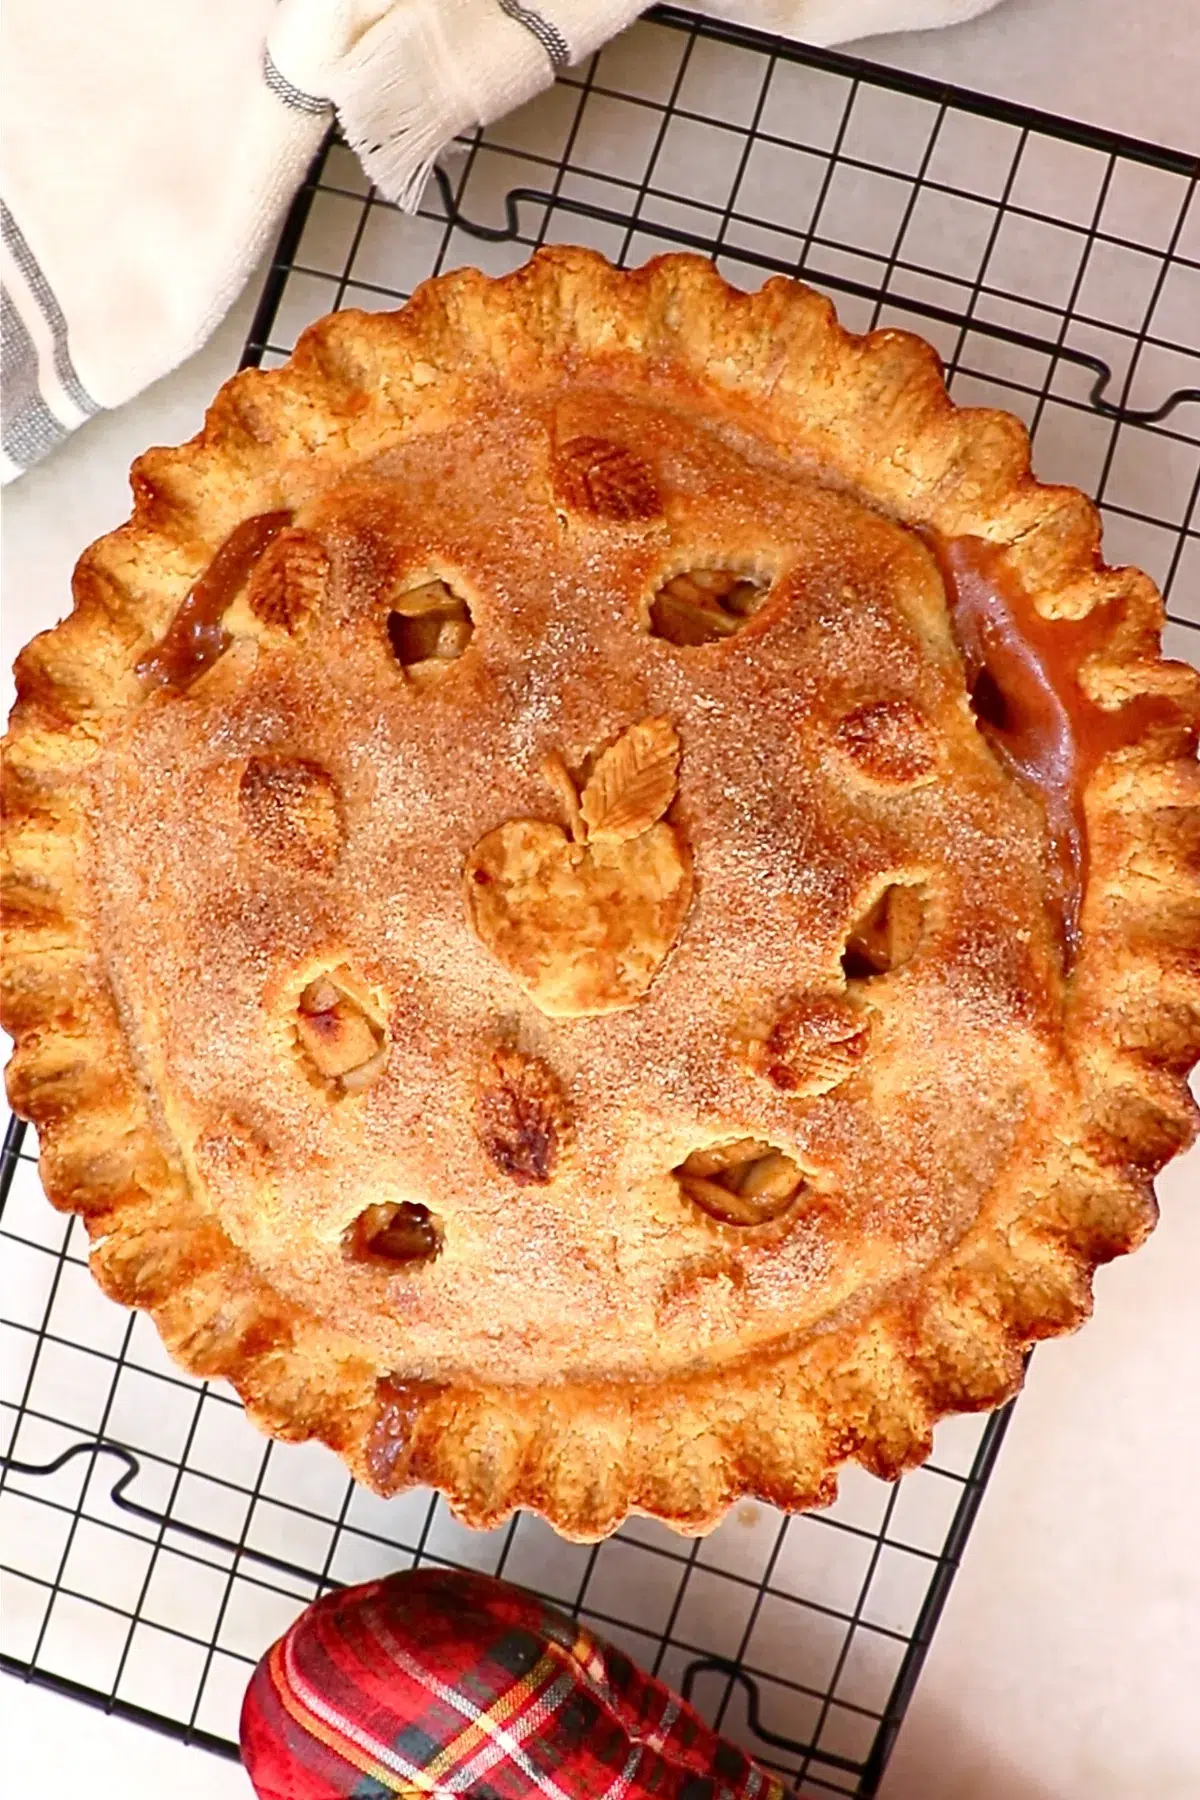
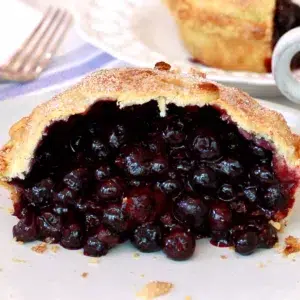
The ultimate apple pie with a flaky pie crust and melty apple filling packed with flavors.
I love apple pies SO MUCH that I used to sell only that menu locally. Apple hand pies and apple pies have been my favorite baked dessert since I was little. I’m excited to share the most classic apple pie recipe! I bet this will be a big hit for your family and guests.

📌 Why I love this apple pie:
- The flaky pie crust: It is perfectly flaky, and the light and crispy texture goes so well with the filling.
- The melty filling: It's not soggy or too thick. It also has depth in flavor and the just-right texture by blending two kinds of apples with different firmness, tartness, sweetness, etc.
- Customizable: Enjoy it in any size and shape - I'm sharing how to make mini apples using this recipe at the end of the post in the "Uses for apple pie."
🍎 The taste and smell of freshly baked homemade apple pie are undescribably pleasing. But making it can go wrong when we don't know the crucial baking tips - soupy or crunchy filling, undercooked dough, etc. That is why I'm sharing all the essential baking tips and techniques today to make the best apple pie - step-by-step with a video instruction and images on each step.
📌 What you'll learn in this post:
In this post, you'll learn essential baking tips, such as:
- Best apples for apple pies
- The difference of all-purpose flour and cornstarch to make the filling
- How to shape the edge of the pie dough into beautiful ruffles.
- A tip for keeping the clear shape of the pie in the oven.
... and more!
Let's get started.

📌 What's In Apple Pie?
Pie Dough
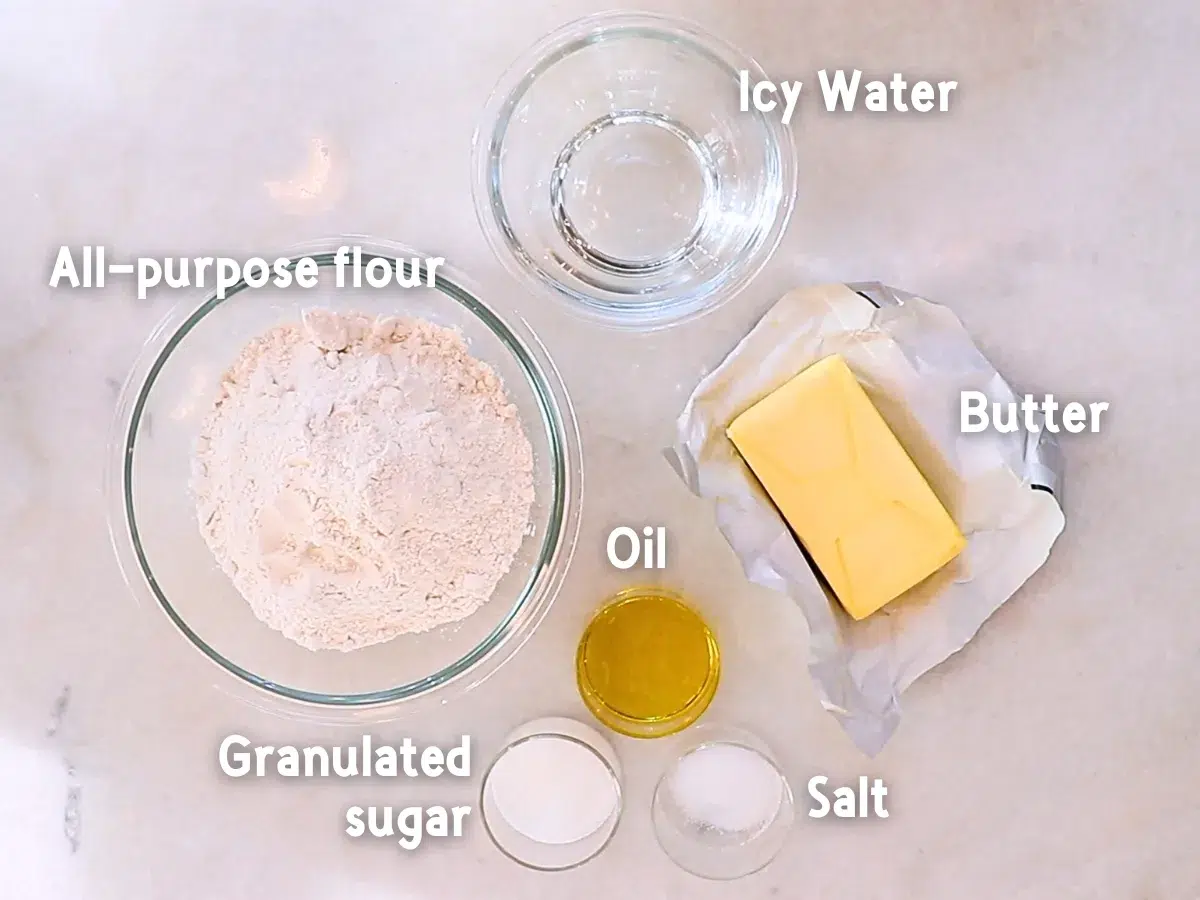
- All-purpose flour: Use regular all-purpose flour. Chilling it in the fridge in advance helps to keep the butter cold.
- Granulated sugar: It is not a must, but a small amount is added today to add a slight sweetness.
- Salt: I used regular table salt.
- Unsalted butter: Use very cold butter to prevent it from getting too soft as you make the dough.
- Icy water: The cold water helps to keep the butter cold.
- Oil: I used olive oil today, but you can use other regular oils.
Apple Filling

- Apple: I blended granny smith and golden delicious (2:1 ratio) to create a not-too-mushy yet melty texture with well-balanced tartness and sweetness.
- Granulated sugar
- Salt: It adds depth in flavor.
- All-purpose flour: It helps to thicken the filling.
- Cornstarch: Cornstarch also thickens the filling. All-purpose flour gives a slightly chunkier texture, while cornstarch gives a gel texture like a jam. I like to blend both of them.
- Cinnamon: It's the magic spice for apple pies - The sweet and warm aroma goes perfectly with cooked apples.
- Nutmeg: It's often added to pies for the warm and spicy aroma.
- Lemon zest: The refreshing flavor is a perfect match with the apple pie filling.
- Lemon juice: Add more or less depending on how tart your apples are.
Assembling
- Butter to spread over a pan: Use soft butter.
- Butter to place on top of filling: It adds a rich flavor.
- Egg white as eggwash: Use only egg white to prevent the surface from getting too dark in the oven.
- Granulated sugar
- Cinnamon: Make cinnamon sugar by mixing the granulated sugar and cinnamon.
📌 How To Make Apple Pie
Now, let me share detailed tips on each step, which are all crucial for making apple pie successful.
Step 1: Make Pie dough.
Make one batch of my pie dough recipe. Follow the steps and tips in the post to make it successful. Set it aside in the fridge for at least 1 hour but ideally for more than a few hours to rest the dough completely.


Step 2: Make Apple Filling.
Add the sliced apples, sugar, salt, all-purpose flour, cornstarch, cinnamon, and nutmeg to a pot and roughly mix.


Add lemon zest and lemon juice and mix again.
Cook them at medium to medium-low heat until the apples get softer. Wrap the surface and chill it in the fridge until it cools to room temperature.


Tips💡:
- Once the sugar is coated in the sliced apples, the juice is slowly coming out from the apples - It will be a little bit easier for you to cook them later!
- Don't keep cooking apples until they start breaking. Pay more attention to the golden delicious because it gets cooked faster. Remove it from the heat once you can see that it is softer and not crunchy anymore when you bite it.
- Spread the cooked filling in a big bowl or a tray so that it cools down faster.
Step 3: Roll Pie Dough.
Preparation: Apply a good amount of butter over a pie plate so the pie comes off more easily after it's baked. Set it aside in the fridge.
Follow my tips for rolling pie dough successfully in this pie dough post.
Roll it into a little bit bigger than the pipe plate.


Tip💡:
- I recommend leaving the pie dough at room temperature for about 10 to 20 minutes (depending on the room temperature) to make it soften a bit so that you can finish rolling faster.
- Use bread flour to dust on the working surface because it spreads well and it doesn't stick as much as other flour. Use all-purpose flour instead if you don't have that.
- Roll 2 pie dough in the same way and use them for the bottom and top layers. I typically roll the top layer first and chill it in the fridge until right before use since assembling it is easier when it's cold and firmer.
Step 4: Assemble The Pie.
Fold a pie sheet in half, place it on a pie plate, check if the edge line is on the diameter of a plate, and fold it over.
Fold the corner edge to ensure it fits on the pie plate. (Check the video tutorial to see the exact movement.)


Press the sides with your thumb to ensure the dough is attached to the side.
When you find parts that are too thick or too thin, push it up, trim the edge with a scissor, and attach it to the part that is too thin. You can also trim the edge when it is too long.


Pour all of the cooled apple pie filling into the pie plate.


The top layer: I marked the lines with a cake spatula this time so that I can slice the pie more easily after it's baked, but this is not necessary! Try any decorations you like and have fun.
I made a little apple using the excess dough after trimming the edge. This is something I always add on top of the apple pies every time I make it. I love it somehow!


Place pieces of butter on top. Apply egg wash on the edge as glue and attach the second layer. Press well to seal the filling.


You can fold the edge as you like if you have your favorite way. I usually like to roll the edge and tuck that in under. Pinch it with your fingers to make it sharp.


You can finish right here or add patterns. Today, I made the ruffle pattern.


Apply eggwash evenly all over the surface except on the ruffles, and sprinkle cinnamon sugar.


Chill it in the fridge for at least 30 minutes before baking it.
Tips💡:
- Folding the corner of the pie dough and ensuring there is no space between it prevent the pie from sliding down as you bake it in the oven.
- Avoid pouring the warm filling into a pie dough to prevent the butter in the pie dough from getting melted.
- Always make cuts or holes on the surface of a pie dough so that the steam can get out from those spots. The pie dough can crack on top from very random places, or the filling can start coming out when it's not ready yet when avoiding it.
- The pie dough gets softened by the time the assembling is done - which means the butter in the pie dough is also softened. The butter melts more quickly when you bake the pie right away, leading to a slightly less flaky pie dough texture. And the shape doesn't stay as clear as it should be.
Step 5: Bake!
Bake (Preheated) at 425 F | 218 C for 10 minutes, turn it down to 375 F | 190 C, and bake for another 60 - 70 minutes.
Tip💡:
The time can vary depending on the oven. Always judge by the look - the crust should look nice dark golden brown, and good amounts of the filling should start coming out from the top of the edge, usually from more than a couple of spots.
Step 5: Slice it.
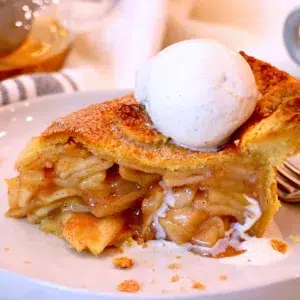
Because the pie crust is so flaky, I recommend using a slated knife to slice the pie crust clean. Ensure that the side edge is cut through since it's often missed out. I must say the first slice is always messy. One sacrifice to be made!

Tip💡:
The filling can be too loose to cut right after it's baked when it's extremely hot. It slowly gets thickened as it cools down - I recommend waiting for about 2 to 3 hours before slicing it.
📌 Uses For Apple Pie

Enjoy the classic apple pie for many occasions, such as:
- Thanksgiving dessert
- Christmas dessert
- Other friends and family gathering
- Snack for kids
- To consume lots of seasonal apples
... and so on!
I like many kinds of apple pies, like caramel or bourbon apple pies. but this is the most basic apple pie that everybody would love.
Mini apple pies
Some of you may know that I also love baking smaller apple pies or any small pies. They are so cute, and I can enjoy the flaky pie crust 360°. (It's the best thing!)
With one batch of the recipe, you can make 5 5-inch pies. You'll need slightly more than one batch of the pie dough. (1.25 bath -)
For small apple pies, I cut apples smaller. The other steps and tips apply the same.
Bake at 425 F | 218 C for 10 minutes, turn it down to 375 F | 190 C, and bake for another 40 - 50 minutes.
You can take them out from the pie plate easily if you want to. Just wait until it cools down before you do that.


I forgot to apply cinnamon sugar to one of the pies (the bottom right)! You can see what it looks like without cinnamon sugar.

📌 Frequently Asked Questions
Enjoy it within that day for the best taste (ideally in 2 - 3 hours). When you need to store it, wrap the surface and store it in the fridge for 3 - 4 days. I do not recommend storing it at room temperature since it contains lots of apple liquid.
It's possible to make this pie without cooking apples. I did that before, but I have to say, it tastes more delicious when you precook the apples. The filling gets more melty, and the flavor gets deeper. That's at least how I felt!
Oftentimes, that is because it's undercooked. Each oven has a different strength, so try baking it longer next time.
Or that could be because the filling was not pre-cooked enough. Cook it until the apples get softer.
Also, wait 2 -3 hours longer before slicing the pie. The filling gets thickened more as it gets settled and cools down.
Yes. I recommend trying the recipe amount first, seeing if you would like it, and adjusting it next time.
What type of apples should I use?
The most popular apple that many people like to use for apple pie is Granny Smith.- It is tart, and it doesn't break easily with heat. I like to mix it up with Golden Delicious, which is sweeter, less tart, and also gets softer with heat. You can enjoy the two different textures in one bite. I also feel it adds more depth in flavor to apple pies. The combination of Granny Smith and Golden Delicious is my favorite for apple pies.


That being said, everybody has their preference for the taste of an apple pie filling - the firmness, sweetness, tartness, etc. It's a taste of home! If you already have your go-to apples that you always use, you can try with them. (You may want to adjust the amount of sugar, flour, and lemon juice in that case.)
Some of the popular apple pies for apple pies are:
- Granny Smith
- Golden Delicious
- Braeburn
- Jonathan
- Jonagold
- Honeycrisp
- McIntosh
- Roma
- Gala
📌 VIDEO: Watch How To Make It!
To learn how to make apple pie visually and have a deeper understanding of all, watch the video!
Don't forget to subscribe if you liked it 😉
📌 Other Classic Dessert Recipes
📌 Printable Recipe
💬 If you loved this recipe, please share your feedback on this post! I always love hearing how you enjoyed it with your friends and family.
Classic Apple Pie
Equipment
- Food processor or a bowl with a pie blade
- Bowl
- Spatula
- Dough scraper
- Rolling Pin
- 9" Pie plate
- Brush
- small heart cookie cutter optional
- small leaf cookie cutter optional
Ingredients
Pie Dough
- 13.2 oz All-purpose flour 3 US cups * Calculated as 1 cup = 125 g, the surface leveled.
- 1 Tbsp Granulated sugar
- ½ teaspoon Salt
- 8 oz Unsalted butter 2 US sticks
- 3.9 oz Icy water ⅓ + ⅛ US cups
- 1 Tbsp Oil
- Some Bread flour (or all-purpose flour) to roll the dough
Apple Pie Filling
- 3 pounds Apple (Peeled and cored) Use 900 g | 2 pounds of Granny Smith and 450 g | 1 pound of Golden Delicious.
- 7 oz Granulated sugar 1 US cup
- ¼ teaspoon Salt
- 2 tablespoon All-purpose flour Level the surface.
- 2.5 tablespoon Cornstarch Level the surface.
- ½ tablespoon Cinnamon
- ¼ teaspoon Nutmeg
- 1 Lemon Lemon zest
- ½ tablespoon Lemon juice
Assembling
- Some Butter to spread over a pan
- 1 tablespoon Butter to place on top of filling
- Some Egg white
- 0.9 oz Granulated sugar ⅛ US cup
- ⅛ teaspoon Cinnamon
Instructions
Pie Dough
- Make one batch of my pie dough recipe. Follow the steps and tips in the post to make it successful. Set it aside in the fridge for at least 1 hour but ideally for more than a few hours to rest the dough completely.13.2 oz All-purpose flour, 1 tablespoon Granulated sugar, ½ teaspoon Salt, 8 oz Unsalted butter, 3.9 oz Icy water, 1 tablespoon Oil


Apple Filling
- Add the sliced apples, sugar, salt, all-purpose flour, cornstarch, cinnamon, and nutmeg to a pot and roughly mix.Add lemon zest and lemon juice and mix again. Cook them at medium to medium-low heat until the apples get softer. Wrap the surface and chill it in the fridge until it cools to room temperature.Tips💡:1. Once the sugar is coated in the sliced apples, the juice is slowly coming out from the apples - It will be a little bit easier for you to cook them later!2. Don't keep cooking apples until they start breaking. Pay more attention to the golden delicious because it gets cooked faster. Remove it from the heat once you can see that it is softer and not crunchy anymore when you bite it.3. Spread the cooked filling in a big bowl or a tray so that it cools down faster.3 pounds Apple (Peeled and cored), 7 oz Granulated sugar, ¼ teaspoon Salt, 2 tablespoon All-purpose flour, 2.5 tablespoon Cornstarch, ½ tablespoon Cinnamon, ¼ teaspoon Nutmeg, 1 Lemon Lemon zest, ½ tablespoon Lemon juice

Roll Pie Dough.
- Preparation: Apply a good amount of butter over a pie plate so the pie comes off more easily after it's baked. Set it aside in the fridge.Follow my tips for rolling pie dough successfully in this pie dough post.Roll it into a little bit bigger than the pipe plate.Tip💡:1. I recommend leaving the pie dough at room temperature for about 10 to 20 minutes (depending on the room temperature) to make it soften a bit so that you can finish rolling faster.2. Use bread flour to dust on the working surface because it spreads well and it doesn't stick as much as other flour. Use all-purpose flour instead if you don't have that.3. Roll 2 pie dough in the same way and use them for the bottom and top layers. I typically roll the top layer first and chill it in the fridge until right before use since assembling it is easier when it's cold and firmer.Some Butter to spread over a pan, Some Bread flour (or all-purpose flour) to roll the dough

Assemble The Pie.
- Fold a pie sheet in half, place it on a pie plate, check if the edge line is on the diameter of a plate, and fold it over.Fold the corner edge to ensure it fits on the pie plate. (Check the video tutorial to see the exact movement.)Press the sides with your thumb to ensure the dough is attached to the side.When you find parts that are too thick or too thin, push it up, trim the edge with a scissor, and attach it to the part that is too thin. You can also trim the edge when it is too long.Pour all of the cooled apple pie filling into the pie plate.The top layer: I marked the lines with a cake spatula this time so that I can slice the pie more easily after it's baked, but this is not necessary! Try any decorations you like and have fun.I made a little apple using the excess dough after trimming the edge. This is something I always add on top of the apple pies every time I make it. I love it somehow!Place pieces of butter on top. Apply egg wash on the edge as glue and attach the second layer. Press well to seal the filling. Fold the edge as you like if you have your favorite way. I usually like to roll the edge and tuck that in under. Pinch it with your fingers to make it sharp.You can finish right here or add patterns. Today, I made the ruffle pattern.Apply eggwash evenly all over the surface except on the ruffles, and sprinkle cinnamon sugar.Chill it in the fridge for at least 30 minutes before baking it.Tips💡:1. Folding the corner of the pie dough and ensuring there is no space between it prevent the pie from sliding down as you bake it in the oven.2. Avoid pouring the warm filling into a pie dough to prevent the butter in the pie dough from getting melted.3. Always make cuts or holes on the surface of a pie dough so that the steam can get out from those spots. The pie dough can crack on top from very random places, or the filling can start coming out when it's not ready yet when avoiding it.4. The pie dough gets softened by the time the assembling is done - which means the butter in the pie dough is also softened. The butter melts more quickly when you bake the pie right away, leading to a slightly less flaky pie dough texture. And the shape doesn't stay as clear as it should be.1 tablespoon Butter to place on top of filling, Some Egg white, 0.9 oz Granulated sugar, ⅛ teaspoon Cinnamon

Bake!
- Bake (Preheated) at 425 F | 218 C for 10 minutes, turn it down to 375 F | 190 C, and bake for another 60 - 70 minutes. Tip💡:The time can vary depending on the oven. Always judge by the look - the crust should look nice dark golden brown, and good amounts of the filling should start coming out from the top of the edge, usually from more than a couple of spots.

Slice it.
- Because the pie crust is so flaky, I recommend using a slated knife to slice the pie crust clean. Ensure that the side edge is cut through since it's often missed out. I must say the first slice is always messy. One sacrifice to be made!Tip💡:The filling can be too loose to cut right after it's baked when it's extremely hot. It slowly gets thickened as it cools down - I recommend waiting for about 2 to 3 hours before slicing it.

Video
Notes
How to store it:
Enjoy it within that day for the best taste (ideally in 2 - 3 hours). When you need to store it, wrap the surface and store it in the fridge for 3 - 4 days. I do not recommend storing it at room temperature since it contains lots of apple liquid.Mini apple pies:
With one batch of the recipe, you can make 5 5-inch pies. You'll need slightly more than one batch of the pie dough. (1.25 bath -) For small apple pies, I cut apples smaller. The other steps and tips apply the same. Bake at 425 F | 218 C for 10 minutes, turn it down to 375 F | 190 C, and bake for another 40 - 50 minutes. ** For best results, measure ingredients with a scale. All recipes are designed with weighed ingredients using grams/ounces. Cup measurements are provided for your convenience. **Nutrition
📌 Pin It!
Pin it if you love this recipe, and find so many other recipes on my Pinterest page!


Leave a Reply